
Far Cry 5
Secret Magnapulse alien weapon
To get the special Magnapulse alien weapon, you must complete an optional Aliens questline. It is given to you by an NPC called Larry, in John’s region. He is at the “Parker Laboratories” fast travel point, just west of Fall’s End (main town in John’s region). When you find Larry, he will be trapped behind an electric barrier. You can disable it by turning off the three nearby generators (marked on the map once you discover Larry). Once Larry is free, he will give you some follow up quests. In total this questline consists of four quests: “Free Larry”, “The Hero’s Journey”, “Close Encounters”, and “Out Of This World”. Always return to Larry after completing one of his quests. At the end of the questline, you will get the Magnapulse alien weapon (you can find and equip it in the special weapons tab at any gun store) and “Science Fact” achievement. You can do this quest at any point in the game, even after having completed the story. It is an optional quest and not part of the main story.
Secret RPG-7 (classic)
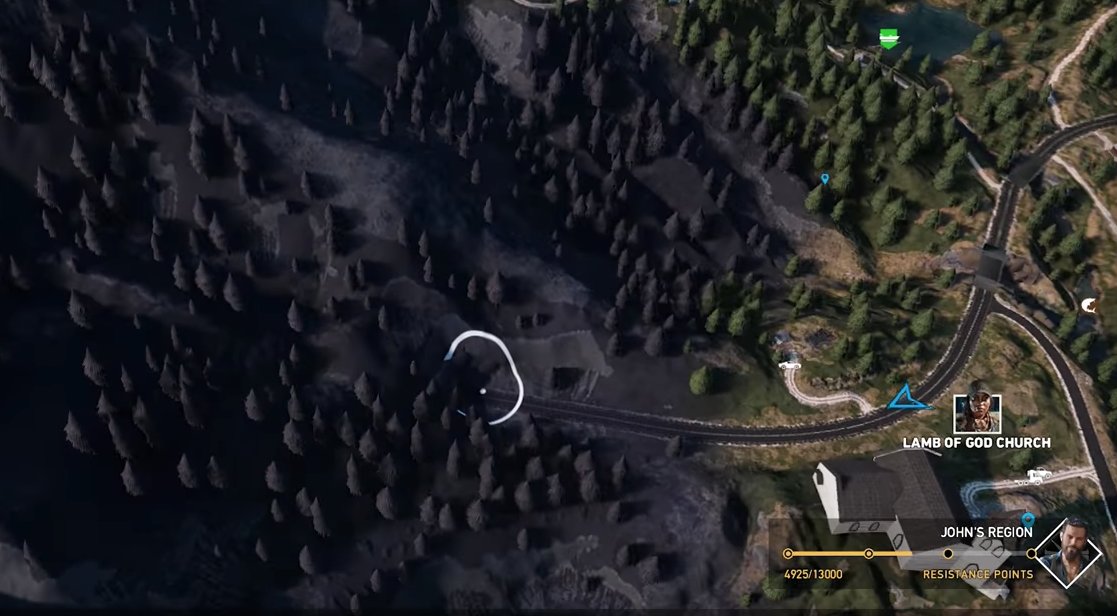
Go to the indicated location in the west of John’s region to find the classic RPG-7, which cannot be bought in the shop. The classic RPG-7 is leaning against the blue rusted truck, in front of the destroyed tunnel. It works just like the regular modern RPG in the game, and can be refilled with rockets around the map and from the shop. However, if you drop it, it cannot be bought from a vendor. You have to collect it from the tunnel again.
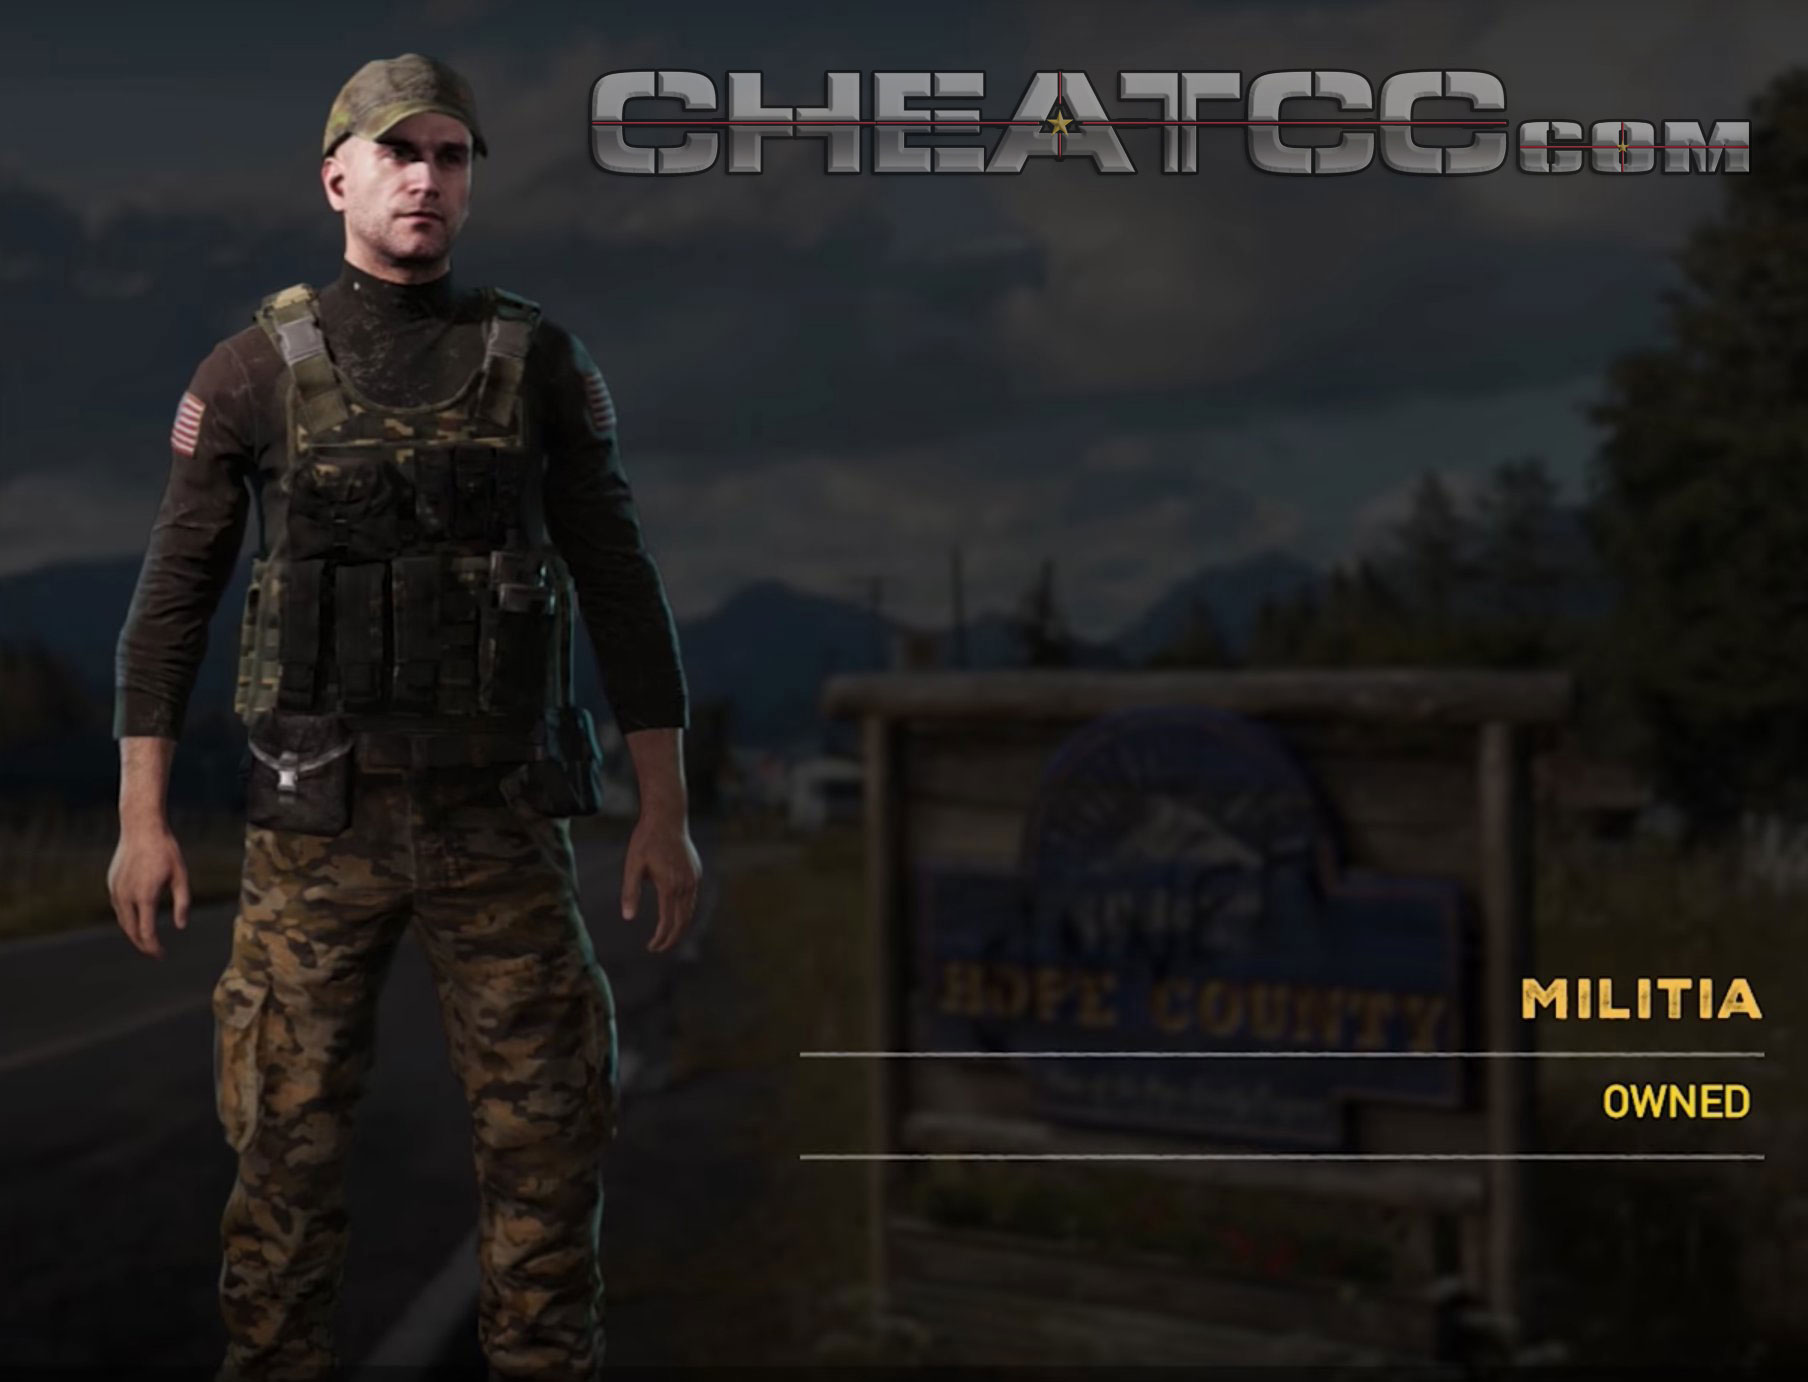
Secret Militia outfit
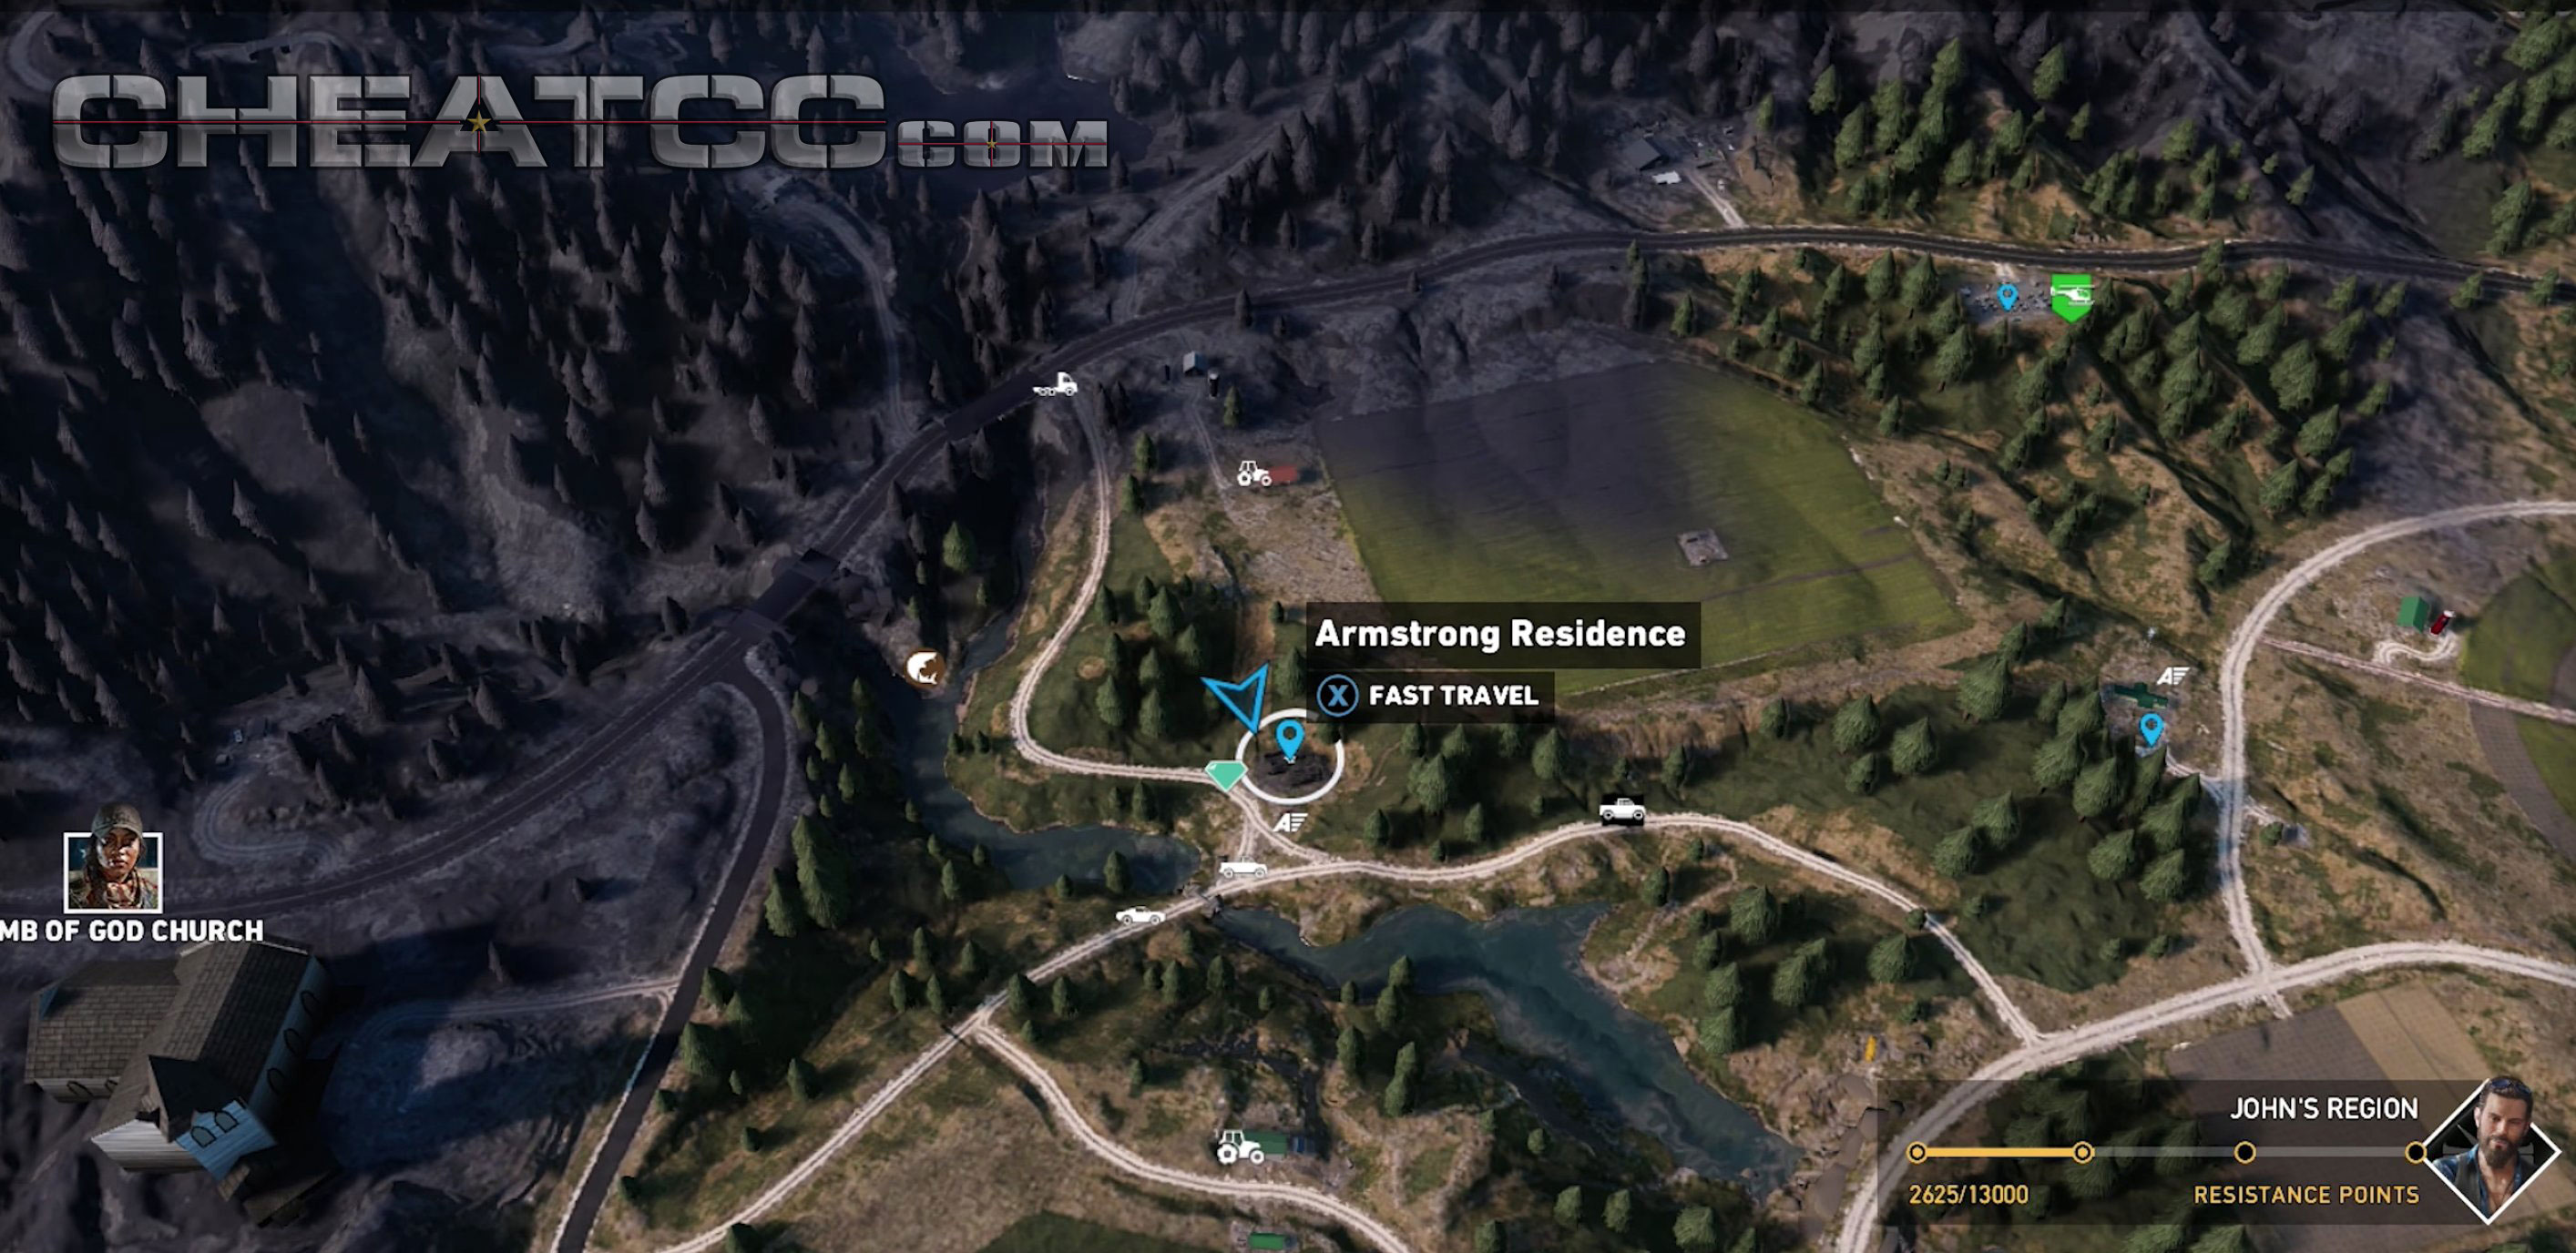
The Militia outfit can be found in the “Foxhole Prepper Stash” quest. To find the Foxhole Prepper Stash, go to the Armstrong Residence in John’s region at the following location . It is heavily guarded, including a flame thrower guard. Kill the enemies, then enter the destroyed building through the window. Follow the short platforming through the building to reach a hatch in the floor. Open it, go down the ladder, and enter the room with the bunk bed to solve the Foxhole Prepper Stash and unlock the Militia outfit .
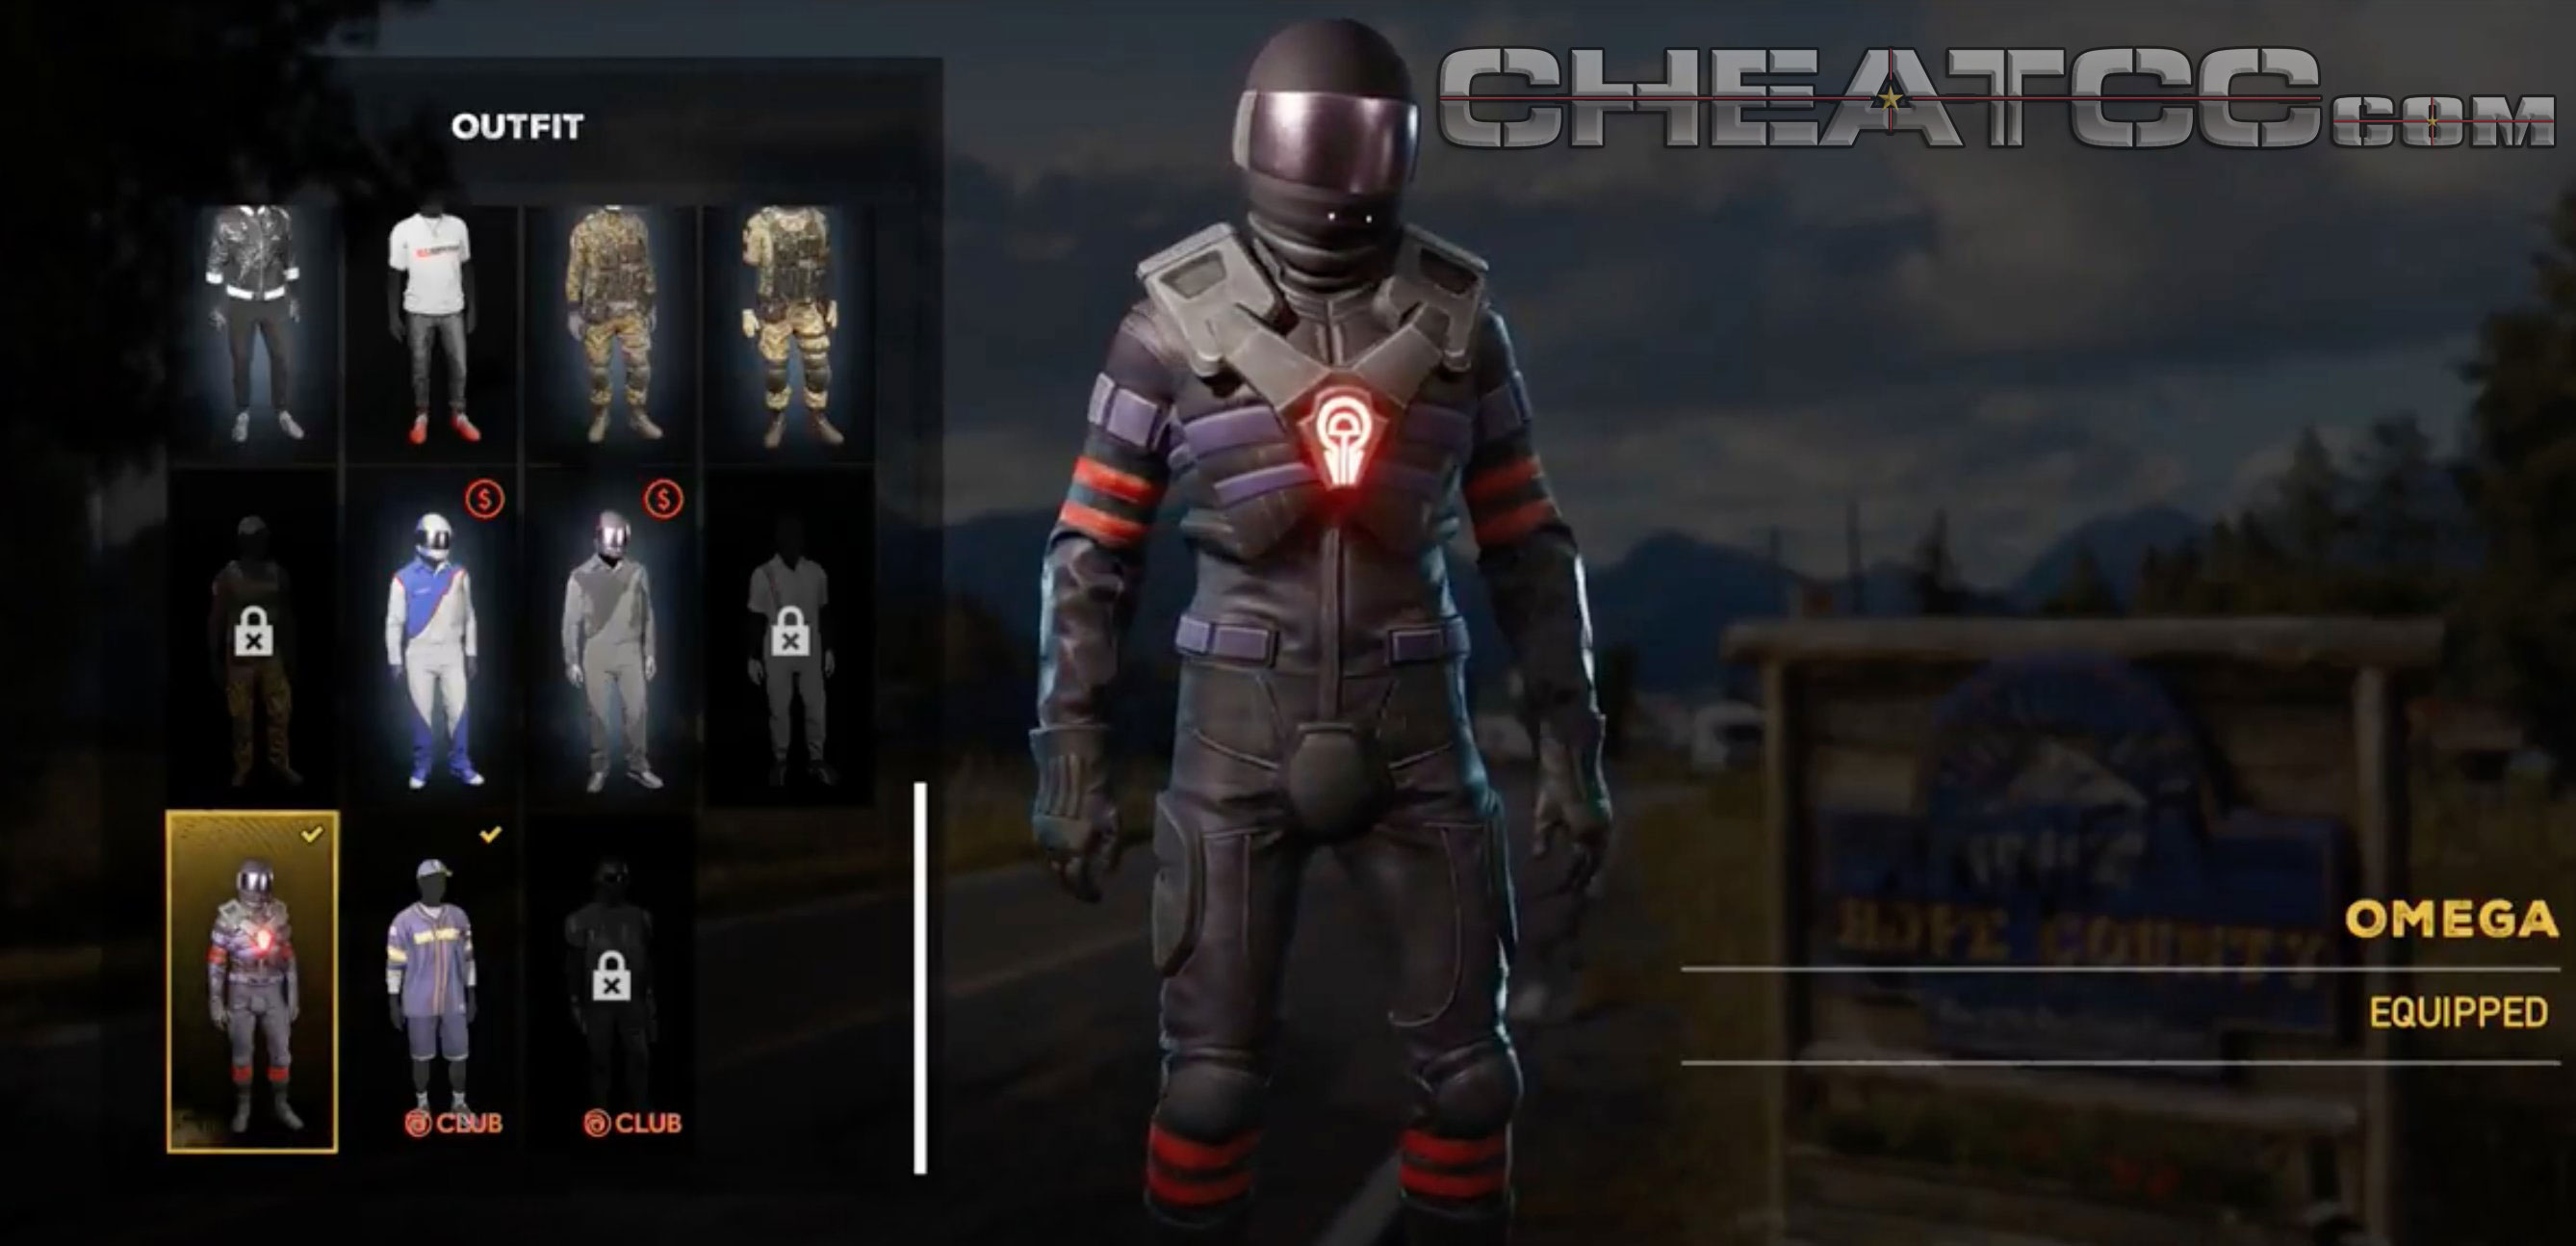
Secret Omega Armor outfit
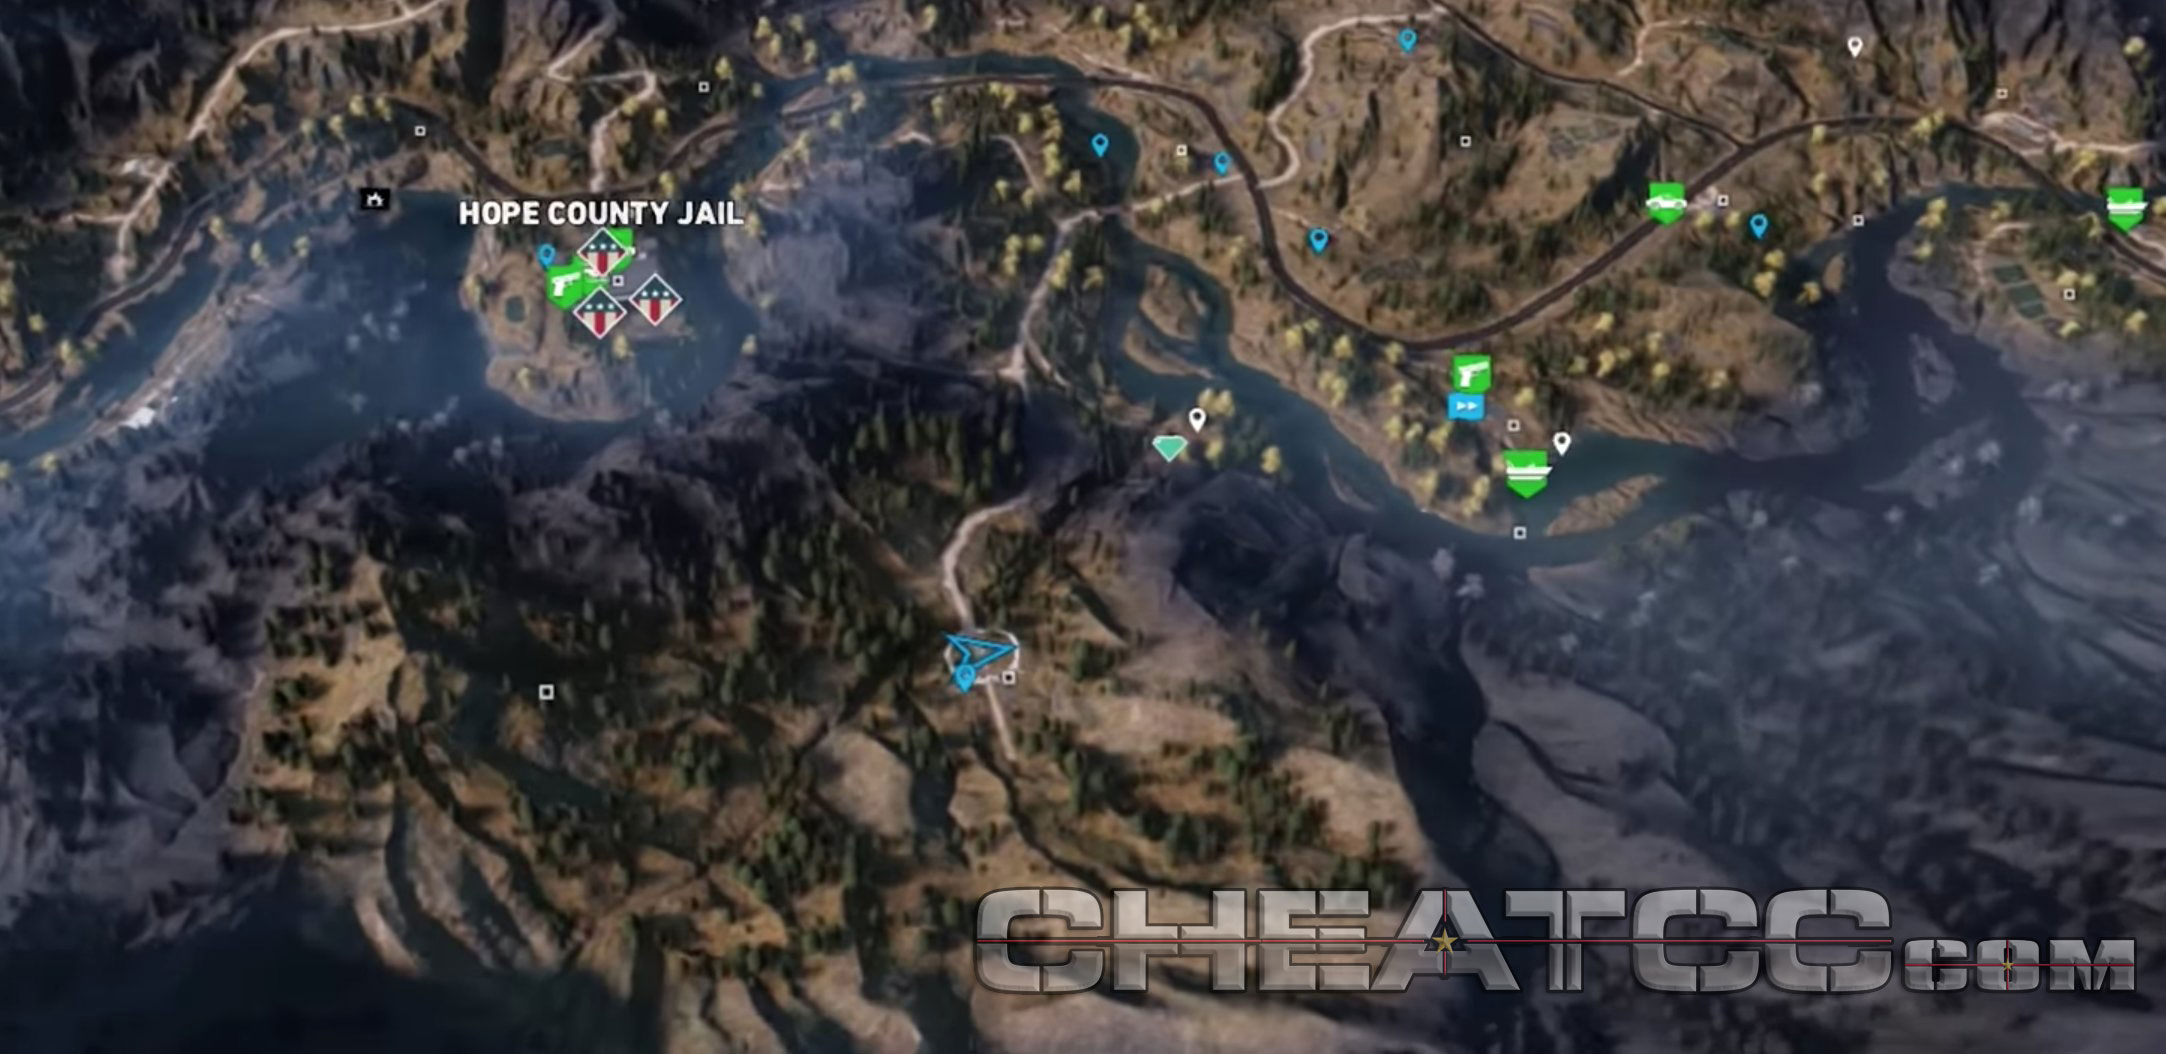
To unlock the secret Omega Armor outfit, go to the Grimalkin Radon Mine at the following location (in the Henbane River area in Faith’s region). You can reach the Grimalkin Radon Mine by following the road east from Hope County Jail, then turn onto the dirt road leading up the mountain. There is a mine entrance with a neon “Omega” symbol outside. You can also ask NPCs at the Hope County Jail, or talk to survivors with “!” notes above their heads. They will often talk about the Radon Mine, and the Hollywood people there. When you arrive, talk to Guy Marvel to begin the “Quiet On The Set” side mission. You will first be tasked with going up and around the mountain to destroy trucks blaring noise in the area. Destroy all the cultist vehicles, which is quick and easy to do. Then, return and talk to the director to complete the mission and unlock the Omega Armor outfit. The set also contains many Far Cry 3: Blood Dragon references. To equip the Omega Armor, go to any gun store and select the clothing customization option, then select “Suit” and scroll down to the bottom to find it.
Secret 1973 SSR Pygmalion muscle car
To get the 1973 SSR Pygmalion muscle car (one of the best and fastest muscle cars in the game), you must find and complete a specific Prepper Stash. Go to the far southeast corner of Henbane River in Faith’s region to find McCallough’s Garage off the main road. If you start at Hope County Jail and drive east on the paved road, you will find McCallough’s Garage. At the old garage, break through the boarded-up doorway behind the garage to enter it. Inside, press the indicated button at the end of the path to open the garage door. Backtrack to the front and go under the open garage door, looking left for a door that leads into a room full of crates. Proceed through the crates until you reach the restroom, and grab the key in this area. Then, go back out and to the interior room through the front door to reach a large set of metal doors. Use the key you just collected to unlock the vault. You will find the 1973 SSR Pygmalion muscle car inside and complete the “Getaway” Prepper Stash. Once the car is unlocked, you will be able to visit any car store and select it from the menu to spawn.
Secret Bailout Buggy
Travel southeast of Hope County Jail in Faith’s Region to the following location to find the Chlutch Nixon racing challenge. It is located next to a ranch and has you drive the Bailout Buggy through the woods. Complete the race before time runs out to unlock the Bailout Buggy.
Alternate endings
Successfully complete the indicated task to view the corresponding ending:
Ending 1 (Secret Prologue ending) – 0:05: When you have to handcuff Father Joseph at the beginning of the game (when “Press [Button] To Arrest The Father” appears), do not press any buttons and wait for a few minutes. After a while, you will just walk away and the story will end and the credits will roll.
Ending 2 (Resist Ending/Nuclear Bad ending) – 4:11: At the end of the game, select the “Resist” option. This is the “real” ending with a proper boss fight. This is also the bad ending.
Ending 3 (Walk Away/Good ending) – 19:03: At the end of the game, select the “Walk Away” option. You will then drive away in a car and the game ends abruptly and is open-ended; it is not clear what happened after this.
Boss Ending 1 (John) – 21:54: Max out the Resistance points in John’s region and kill the John boss.
Boss Ending 2 (Faith) – 23:15: Max out the Resistance points in Faith’s region and kill the Faith boss.
Boss Ending 3 (Jacob) – 24:58: Max out the Resistance points in Jacob’s region and kill the Jacob boss.
Easy money
Travel to the Moccassin River in Jacob’s region. Locate the caribou hunting spot area south of the F.A.N.G. Center, in a flooded basin near the bridge. It is recommended to use an LMG when hunting in this area. You will find one early if you clear out the F.A.N.G. Center. Collect one of the big guns from an armored cultist. There is also a gun store in this area you can use to sell the collected skins. This area is a great hunting spot because it is a large flat land, making it very easy to spot animals. Shoot caribou to collect skins and bait. Look for the rare and valuable Alpha Caribou as well. Unlock the Harvest Master perk to get double skins when harvesting animals. Use the bait here as wel. Toss bait on the ground, and a predator will usually appear right in front of you after a few seconds. Take it out and collect the skin. You will get either Wolf Leaders or Black Bears. Continue to hunt caribou, collecting skins and bait, then using the bait to summon predators with even more valuable skins. Wolf Leaders will usually spawn when you drop bait. Repeat this as many times as desired. Wolf Leader skins sell for $225, and Alpha Caribou sell for $350. One quick hunt that only lasts 2-3 minutes can earn you $2,000. If you use the “Harvest Master” perk, it will double to $4,000.
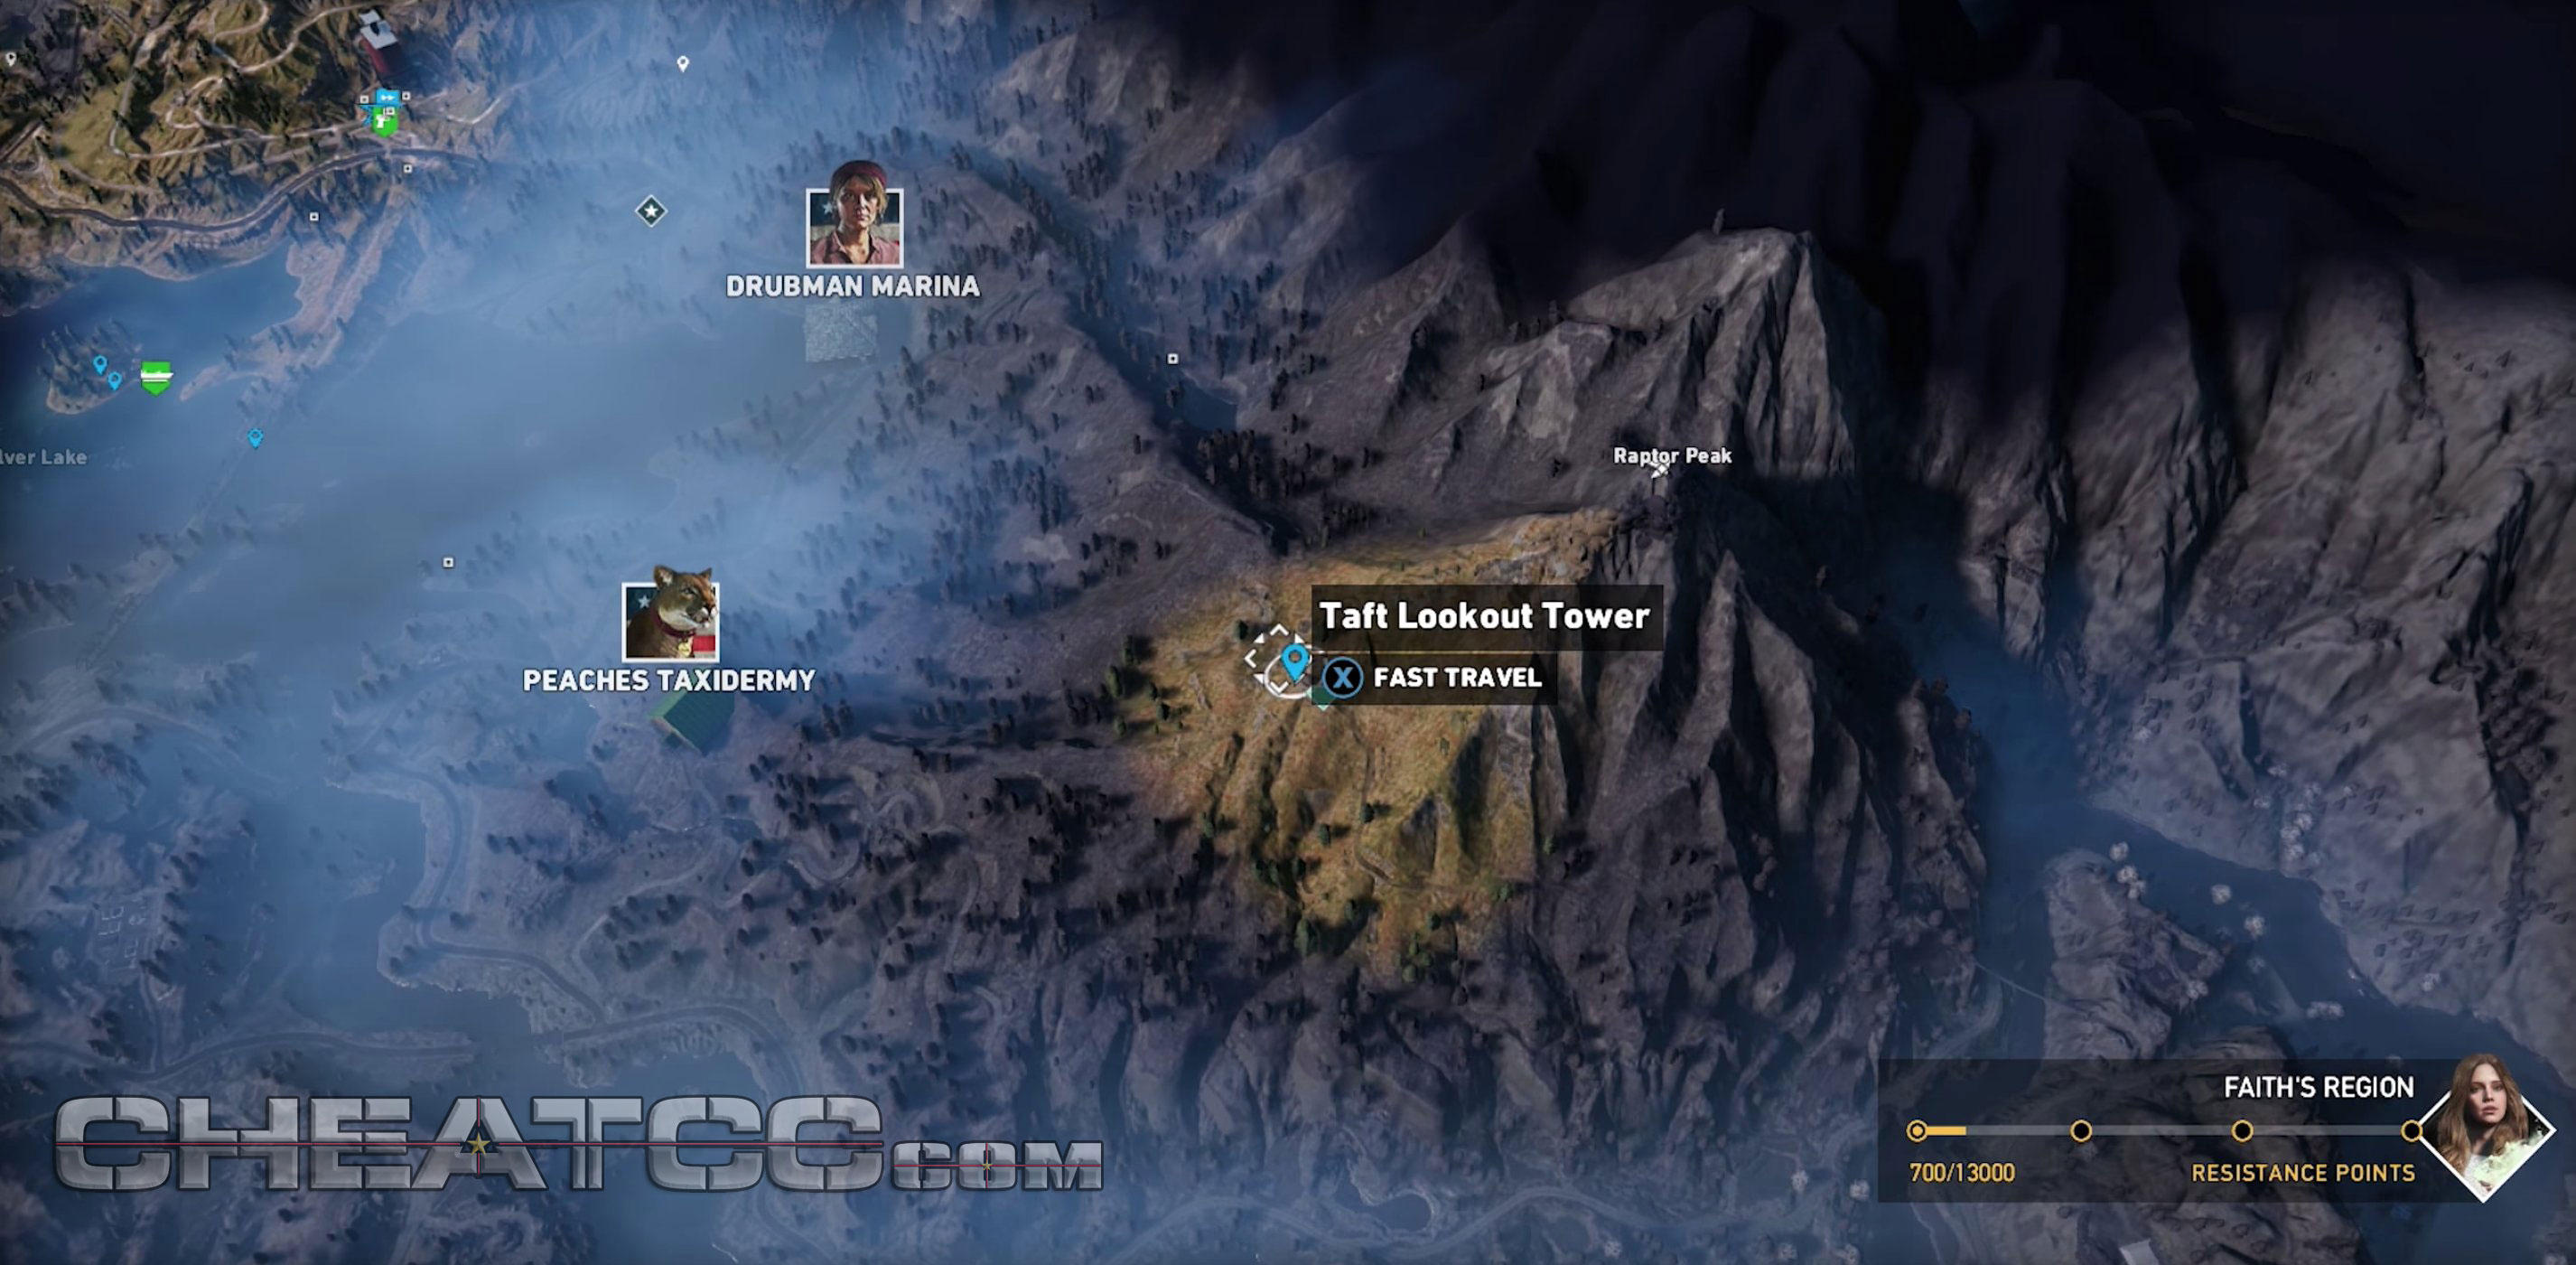
Before you start to farm money, make sure you have the “Harvest Master” and “Jorney Pack” perks unlocked. These perks double the skins you get and allow you to carry 10 skins of each animal. Next, equip the bow and take Jess Black with you to hunt. Travel to the following location . This area is located in the west at the Taft Lookout Tower in Faith’s region. Next to the large tower is a hill where bison constantly respawn. Hunt them with your bow to get +4 bison skin and +2 bait. Keep hunting bisons and throw the collected bait to attract bears, cougars, and other animals. Kill the animals attracted from the bait, then kill more bison. Repeat this until your backpack is full. Once your backpack is full, fast travel to a shop (such as the one at Baron Lumber Mill) and sell all your animal skins. Repeat this process as many times as desired.
Quickly earning Resistance points
The best way to earn Resistance points is by completing story and Gun-For-Hire missions — both of those give a lot of RP, but they are not always available. The next best for earning RP are outpost liberations. The map is covered in outposts, and it helps to complete some of the minor RP tasks while you are traveling between outposts, or even while you are in an outpost. If there is a Gun-For-Hire mission available, it is recommended to take it. When you are out of those, you can liberate outposts while destroying silos, smashing shrines, blowing up VIPs/supply vehicles, and saving hostages. All the minor activities are worth doing in conjunction with outposts, but they are not worth tracking down alone. There is no reason to run around and only complete these minor jobs. The following is a list of all Resistance point activities and the RP earned for completing them:
- 600-900 RP: Story missions
- 600-900 RP: Gun-For-Hire missions
- 400 RP: Liberate Outposts
- 200 RP: Clutch Nixon challenge
- 100-200 RP: Side missions
- 100 RP: Destroy Silos
- 100 RP: Destroy Shrines
- 75 RP: Destroy Roadblocks
- 75 RP: Destroy Supply Vehicles
- 50 RP: Save Hostages
- 50 RP: Kill Cult VIPs
There are three regions you need to liberate from cult control, and each one is ruled by an evil brother or sister of Joseph Seed, the leader of the cult. As you progress through the region meters, you will reach different levels of resistance. Each time you go up a level, you will be unlock a cutscene, and things will change in the region. More allies and difficult enemies will appear. To unlock the story mission of each region, you must earn the indicated amount of RP:
- John’s region: 13,000 RP
- Jacob’s region: 10,000 RP
- Faith’s region: 13,000 RP
At each level of the resistance, different events will occur in the region (each region has its own special events). Faith will spread drugs throughout her territory, while Jacob hunts and captures more civilians for his cult initiation techniques. The following are the events that occur at the different levels:
Level 1: The resistance is at its weakest. The cult operates openly everywhere.
Level 2: The resistance begins taking back locations and defending them. The cult reacts with special events. Drugging, kidnapping, or blocking roads.
Level 3: The resistance fights back everywhere, and the cult is forced to hide in their enclaves. The regional leader sends airplanes to hunt the player.
That is basically how progression works in the game. To complete the game, you must reach the resistance meter threshold in all three regions, then confront Joseph Seed.
All animal and fish locations
There are 16 animals and 12 fishes required to get the “Been There, Done That” achievement. The video below shows the location of all animals and fishes and where to find their best hunting/fishing spots. First, progress through the story in John’s region to unlock Boomer the dog. He will sniff out nearby animals and mark them for you. This is extremely helpful and saves a lot of time. Also, complete the “Hope County Master Angler” achievement, which requires you to catch all the types of fish in the game — so half of the achievement requirement will already be completed. For the “Been There, Done That” achievement, you must complete each hunting challenge. You can track those by viewing “Challenges” and scrolling to the tab on right side, then scroll down to the “Hunting” section. You must complete all of the challenges listed in that menu. Some require you to catch multiple animals of one type. The animal spawns are slightly random. The hunting spots just mark the general spawn area. The animals usually spawn within a 200 meter radius around that area — so just walk around with Boomer for a minute. If nothing spawns, air drop to the nearest fast travel point and check again. Some of them (such as hares) can be pretty rare.
Timeline (same order as in-game challenge list)
Animals
- 1. Deer – 0:05
- 2. Pronghorn – 0:37
- 3. Elk – 1:01
- 4. Caribou – 1:38
- 5. Bison – 2:11
- 6. Moose – 2:35
- 7. Hare – 3:03
- 8. Boar – 3:29
- 9. Skunk – 3:57
- 10. Wolverine – 4:34
- 11. Wolf – 4:54
- 12. Cougar – 5:31
- 13. Black Bear – 5:55
- 14. Grizzly Bear – 6:16
- 15. Turkey – 6:52
- 16. Eagle – 7:22
Fish
- 17. Kokanee – 7:51
- 18. Arctic Grayling – 8:06
- 19. Golden Trout – 8:23
- 20. Rock Bass – 8:38
- 21. Smallmouth – 8:54
- 22. Largemouth – 9:09
- 23. Bull Trout – 9:26
- 24. Lake Trout – 9:42
- 25. Rainbow Trout – 9:56
- 26. Chinook – 10:11
- 27. Pallid Sturgeon – 10:27
- 28. Paddlefish – 10:42
Note: Only the ones listed above (as seen in the Challenges tracker) count. Some other animals such as bulls, cows, dogs, ducks, birds, goats, pigs, snakes, etc. are not needed.
All fishing rods and hard fishing spots
There are four fishing rods in the game. You can view all of them and their requirements at every shop in the game. The rods are listed under “Weapons”, “Fishing Rods”. Before you begin, it is highly recommended to first unlock the “Fisher King” perk for four perk points. You need it for rod 3 and 4. With this perk, you scroll over the rod in the utility wheel and can change the flies (lure). You must select the correct flies for each fish (Salmon, Bass, Trout, Sturgeon). Successfully complete the indicated task to unlock the corresponding fishing rod:
1. Basic Fishing Rod: Buy it at any shop for $300 (also found at every fishing spot for free).
2. Natural Fishing Rod: Buy it at any shop for $800.
3. Wonderboy Fishing Rod: Successfully complete Skylar’s questline. She is found at “Dylan’s Master Bait Shop” fast travel point in Jacob’s region. You must complete the following three quests for her: “Tools Of The Trade”, “Gone Fishin'”, and “The Admiral”.
4. Old Betsy Fishing Rod: Beat each region’s records at the hard fishing spots. Equip the Wonderboy fishing rod to increase the odds of catching bigger fish. There is a fishing board in every region’s headquarters (Fall’s End, Hope County Jail, and Wolf’s Den). It shows the weight of the fish you need to catch on the board. This can only be done at fishing spots that say “Hard” on the map. The weight of the fish you catch is random, but you will probably beat most of them on your first try when using the Wonderboy fishing rod (you almost never break the records with the first two fishing rods). The most it will usually take to beat a record is five tries.
You can see blue ribbons on the fish records you have broken on the fish record boards. That is the only way to keep track of it. So you actually need to go inside the headquarters of each region, look at the board, and check for a blue ribbon on the fish. When you catch a fish, it also shows its size. Additionally, the four fishes on the left side of the board only need to be caught once and will count for all three regions. You do not need to catch them three times. Only the 2-3 fishes on the right side of the board are required specifically for a region. You will have to catch every single fish in the game at a hard spot. This also completes half of the “Been There, Done That” achievement. The following is a list of the required sizes of fish to catch to beat the records:
All areas
- [3:38] Bull Trout, 21 lbs
- [3:50] Golden Trout, 4 lbs
- [4:02] Lake Trout, 37 lbs
- [4:14] Rainbow Trout, 28 lbs
Holland Valley:
- [4:26] Pallid Sturgeon, 55 lbs
- [4:39] Paddlefish Sturgeon, 112 lbs
Henbane River
- [4:51] Smallmouth Bass, 6 lbs
- [5:04] Largemouth Bass, 8 lbs
- [5:18] Rock Bass, 3 lbs
Whitetail Mountains
- [5:30] Chinook Salmon, 27 lbs
- [5:43] Kokanee Salmon, 6 lbs
- [5:55] Arctic Grayling, 3 lbs
Haunted House Easter Egg
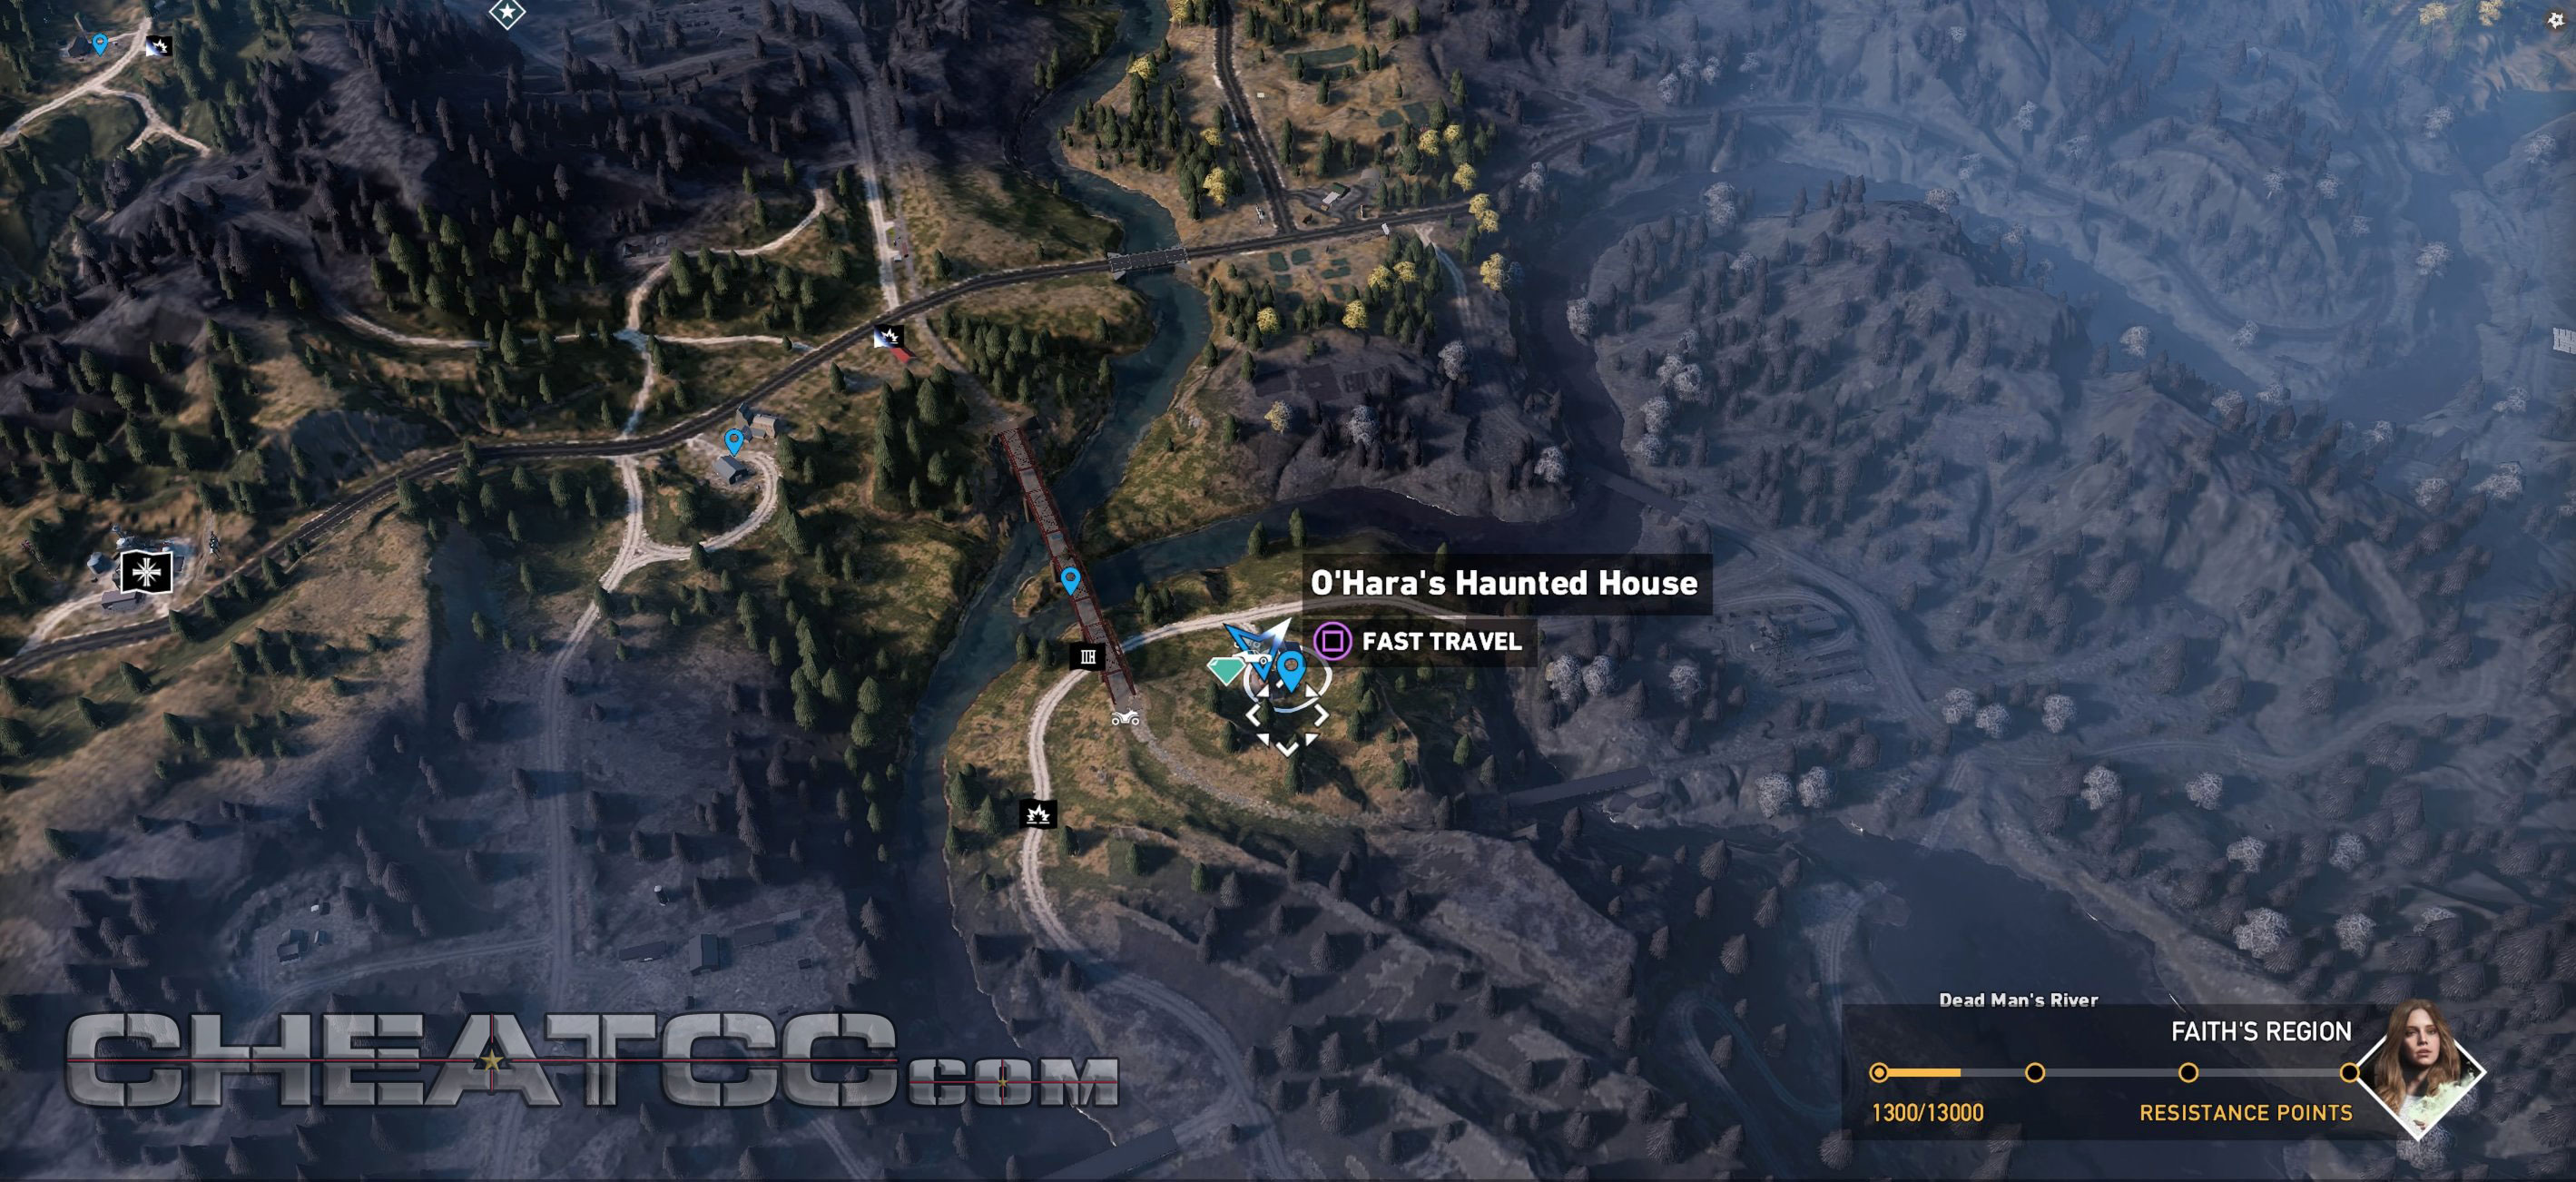
To find the secret O’Hara’s Haunted House, travel to the following location , near the border between Faith’s and John’s region in the southern area of Hope County. Find the large red bridge (Henbane River Rail Bridge) located northwest from Dead Man’s River. Next to the bridge is an abandoned building called O’Hara’s Haunted House. To get the Haunted House Prepper Stash, find the note beside the big barn doors to start the Prepper Stash side mission. Climb up onto the roof of the house using a crate. Drop down onto the construction area with the exterior scaffolding, and crawl through the open window. Hit the power switch to unlock the door to the haunted house. Then, proceed through the haunted house. At the end of it, climb into the attic to find three perk magazines and a bunch of money.
Best weapon
The M249 LMG is the best all around weapon in the game. It can quickly and easily destroy vehicles and armored cultists. It is faster than a rocket launcher, and it has much more ammo. Immediately unlock the Heavy Weapons Mastery and Vehicle Buster perks for it to make it much better. Additionally, use armor-piercing ammo to easily destroy the strongest soldiers and helicopters. A quick burst from the M249 will destroy everything in your path. There is almost no reason to equip other guns. It is like an automatic bazooka.
Easy “Ace Killer” achievement
First, go to a boat shop or hangar (green icon on map) and get a sea plane with a machine gun (Carmina, Clusterduck, The Wild Goose). The Carmina plane is unlocked automatically from the “Air Raid” story mission in John’s region (Nick is the mission giver for it). Then, spawn another plane and use the machine gun to destroy it with your plane. Stay parked on the ground while doing this, as there is no need to fly. After destroying the plane, spawn a new one and repeat the process until you get the “Ace Killer” achievement.
Easy “Death From Above” achievement
First, go to a boat shop or hangar (green icon on map) and get one of the planes with bombs (Carmina, Clusterduck, The Wild Goose). The Carmina plane is unlocked automatically from the “Air Raid” story mission in John’s region (Nick is the mission giver for it). Next, fly the plane to any garage (green icon on map). Park the plane in front of the garage. Then, get four quads from the garage and place them around the plane. Make sure they touch the plane. It can be four of the same vehicle (quad works best, as other vehicles can disappear after placing more than two). Finally, get in the plane, stay in the parked position (do not move), and drop the bomb to get the “Death From Above” achievement. It will blow up your plane and the four vehicles. You do not need to fly, just stay parked on the ground.
Easy “Explosive Surprise” achievement
First, purchase the “Saboteur” perk for seven perk points. Then, stand on any road near a fast travel point, in a hostile territory, and wait for an enemy car. For example, try the “Red’s Farm Supply” fast travel point in the middle of John’s region. Enemy cars always spawn there within a few seconds, but any other fast travel point works too. When an enemy car appears, wait for it to stop and shoot the driver. Next, stand by the driver’s door and sabotage the hood of the car. The remaining enemy cannot hit you when you stand on the side of the hood rather than the front. It takes a few seconds to sabotage it. Once done, crouch around the car. Make sure the enemy stays nearby (he usually takes cover behind the car if you crouch). It takes approximately 10 seconds for the car to explode. It has to kill the enemy (he has to be very close to the car). Once the enemy is dead, open the map and travel to the fast travel point again. Stand on the road again and wait for the next car. One usually spawns within 10-15 seconds after reloading the fast travel point. Repeat this until you get the “Explosive Surprise” achievement.
Easy “Fertilizing The Land” achievement
Go to “Nolan’s Fly Shop” outpost in Faith’s region (east of Hope County Jail). There is a tractor in that outpost. Enter it and then run over five enemies to get the “Fertilizing The Land” achievement. Set the difficulty to Easy and bring a few medkits so you can heal yourself when the enemies shoot at you. You do not have to kill five enemies in one hit, just five total enemies. If you have already captured this outpost, you can reset it by going to the pause menu and clicking “Outpost Master”, but you must have captured all other outposts for it to work.
Easy “Ghost Kill” achievement
First, equip the AR-CL with a “Marksman Adv-X Scope”. The weapon is frequently dropped by many enemies. Once it is collected, it will get added to the “Sniper Rifle” section at every store. The scope costs $1,600. Next, go to the “Sacred Skies Youth Camp” outpost in Faith’s region. Approach it from uphill. You can airdrop to the nearest fast travel point, “Chan Residence”. Use the binoculars, and press R3 to put a distance marker on an enemy (ideally the one of the roof). Then, crouch and zoom in with the sniper scope and perform a headshot. Make sure the distance marker is more than 150m away (160+ meters to be safe). The good thing about this camp is if you miss your shot, one enemy will get behind the mounted turret. He will be standing perfectly still behind the turret, making him an easy target. If you fail (for example, kill too many enemies), air drop to the nearest fast travel point to make the enemies respawn. If you have already captured this outpost, you can reset it by going to the pause menu and clicking “Outpost Master”, but you must have captured all other outposts for it to work. Note: You can also get the “Ghost Kill” achievement by shooting helicopter and plane pilots with a mounted turret (MG).
Easy “Ignoble Beast” achievement
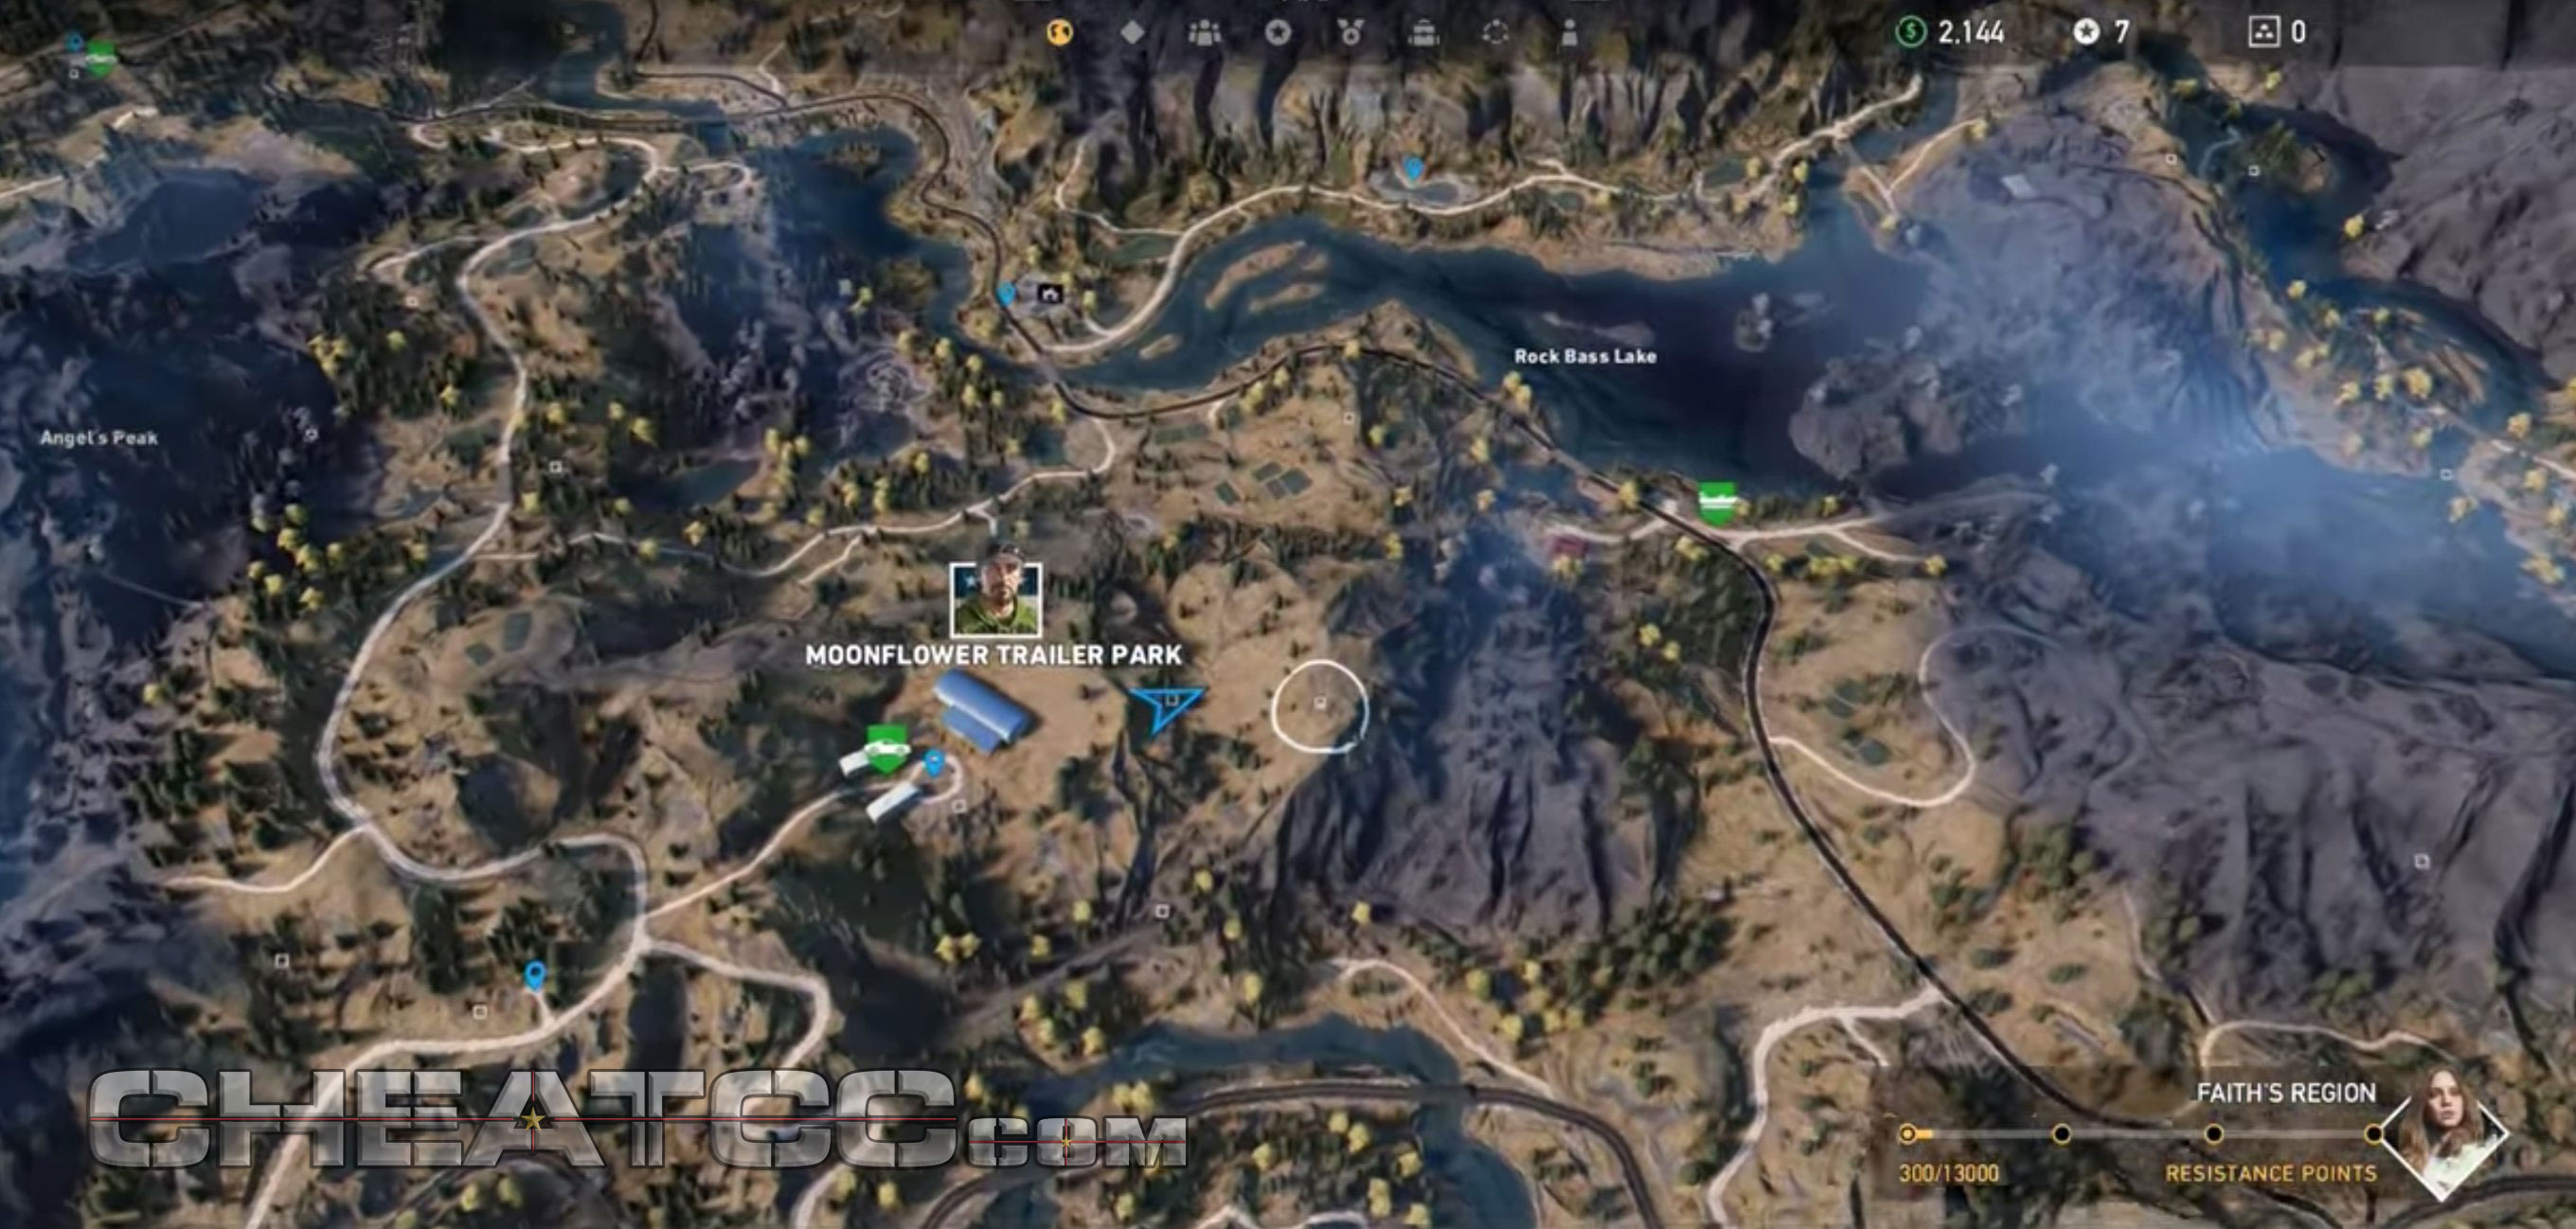
Go to the bison hunting spot at the following location in Faith’s region (just east of Moonflower Trailer Park). There will always be some bisons in that general area. Make sure to bring a melee weapon, such as a metal pipe or aluminium bat. The easiest way to do this is to consume “The Furious” homeopathic from the utility wheel. This boosts your melee damage and will kill the bison in one hit. If you do not have this, it is still easy without it. Just attack the bison with the melee weapon until it dies. Set the difficulty to Easy when doing this. It takes approximately 17 hits with a metal pipe. Try to stand behind the bison so it cannot attack you. If it moves around, move the other way to stay out of its attack radius.
Easy “Locked And Loaded” achievement
Go to any shop and purchase the two sights for the bow to get the “Locked And Loaded” achievement. It costs a total of $1,695 (Red Dot Sight is $795 and Marksman Sight is $900). That is all the customization options for the bow. You do not need to buy any skins/colors, just the two sights. It is cheaper than upgrading firearms. If you do it with a firearm, you must buy every possible upgrade except skins (sights, silencers, extended mag). The bow is found in many places and from many enemies over the course of the game. After you have found it, it will become available for customization at every shop.
Easy “Pack Rat” achievement
There are six different collectible types in the game. Collect one of each of the following collectibles to get the “Pack Rat” achievement:
- 1. Baseball Card – 0:05
- 2. Comic Book – 0:24
- 3. Vietnam Lighter – 0:46
- 4. Bobble Head – 1:07
- 5. Vinyl Crate – 1:26
- 6. Whiskey Cask – 1:44
Easy “Special Delivery” achievement
Successfully complete “Special Delivery” optional story quest to get the “Special Delivery” achievement. You can find it at Rye & Sons Aviation in John’s region. This quest is only available after liberating John’s region. You will then randomly get a call from Kim Rye telling you to come see her, which begins this quest.
Easy “Troublemaker” achievement
There are four regions with cult property on them. Destroy one property in each region to get the “Troublemaker” achievement.
- 1. Dutch’s Region (Shrines) – 0:05
- 2. Jacob’s Region (Wolf Beacon) – 0:24
- 3. Faith’s Region (Shrine) – 0:45
- 4. John’s Region (Silo) – 1:08
Easy “Where’s The Beef?” achievement
Go to the field at the following location in the northwest in John’s region. There are always a few bulls somewhere in that field. You must kill a bull using your bare hands only. Do not use any other weapons to weaken it, just fists. The easiest way to do this is to consume “The Furious” homeopathic from the utility wheel. This boosts your melee damage and will kill the bull in one hit. If you do not have it, just keep playing and collect Prairie Fire herbs in the wild to craft it (found in rocky areas and close to cliffs). Without “The Furious” homeopathic, it takes exactly 110 punches to kill it. Just stand behind the bull so it cannot hit you. It will try to turn around, so move in the other direction when it does. You can take three hits from the bull; the fourth will kill you. Make sure to set the difficulty to Easy when doing this. You can do this at any time, even at the very start of the game after the prologue. Note: Do not use the brass knuckles, as having the brass knuckles equipped voids this achievement.
Steam achievements
Successfully complete the indicated task to unlock the corresponding achievement. To view your achievements and stats in Steam, select “Community”, “My profile”, “View all my games”, then the game and view stats.
- ARCADE Player: Reach level 20 in the Arcade (Arcade only).
- Close and Personal: Perform 25 close combat Takedown Kills (Campaign only).
- Explosive Surprise: Kill 5 enemies with sabotaged vehicles (Campaign only).
- Hope County Master Angler: Acquire all 4 Fishing Rods (Campaign only).
- Pack Rat: Grab 1 of each collectible item. You never know when it will come in handy (Solo Campaign only).
- Survivalist: Purchase half of all perks available (Campaign only).
- Troublemaker: Discover the joys of destroying cult property in every region (Solo Campaign only).
- A Wing And A Prayer: Fly Nick’s plane. Hopefully you’re not afraid of heights (Solo Campaign only).
- Ace Killer: Destroy 10 planes while driving any aerial vehicle (Campaign only).
- Ain’t No Wallflower: Who are these people? Speak to 50 citizens of Hope County (Solo Campaign only).
- ARCADE Competitor: Win 10 featured maps in Multiplayer (Arcade only).
- ARCADE Enthusiast: Successfully complete 10 featured Arcade maps in Solo or Co-op (Arcade only).
- ARCADE Hero: Play the ‘Arcade Hero’ mode 5 times (Arcade only).
- ARCADE Hunter: Kill 100 enemies in Arcade Multiplayer maps (Arcade only).
- Been There, Done That: Complete all Hunting & Fishing Challenges (Campaign only).
- Big Spender: Spend $50000 in Vehicle Shops (Campaign only).
- Death From Above: Drop a bomb from a plane and destroy or disable 4 vehicles at once (Campaign only).
- Extra Crafty: Craft 25 recipes (Campaign only).
- Fashion First: Purchase $1000 in clothing (Campaign only).
- Fertilizing the Land: Using a tractor, obliterate 5 enemies (Campaign only).
- Fish Market: Sell 20 fish for cash (Campaign only).
- Ghost Kill: Perform a Headshot kill with any bow or rifle on any cultist more than 150m away (Campaign only).
- Hitting it Off: Play 3 quests with a friend (Campaign only).
- Ignoble Beasts: Kill a bison using only melee weapons (Campaign only).
- Kicking the Hornet’s Nest: Trigger the wrath of a Herald (Solo Campaign only).
- Liberator: Liberate 5 locations from the Project at Eden’s Gate (Campaign only).
- Like A Bird: Use a wingsuit to travel more than 5000m (Campaign only).
- Locked and Loaded: Buy all attachments for one weapon (Campaign only).
- Opportunity Knocks: Using rocks or cans, distract 15 enemies (Campaign only).
- Peachy Keen: Bait Peaches into going back home (Solo Campaign only).
- Road Gunner: While driving or leaning out of a vehicle, kill 25 enemies (Campaign only).
- Scavenger: Follow the clues to the end of 3 treasure hunts (Solo Campaign only).
- Science Fact: Put aside skepticism and help Larry (Solo Campaign only).
- Sewer Rat: Destroy a cult water treatment pump and make them thirst for revenge (Solo Campaign only).
- Squash and Run: Run over and kill 20 enemies (Campaign only).
- Stocked Garage: Buy 3 vehicles to populate your garage (Campaign only).
- The Greatest SOB That Ever Lived: Laugh in danger’s face by executing a Clutch Nixon stunt in each region (Solo Campaign only).
- The Hurk Locker: Truly bond with Hurk by destroying 15 vehicles together (Campaign only).
- What Now?: Complete 3 Side Missions in Hope County (Solo Campaign only).
- Where’s the Beef?: Tenderize a bull with your bare hands. To death (Campaign only).
- Saving Deputy Hudson: Save Deputy Hudson (Solo Campaign only).
- Together Forever: Get to the End (Solo Campaign only).
- Blissful: Save the Marshal from the Bliss (Solo Campaign only).
- Only You: Sucessfully complete the First Trial (Solo Campaign only).
- You Are Wrath: Be deemed the Sin of Wrath (Solo Campaign only).
- Saving Deputy Pratt: Save Deputy Pratt (Solo Campaign only).
- Saving Sheriff Whitehorse: Save Sheriff Whitehorse (Solo Campaign only).
- Special Delivery: Ensure a baby’s safe passage into this world (Solo Campaign only).
- The Spark: Complete the game intro by liberating Dutch’s island (Solo Campaign only).
- Walk The Path: Discover the Bliss (Solo Campaign only).
The image featured at the top of this post is ©The Legend of Heroes: Trails of Cold Steel III key art / Original