
Just Cause 3
Noir mode
Find all Vintage Parts to unlock Noir mode, which changes the graphics filter to black and white.
Fast Travel
Find all Rebel Shrine locations to unlock Fast Travel.
Unique weapons
Successfully complete the indicated task to obtain the corresponding special weapon:
- Capstone Hydra: Capture Cava Grenade in Prsopere at coordinates N40 45.651, E5 40.622.
- CS Negotiator: Capture Le Gelera in Sud Sirocco at coordinates N40 36.937, E5 44.278.
- CS-110 Archangel: Capture Espia Alta in Capite Est. at coordinates N40 46.800, E5 33.312.
- CS-44 Peacebringer: Find 14 parts in Insula Dracon.
- Dionysus PLDS-H: Progress through the storyline.
- Fire Leech: Capture Cava Geminos Nord in Rocca Blauda at coordinates N40 48.026, E5 33.954.
- M-488: Progress through the storyline.
- The Thunderbird: Progress through the storyline.
- U-24 Shotgun Bully: Find 18 parts in Insula Fonte.
- UPU-210: Capture Espia Bassa in Petra at coordinates N40 42.031, E5 36.760.
- Urga STUPKA-210 (Handheld Mortar): Find 23 Ancient Tombs in Insula Striate.
- USV-45 Sokol: Capture Vigilator Nord in Plague at coordinates N40 42.477, E5 45.037.
- UVK-13: Capture Vigilator in Sud Sirocco at coordinates N40 38.428, E5 41.598.
Unique vehicles
Successfully complete the indicated task to obtain the corresponding vehicle:
- Assault Chopper: Successfully complete the game.
- Bavarium Tank: Found inside a military base near a small lake in Monta on Insula Striate at coordinates N40 46.925, E5 43.347.
- Bomber Jet: Found in Insula Striate at coordinates N40 49.621, E5 32.301.
- Cart Urga 570: Capture Cava Geminos Est. in Rocca Blauda at coordinates N40 47.538, E5 34.628.
- Cavouk U-15: Capture Cava Grande Secunda in Prospere at coordinates N40 45.245, E5 39.81.
- CS BALTDJUR: Capture Cima Leon Silos in Lacos at coordinates N40 41.357, E5 43.561.
- Custom Geschwind: Successfully complete all thirteen Daredevil Jumps in Insula Forte.
- Custom Kletter 300: Successfully complete all ten Daredevil Jumps in Insula Dracon.
- Fighter Jet: Found at coordinates at N40 44.510, E5 44.631 in Costa Sud, Insula Striate.
- Incendario Monster Truck: Successfully complete all seven Daredevil Jumps in Insula Striate.
- Navajo Assault Chopper: Found in Puncta Sud at coordinates N40 41.145, E5 37.401.
- Stri Facocero: Capture Porto Le Gratia in Lavanda at coordinates N40 41.232, E5 42.278.
- Urga Hound-7 V-8: Capture Le Tutor in Nord Sirocco at coordinates N40 39.952, E5 41.759.
- Urga STURM 63-A: Capture Cava Geminos in Sud Rocca Blauda at coordinates N40 47.289, E5 33.590.
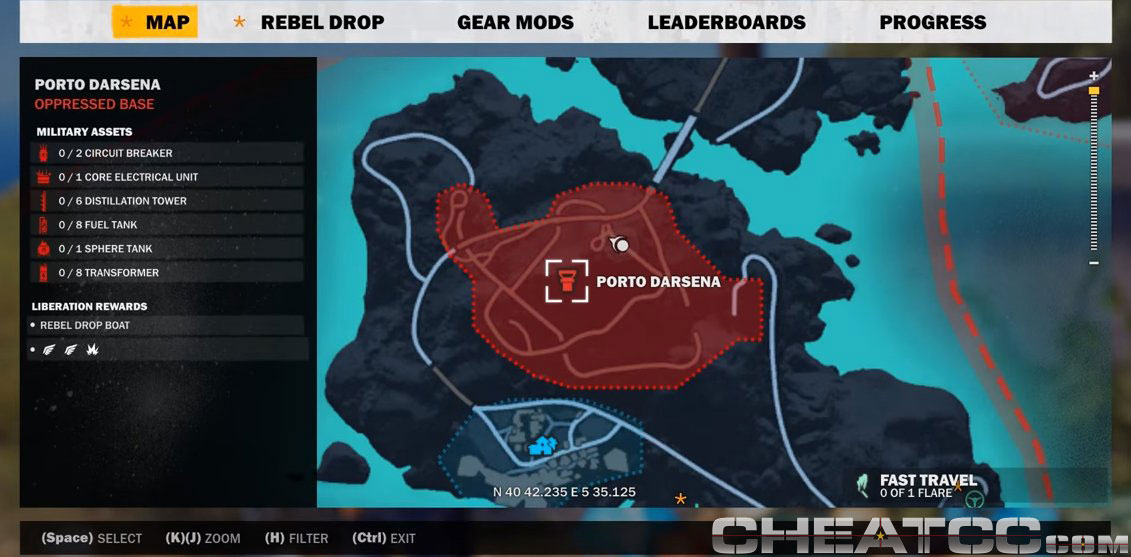
Wormhole warp
Go to the following location (N 40 42.235, E 5 35.125 coordinates) in north Porto Darsena, and press the buttons in the following order (from left to right): 1, 4, 3, 4, 2, 1. Jump into the entrance that opens to warp through a wormhole to the other side of the map. You can also travel back using the same wormhole.
Mile High Club blimp
Go to the following location (N 40 48.982, E 5 36.629 coordinates) in northern Maestrale to see the wreckage on the beach and in the water of the Mile High Club blimp from Just Cause 2 .
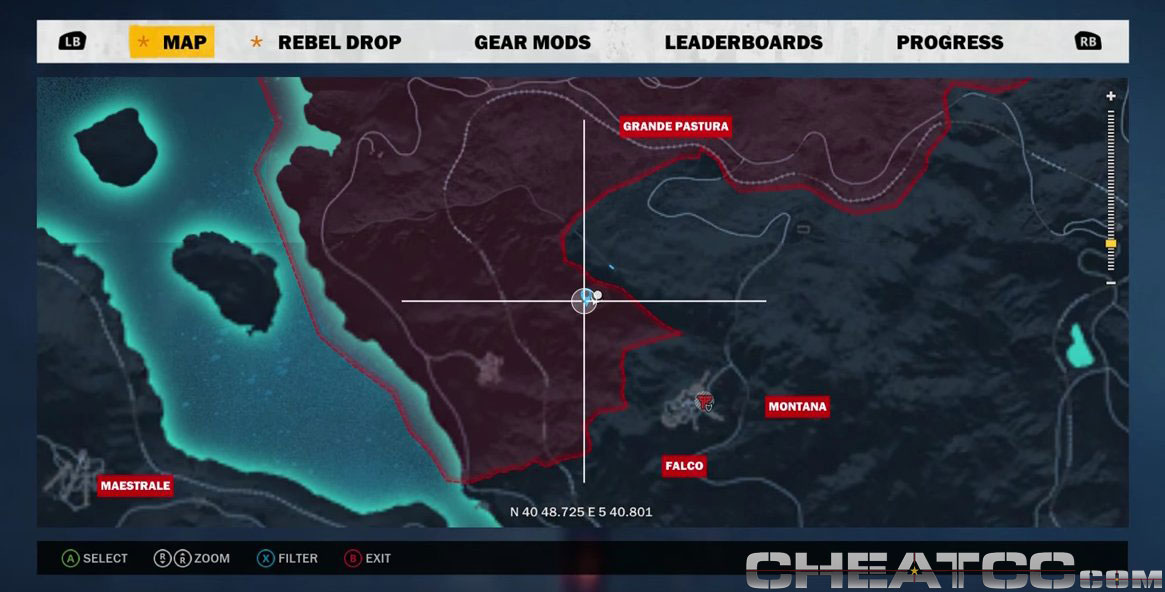
Thor’s Mjolnir hammer
Fly a helicopter to the following location (N 40 48.566, E 5 40.859 coordinates) in southeast Grande Pastura to reach a crater on a high mountaintop with Thor’s Mjolnir hammer in the middle of it. However, you cannot collect or do anything with Thor’s hammer.
Dark Souls Easter Egg
Go to the beach in north Cauda at the following location (N 40 41.216, E 5 35.026 coordinates) to see a stack of wood with a rifle stuck vertically into the ground similar to the sword in the Dark Soul series bonfires used to save the game.
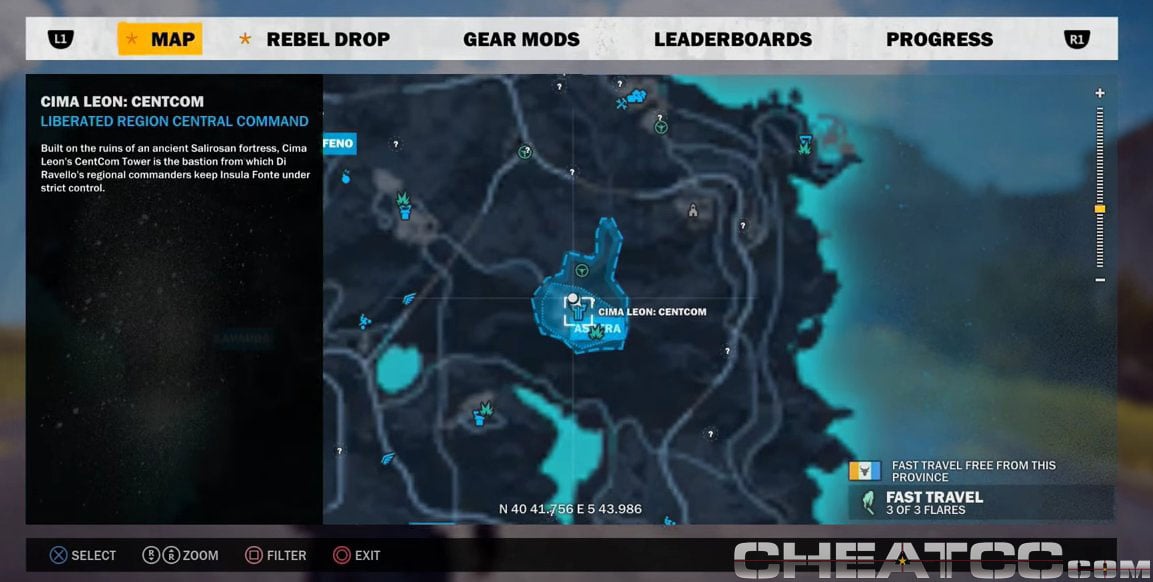
Soap Box Car location
The Soap Box Car is required for completing the “Endless Runner” feat. Complete all feats to get the “Feat Fetish” trophy. It can be found at the entrance of Cima Leon: Centcom (N 40 41.756, E 5 43.986), which is on the island where the game starts (Insula Fonte). You must play through Act 1 of the story to disable the airstrike FOW or else it will destroy the Soap Box Car. Go to the “Feats” section of the Leaderboards to view the feats you have left to complete. Everything else is fairly easy and should come during natural gameplay. Note: Feats are disabled during story missions and can only be done in free roam.
All vehicle locations
Go to the indicated locations to find all 47 vehicles and get the “Caught ‘Em All!” trophy. After finding a vehicle, you must bring it to one of Marior’s garages in a town you have liberated. It is recommended to first play some Land Races (challenges) to unlock the Vehicle Detector mod. When a missing vehicle is nearby, the radar will display its location. When entering a missing vehicle, you will see a blue garage icon next to its name (bottom left of the screen). To view all the vehicles you have found, go to the Rebel Drop list or to “Progress” – “Garage Blueprints”. The following are some tips for finding vehicles:
- There are 18 Land Races, and many of them let you drive a new vehicle. Liberate all settlements to unlock them. When a Land Race has a new vehicle, immediately quit after the race begins and drive the vehicle to a nearby garage.
- Fast travel from one large town to the next and check the parking spots near the garage, as there are always some random vehicles in that area.
- You can also keep fast travelling to the same town and new vehicles will spawn in the parking spots every time.
- Stand at a road with the Vehicle Detector mod and wait for a missing vehicle to come by. Another strategy is to fly over streets with the wingsuit and Vehicle Detector mod.
- If a vehicle does not spawn at the location in the video, move on to the next one and return later. If it is still not there, keep fast travelling to the nearest challenge or settlement and it will spawn after a while.
There are other military vehicles such as tanks, attack helicopters, and fighter jets that are unlocked by liberating all military bases, completing the story, and finding collectibles — all of which comes through natural progress (needed for the “Unlocked And Fully Loaded” trophy). The order in the video is the same as the in-game Rebel Drop list. Everything from one vehicle category will be shown before moving onto the next category.
Motorcycles
- ’69 Stria Sussurro – 0:05
- Mugello Furia MS-316 – 0:27
- MV402 – 1:07
- Stria Risata – 1:46
- Stria Giovanni – 2:20
- Vintage Stria M7 – 2:52
- Pavouk U-15 – 3:21
Off-Road
- Geschwind V3000 – 4:00
- Autostraad Kletterer 300 – 4:30
Vintage Cars
- Weimaraner W3 – 5:06
- ’63 Autostraad Weltbus – 7:16
- Stria Cucciola – 7:48
- Stria Infimo S – 8:18
- Stria Carera Standard – 8:47
- Stria Carera G – 9:19
Modern Cars
- Autostraad D90 – 10:00
- Stria Joia – 10:33
- Stria Kavala – 11:03
- Stria Gioco – 11:41
- Stria Toro – 12:13
Sports Cars
- Windhund 4 – 12:53
- Autostraad D700 – 13:37
- Kerner Serpente R – 14:15
- ’13 Vigueur – 14:51
- Mugello Raffinati Vitesse – 15:28
- Mugello Vistosa – 16:12
- Mugello Quipozza F – 16:50
- Verdeleon 3 – 17:33
- Mugello Farino Duo – 18:15
Utility Vehicles
- Stria Ghepardo 3S – 18:53
- Autostraad Reisender 7 – 19:17
- ’05 Charmant – 20:30
- Stadt Tresor ST 8530 – 21:04
- Nashorn 6100 – 21:46
- Citispeed Eco 75 – 22:26
- Stria Switzo Ambulance – 23:04
- Stria Switzo – 23:42
- Stria Obero – 24:12
- Stria Rustico – 24:50
- Stria Campania 115 – 24:15
Sea Vehicles
- Minnow Fishing Boat – 25:52
- Whaleshark – 26:21
- Brise 32 – 27:07
- Dame De La Mer 99 – 27:42
- Pescespada SS – 28:23
- Stria PW 220 R-GT – 29:04
- Squalo X7 – 29:33
Helicopters
- News Chopper – 32:58
Planes
- Stria Ghibli – 33:38
Ancient Tomb locations
Go to the indicated locations on Isla Striate to find all 23 Ancient Tombs. They appear as mounds with blue flowers. Find the door and pay your respects. You can find an Urga Stupka-201 behind each tomb. You will get a Handheld Mortar for finding all tombs.
- 1. Litore Torto at N40 50.48, E5 45.10
- 2. Grande Pastura at N40 51.54, E5 44.60
- 3. Grande Pastura at N40 50.67, E5 41.79
- 4. Grande Pastura at N40 49.94, E5 41.84
- 5. Grande Pastura at N40 49.65, E5 42.93
- 6. Val De Mar at N40 47.10, E5 41.19
- 7. Val De Mar at N40 46.79, E5 40.78
- 8. Maestrale at N40 47.20, E5 39.02
- 9. Maestrale at N40 47.14, E5 38.06
- 10. Maestrale at N40 47.18, E5 36.89
- 11. Maestrale at N40 47.71, E5 35.08
- 12. Maestrale at N40 48.52, E5 36.04
- 13. Maestrale at N40 48.79, E5 35.44
- 14. Maestrale at N40 48.82, E5 34.57
- 15. Maestrale at N40 49.47, E5 34.26
- 16. Maestrale at N40 49.07, E5 33.08
- 17. Libeccio at N40 45.89, E5 32.75
- 18. Libeccio at N40 45.98, E5 33.68
- 19. Libeccio at N40 46.37, E5 36.94
- 20. Maestrale at N40 45.75, E5 38.74
- 21. Prospere at N40 44.605, E5 40.03
- 22. Litore Torto at N40 46.91, E5 45.68
- 23. Costa Sud at N40 46.46, E5 46.69
Rebel Shrine locations
Go to the indicated locations to find all 49 Rebel Shrines. Light the shrines to pay your respects. You will unlock Fast Travelling for finding all shrines.
Insula Dracon
- 1. Cauda at N40 40.95, E5 35.36
- 2. Trio at N40 41.96, E5 35.86
- 3. Trio at N40 42.78, E5 35.71
- 4. Capite West at N40 43.29, E5 34.87
- 5. Capite West at N40 43.76, E5 34.52
- 6. Capite Est at N40 43.62, E5 35.98
- 7. Massos at N40 42.86, E5 36.74
- 8. Masson at N40 42.75, E5 37.40
- 9. Petra at N40 41.83, E5 37.05
- 10. Petra at N40 41.52, E5 36.54
Insula Forte
- 1. Soros at N40 37.14, E5 39.54
- 2. Soros at N40 37.60, E5 40.47
- 3. Sirocco Sud at N40 38.61, E5 41.13
- 4. Lacos at N40 40.08, E5 43.05
- 5. Baia at N40 40.24, E5 44.05
- 6. Lacos at N40 40.31, E5 43.51
- 7. Lacos at N40 40.63, E5 43.22
- 8. Lacos at N40 40.75, E5 42.48
- 9. Lavanda at N40 41.62, E5 42.85
- 10. Lavanda at N40 41.76, E5 42.14
- 11. Lavanda at N40 42.14, E5 42.25
- 12. Feno at N40 42.60, E5 41.40
- 13. Feno at N40 42.58, E5 42.92
- 14. Plagia at N40 42.80, E5 43.90
- 15. Plagia at N40 42.46, E5 43.93
- 16. Plagia at N40 42.00, E5 44.75
- 17. Baia at N40 41.31, E5 44.60
- 18. Lacos at N40 41.04, E5 43.89
Insula Striate
- 1. Costa Sud at N40 44.25, E5 46.00
- 2. Costa Sud at N40 43.44, E5 44.67
- 3. Costa Sud at N40 43.69, E5 44.33
- 4. Prima at N40 44.48, E5 43.57
- 5. Prima at N40 44.46, E5 42.72
- 6. Val De Mar at N40 45.99, E5 42.13
- 7. Costa Sud at N40 45.92, E5 44.17
- 8. Umbra at N40 46.50, E5 44.73
- 9. Umbra at N40 46.54, E5 44.81
- 10. Costa Sud at N40 45.93, E5 45.76
- 11. Prima at N40 44.54, E5 39.73
- 12. Libeccio at N40 45.80, E5 37.92
- 13. Libeccio at N40 46.79, E5 34.91
- 14. Rocca Blau at N40 47.80, E5 33.19
- 15. Maestrale at N40 49.12, E5 33.17
- 16. Maestrale at N40 48.99, E5 35.60
- 17. Val De Mar at N40 47.43, E5 39.53
- 18. Maestrale at N40 46.49, E5 39.37
- 19. Montana at N40 49.15, E5 42.59
- 20. Litore Torto at N40 49.12, E5 45.02
- 21. Litore Torto at N40 50.20, E5 45.55
Vintage Part locations
Go to the indicated locations to find all 54 Vintage Parts. You will unlock Noir mode for finding all parts. This mode changes the graphics filter to black and white.
Insula Dracon
- 1. Capite Est at N40 44.25, E5 35.43
- 2. Capite West at N40 44.14, E5 35.16
- 3. Capite West at N40 43.40, E5 34.32
- 4. Trio at N40 42.37, E5 34.83
- 5. Trio at N40 42.35, E5 35.31
- 6. Trio at N40 42.20, E5 35.61
- 7. Cauda at N40 41.10, E5 34.96
- 8. Cauda at N40 40.55, E5 34.53
- 9. Petra at N40 41.15, E5 35.15
- 10. Petra at N40 40.98, E5 36.53
- 11. Petra at N40 41.91, E5 37.07
- 12. Massos at N40 42.43, E5 37.50
- 13. Massos at N40 43.04, E5 36.82
- 14. Capite Est at N40 44.24, E5 36.83
Insula Fonte
- 1. Plagia at N40 42.85, E5 43.69
- 2. Feno at N40 42.56, E5 42.45
- 3. Feno at N40 42.27, E5 43.20
- 4. Plagia at N40 42.18, E5 43.98
- 5. Aspera at N40 41.75, E5 44.08
- 6. Lavanda at N40 41.84, E5 42.59
- 7. Lavanda at N40 42.10, E5 41.31
- 8. Lavanda at N40 41.96, E5 41.45
- 9. Lavanda at N40 41.25, E5 42.94
- 10. Lacos at N40 40.75, E5 42.17
- 11. Lacos at N40 40.64, E5 43.98
- 12. Sirocco Nord at N40 39.40, E5 42.15
- 13. Sirocco Nord at N40 39.24, E5 43.40
- 14. Sirocco Sud at N40 38.52, E5 42.65
- 15. Sirocco Sud at N40 38.04, E5 41.39
- 16. Soros at N40 37.35, E5 40.08
- 17. Soros at N40 37.03, E5 38.31
- 18. Soros at N40 37.12, E5 38.98
Insula Striate
- 1. Maestrale at N40 48.55, E5 36.22
- 2. Maestrale at N40 48.50, E5 32.74
- 3. Libeccio at N40 46.37, E5 33.79
- 4. Libeccio at N40 46.65, E5 35.61
- 5. Libeccio at N40 45.18, E5 36.48
- 6. Prima at N40 44.03, E5 42.11
- 7. Costa Sud at N40 43.63, E5 44.98
- 8. Val de Mar at N40 45.48, E5 43.59
- 9. Costa Sud at N40 45.64, E5 45.89
- 10. Litore Torto at N40 46.94, E5 44.73
- 11. Val De Mar at N40 46.52, E5 42.25
- 12. Val De Mar at N40 47.32, E5 41.98
- 13. Grande Pastura at N40 48.62, E5 39.73
- 14. Grande Pastura at N40 49.17, E5 40.67
- 15. Grande Pastura at N40 50.72, E5 38.67
- 16. Grande Pastura at N40 50.80, E5 41.34
- 17. Grande Pastura at N40 51.40, E5 43.10
- 18. Grande Pastura at N40 50.34, E5 44.35
- 19. Litore Torto at N40 48.72, E5 46.69
- 20. Litore Torto at N40 47.97, E5 46.67
- 21. Montana at N40 48.27, E5 43.62
- 22. Montana at N40 48.32, E5 43.23
All Daredevil Stunt Jump locations
Go to the indicated locations to find all 30 Daredevil Stunt Jumps. Complete all of them to get the “Consummate Daredevil” trophy. Liberating every province will reveal their locations on the map. You can do them with almost any vehicle, including really slow ones. You do not need to jump far for it to count, and you do not have to land in a specific area. The “Max Beacons” gear mod is very helpful since it allows you to request more vehicles from rebel drops.
Insula Dracon
- 1. Petra at N40 41.24, E5 37.34
- 2. Petra at N40 42.06, E5 36.76
- 3. Petra at N40 42.15, E5 36.83
- 4. Corda Dracon at N40 42.79, E5 36.59
- 5. Corda Dracon at N40 42.89, E5 36.29
- 6. Trio at N40 42.40, E5 35.37
- 7. Capite West at N40 43.49, E5 35.58
- 8. Capite West at N40 43.51, E5 35.60
- 9. Capite Est at N40 43.79, E5 36.15
- 10. Capite West at N40 43.80, E5 34.94
Insula Forte
- 1. Feno at N40 42.68, E5 42.87
- 2. Plagia at N40 42.54, E5 43.30
- 3. Feno at N40 42.13, E5 42.44
- 4. Lavanda at N40 41.89, E5 42.61
- 5. Feno at N40 41.68, E5 43.05
- 6. Lacos at N40 40.76, E5 43.47
- 7. Lacos at N40 40.87, E5 43.74
- 8. Lacos at N40 41.01, E5 44.41
- 9. Baia at N40 40.30, E5 44.62
- 10. Baia at N40 40.15, E5 44.56
- 11. Baia at N40 40.02, E5 43.77
- 12. Sirocco Nord at N40 39.04, E5 42.87
- 13. Sirocco Nord at N40 38.51, E5 42.50
Insula Striate
- 1. Libeccio at N40 45.74, E5 35.18
- 2. Val De Mar at N40 44.73, E5 42.36
- 3. Costa Sud at N40 44.30, E5 45.45
- 4. Costa Sud at N40 46.12, E5 44.42
- 5. Val De Mar at N40 46.73, E5 42.06
- 6. Litore Torto at N40 47.42, E5 45.72
- 7. Litore Torto at N40 49.22, E5 45.05
Di Ravello tape locations
Go to the indicated locations to find all 71 Di Ravello tapes:
Insula Dracon
- 1. Capite Est at coordinates N40 44.25, E5 35.49
- 2. Capite Est at coordinates N40 44.13, E5 36.80
- 3. Massos at coordinates N40 43.39, E5 37.05
- 4. Capite Est at coordinates N40 43.60, E5 35.84
- 5. Capite West at coordinates N40 42.93, E5 35.18
- 6. Trio at coordinates N40 42.69, E5 35.07
- 7. Trio at coordinates N40 41.93, E5 35.03
- 8. Trio at coordinates N40 41.77, E5 35.14
- 9. Trio at coordinates N40 41.87, E5 35.79
- 10. Petra at coordinates N40 41.80, E5 36.47
- 11. Petra at coordinates N40 41.84, E5 36.97
- 12. Massos at coordinates N40 42.19, E5 37.60
Insula Fonte
- 1. Sirocco Sud at coordinates N40 38.40, E5 42.37
- 2. Sirocco Sud at coordinates N40 38.65, E5 42.65
- 3. Sirocco Nord at coordinates N40 38.95, E5 42.66
- 4. Sirocco Nord at coordinates N40 39.29, E5 42.87
- 5. Lacos at coordinates N40 40.07, E5 43.71
- 6. Lacos at coordinates N40 40.16, E5 42.76
- 7. Lacos at coordinates N40 40.69, E5 43.53
- 8. Lacos at coordinates N40 40.95, E5 44.18
- 9. Baia at coordinates N40 40.76, E5 45.20
- 10. Plagia at coordinates N40 41.58, E5 44.68
- 11. Plagia at coordinates N40 42.36, E5 44.37
- 12. Plagia at coordinates N40 42.47, E5 44.20
- 13. Plagia at coordinates N40 42.51, E5 43.95
- 14. Plagia at coordinates N40 42.25, E5 43.78
- 15. Feno at coordinates N40 42.37, E5 42.86
- 16. Feno at coordinates N40 42.73, E5 43.29
- 17. Feno at coordinates N40 42.88, E5 43.00
- 18. Feno at coordinates N40 42.42, E5 42.03
- 19. Lavanda at coordinates N40 41.95, E5 41.59
- 20. Lavanda at coordinates N40 41.84, E5 42.34
Insula Striate
- 1. Montana at coordinates N40 48.09, E5 43.36
- 2. Litore Torto at coordinates N40 49.26, E5 46.25
- 3. Litore Torto at coordinates N40 50.31, E5 44.98
- 4. Grande Pastura at coordinates N40 50.93, E5 41.21
- 5. Grande Pastura at coordinates N40 49.97, E5 40.11
- 6. Grande Pastura at coordinates N40 48.52, E5 40.75
- 7. Val De Mar at coordinates N40 47.51, E5 39.93
- 8. Val De Mar at coordinates N40 45.98, E5 42.16
- 9. Val De Mar at coordinates N40 44.91, E5 42.22
- 10. Maestrale at coordinates N40 45.38, E5 39.07
- 11. Maestrale at coordinates N40 46.18, E5 39.16
- 12. Maestrale at coordinates N40 46.99, E5 38.30
- 13. Maestrale at coordinates N40 47.54, E5 37.78
- 14. Maestrale at coordinates N40 47.40, E5 36.05
- 15. Maestrale at coordinates N40 48.22, E5 35.34
- 16. Maestrale at coordinates N40 48.57, E5 34.83
- 17. Maestrale at coordinates N40 48.30, E5 32.87
- 18. Libeccio at coordinates N40 45.18, E5 33.39
- 19. Libeccio at coordinates N40 44.98, E5 35.24
- 20. Libeccio at coordinates N40 44.88, E5 35.36
- 21. Libeccio at coordinates N40 45.83, E5 35.42
- 22. Libeccio at coordinates N40 45.72, E5 37.15
- 23. Libeccio at coordinates N40 45.25, E5 37.87
- 24. Regno at coordinates N40 44.41, E5 37.82
- 25. Regno at coordinates N40 44.07, E5 38.17
- 26. Regno at coordinates N40 44.35, E5 38.45
- 27. Regno at coordinates N40 44.22, E5 38.68
- 28. Regno at coordinates N40 44.21, E5 39.30
- 29. Prima at coordinates N40 43.94, E5 39.99
- 30. Prima at coordinates N40 43.71, E5 40.15
- 31. Prima at coordinates N40 43.94, E5 40.66
- 32. Prima at coordinates N40 43.76, E5 41.60
- 33. Prima at coordinates N40 43.91, E5 41.65
- 34. Prima at coordinates N40 43.82, E5 43.38
- 35. Prima at coordinates N40 43.77, E5 43.50
- 36. Costa Sud at coordinates N40 44.54, E5 44.18
- 37. Costa Sud at coordinates N40 44.15, E5 45.36
- 38. Costa Sud at coordinates N40 44.25, E5 45.59
- 39. Costa Sud at coordinates N40 45.23, E5 46.21
Getting five gears in all Shooting Gallery Weapon Challenges
There are five Shooting Gallery (Weapon Training) Challenges. Getting five gears in all of them is required for 100% completion and to get the “All The Gears”, “MOD Tinkerer”, and “Winner Takes All, Again” trophies. There are eight types of challenges: 27 Wingsuit Courses, 18 Land Races, 4 Scrapyard Scrambles, 12 Crash Bombs, 5 Shooting Galleries, 25 Destruction Frenzies, 9 Sea Races, and 12 Air Races. That is a total of 112 challenges, and you must get five gears in each one of them for 100% completion. To unlock challenges, you must liberate every settlement in the game. The following are some weapon tips:
- General: Remember the target order and locations, as they are always the same.
- Shotgun: Spray and pray — shoot as quickly as possible and hit many targets at once for bonus points.
- Handgun: Be quick and aim for the bullseye.
- Machine Gun: Use Weapon Zoom and shoot the bullseye.
- Burst Rifle: Use Weapon Zoom and quickly shoot the bullseye.
- Revolver: Use Weapon Zoom, and instead of aiming around, wait for the target to cross your aim.
The video begins on Insula Fonte, then goes to Insula Dracon, and finally to Insula Striate (always from south to north).
Timeline
- 1. Shotgun Training Course – 0:05
- 2. Handgun Training Course – 1:28
- 3. Machine Gun Training Course – 3:01
- 4. Burst Training Course – 4:32
- 5. Revolver Training Course – 6:22
Getting five gears in all Wingsuit Traversal Course Challenges
There are 27 Wingsuit (Traversal) Challenges. Getting five gears in all of them is required for 100% completion and to get the “All The Gears”, “MOD Tinkerer”, and “Winner Takes All, Again” trophies. There are eight types of challenges: 27 Wingsuit Courses, 18 Land Races, 4 Scrapyard Scrambles, 12 Crash Bombs, 5 Shooting Galleries, 25 Destruction Frenzies, 9 Sea Races, and 12 Air Races. That is a total of 112 challenges, and you must get five gears in each one of them for 100% completion. To unlock challenges, you must liberate every settlement in the game. The following are some wingsuit tips:
- There is no time limit, so use the “Wingsuit Air Brake” gear mod to go as slow as desired. Especially in the challenges where you have to glide downhill, it is very useful to use, but do not activate the “Wingsuit Quick Close” gear mod for this.
- Shoot tethers on the ground to gain speed when needed.
- The hardest challenges are 23, 24, 25, and 26. Take a look at those if you want to know what to expect.
The video begins on Insula Fonte, then goes to Insula Dracon, and finally to Insula Striate (always from south to north).
Timeline
- 1. Sirocco Skies Tour – 0:05
- 2. Manea Tour – 1:40
- 3. Cavern Tour – 2:28
- 4. Tunnel Tour – 3:43
- 5. Fonte Grande Tour – 4:48
- 6. Le Gratia Tour – 6:42
- 7. Via Campania Tour – 7:45
- 8. Rondella Tour – 8:54
- 9. Puncta Tour – 9:52
- 10. Olivo Bassa Tour – 10:55
- 11. Pirate Tour – 12:07
- 12. Darsena Dive Tour – 13:13
- 13. Hilltop Tour – 14:14
- 14. Monte Dracon Tour – 15:30
- 15. Undertwon Tour – 17:30
- 16. Metropolis Tour – 18:36
- 17. Vista Plunge Tour – 19:42
- 18. Canyon Tour – 21:11
- 19. Badlands Tour – 22:51
- 20. Aeroporto Tour – 24:18
- 21. Dragline Dive Tour – 25:32
- 22. Hayfield Tour – 27:20
- 23. Maxime Tour – 29:02
- 24. Mountain Marathon Tour – 31:07
- 25. Snowy Slopes Tour – 33:53
- 26. Cloudy Crevasse Tour – 37:03
- 27. Griphon Tour – 39:09
Easy “Forgive Me, Father…” and “Three Holy Hideaways” trophies
First, you must complete random encounters to unlock Priests and Monasteries. They occasionally appear randomly in liberated areas and will get marked when nearby. Complete three of them to get the “Three Holy Hideaways” trophy. Encounters can either unlock Priests or Resupply Points. When you have rescued your first priest, go to a large military base or town and cause chaos until you are heat level 5 (destroy chaos objects and kill enemies). Then, go to the monastery and talk to the priest to get the “Forgive Me, Father…”. Make sure you do not lose your attackers on the way. You can also reset all settlements after the final story mission.
Easy “My Little Rocket Man” trophy
There is a gas cannister in the “Guardia Lacos I” outpost (N 40 40.505, E 5 42.653) in the Lacos Province of Insula Fonte. Shoot your grappling hook at a soldier, then at the cannister. Shoot the cannister to make it fly into the air with the soldier attached to it. You can also do this on your allies, as it does not have to be an enemy soldier. You can still do it after the outpost has been liberated. The gas cannister respawns when you fast travel to the outpost.
Easy “This Was Supposed To Be A Western” trophy
This only works with military bases (not with military outposts, towns, or villages). You can reset all bases after the final story mission. The easiest location is the “Cima Leon: Silo” military base (N 40 41.358, E 5 43.563) in the Lacos Province of Insula Fonte. There is a tank at the back of the base. Get in the tank and destroy all Chaos Objects in the base. Chaos Objects are the ones displayed in the bar on the left side (you do not need to destroy small explosive barrels, only the stuff that is required to conquer the base). Make sure you do it with a tank. Do not use a helicopter, as it will get shot down. If you have already captured this base, either start a new game and immediately go there or reset the base after the last story mission.
Easy “Top Of The World” trophy
The highest point of Medici is on top of a mountain (N 40 48.118, E 5 43.245) in the Montana Province on Insula Striate. Use a helicopter or plane to fly up to the top. You can request a helicopter via Rebel Drop, which you unlock automatically very early in the game. One you are on top of the mountain, go up the steps of the structure there to get the “Top Of The World” trophy.
Easy “…Without Bullets!” trophy
This only works with military bases (not with military outposts, towns, or villages). You can reset all bases after the final story mission. The “Vis Electra” military base (N 40 40.450, E 5 44.153) in the Baia Province of Insula Fonte is very easy. It is small, has few objects, and little defense. Use only tethers and melee attacks to destroy all Chaos Objects. Attach tethers to the ground, and then to the object to tear it down. Chaos Objects are the ones displayed in the bar on the left side (you do not need to destroy small explosive barrels, only the stuff that is required to conquer the base). If you have already captured this base, either start a new game and immediately go there or reset the base after the last story mission. The problem with a lot of the other bases is that your standard grappling hook is not strong enough to tear down certain structures. If you try it in a base with such structures, you must attach explosive barrels or flying helicopters to destroy them.
Easy “You’re Outta Here!” trophy
First, you must activate the “Booster Explosives” gear mod. It turns your GE-64 explosives into rocket engines. To unlock the “Booster Explosives” gear mod, you must complete some Crash Bomb challenges. Then, simply walk up to an enemy soldier and plant the explosive on him to get the “You’re Outta Here!” trophy. It must be an enemy, as it does not work with allies or civilians.
Trophies
Successfully complete one of the following tasks to get a trophy:
- King of Medici (Platinum): Earned all Just Cause 3 trophies.
- …Without Bullets! (Bronze): Destroy every Chaos Object in a Military Base without using any weapons, grenades, or planted explosives.
- My Little Rocket Man (Bronze): Tether an enemy to a launched gas cannister. Adeo, amico!
- This was Supposed to be a Western (Bronze): Destroy all Chaos Objects in a Base without leaving your vehicle.
- You’re Outta Here! (Bronze): Plant a Booster Explosive on an enemy soldier. Then send them flying.
- Bragging Rights (Bronze): Beat another player’s score in a Challenge.
- Getting it in Gear (Bronze): Earn at least 3 Gears in a Challenge.
- You’ve Got Gear (Bronze): Earn 5 Gears in a Challenge.
- A Real Gear-Getter (Bronze): Earn at least 3 Gears in one Challenge of every type.
- All the Gears (Silver): Earn 5 Gears in every Challenge.
- (Just) Causin’ Chaos (Bronze): Get 1,000 Chaos
- Chaos Is My Middle Name (Silver): Get 100,000 Chaos
- Chaos Millionaire (Gold): Get 1,000,000 Chaos
- Earth, Wind and Sea (Bronze): Unlock Rebel Drops for at least one land vehicle, at least one air vehicle, and at least one sea vehicle.
- Caught ‘Em All! (Silver): Collect every vehicle available by bringing them to Mario’s Rebel Garages.
- Tomb Raider (Bronze): Pay your respects at every Ancient Tomb.
- Remember the Fallen (Bronze): Light a candle at every Rebel Shrine.
- Diary of the Madman (Bronze): Gather all of Di Ravello’s tapes.
- Old School Cool (Bronze): Find every vintage weapon and vehicle part.
- Consummate Daredevil (Bronze): Launch a land vehicle off of every Daredevil Jump in Medici.
- No Stone Unturned (Silver): Find every collectible strewn across Medici.
- Top of the World (Bronze): Stand on foot at the highest point of Medici.
- Anything You Can Do… (Bronze): Beat a score you were Called-Out on.
- Feat Fetish (Bronze): Perform every Feat.
- Vive Le Revolution (Bronze): Liberate a Province.
- Take That, You Pipeline Jerks (Bronze): Disable the FOW in Insula Fonte.
- Baker’s Dozen (Bronze): Liberate 13 settlements.
- Taming the Dracon (Silver): Completely liberate Insula Dracon.
- Hope Springs Eternal (Silver): Completely liberate Insula Fonte.
- Heart of Stone (Silver): Completely liberate Insula Striate.
- Unlocked and Fully Loaded (Silver): Unlock every weapon and vehicle available in the Rebel Drop menu.
- Winner Takes All, Again (Gold): 100% Just Cause 3.
- Can’t Touch This (Bronze): Call-Out another player in a Feat.
- Forgive Me, Father… (Bronze): Take sanctuary in a monastery to clear Heat Level 5.
- MOD Initiate (Bronze): Unlock your first Gear MOD, and then activate it.
- MOD Specialist (Bronze): Unlock every Gear MOD in a single category.
- MOD Tinkerer (Silver): Have every Gear MOD active for at least 1 minute each.
- First Encounter (Bronze): Complete an Encounter.
- Supply and Demand (Bronze): Unlock 10 Resupply Points by completing Encounters.
- Three Holy Hideaways (Bronze): Unlock 3 Heat-Clearing Priests by completing Encounters.
Additionally, there are eight secret trophies:
- Enjoy Your Homecoming (Bronze): Complete Story Mission: Welcome Home.
- What a Disaster (Bronze): Complete Story Mission: A Terrible Reaction.
- The Power of Bavarium (Bronze): Complete Story Mission: A Long and Dangerous Road.
- These Mines are the Pits (Bronze): Complete Story Mission: The Great Escape.
- F!#& YOU, MISSILE (Bronze): Complete Story Mission: Missile Cowboy.
- Finally on the Offensive (Bronze): Complete Story Mission: Tangled Up In Blue.
- Mistakes and Triumphs (Bronze): Complete Story Mission: The Shatterer of Worlds.
- Son of Medici (Silver): Complete Story Mission: Son of Medici.
The following trophies require the “Sky Fortress” bonus downloadable content:
- Like a Fish… in the Air! (Bronze): Use the Bavarium Wingsuit to take off from water.
- Look at the Sly Fox (Bronze): Use the Barrel Roll to evade 10 incoming missiles.
- My Name is Eden (Silver): Beat the last mission of the Sky Fortress Expansion and complete the story arc.
- Break a Leg! (Bronze): Defeat the “Old Friend” (Boss at the end of “Taking Control”).
- Stock-Keeping (Bronze): Defeat 1 of each Drone type.
- Quite the Connoisseur (Bronze): Earn at least 1 Gear in all Challenges of the Sky Fortress Expansion.
- A True Master (Gold): Earn 5 Gears in all Challenges of the Sky Fortress Expansion.