
Mass Effect: Andromeda
Infinite credits
First, complete the Priority missions until you reach the Govorkam System. Land on Kadara, go to the Transit Console, and select “Take Lift to Slums” as the destination. Drive along the road to the west to the following location to find the station with Thrasia. Complete her “A Packaged Deal” side quest to get a discount at her shop. Have the “Grey Market Connections” perk, and you will sell items for 10% more than what they are worth at her store. Buy as much Titanium from her as possible since it gives the best profit. It cost 231 credits each to purchase and you get 256 credits each for selling it back to her. Try to get around 10,000 Titanium to get 250,000 credits from each trade, giving you approximately 5 million credits every minute. Simply save the game and load it again to reload the store inventory. Repeat this as many times as desired to obtain an unlimited amount of money. Note: This exploit was performed on an unpatched version of the game. It may eventually get patched. To avoid not being able to use this exploit, either do not install new patches before using it or delete the patches. You can avoid patches being installed by disconnecting from the internet until you are ready for the game to install new patches.
Infinite research points
Note: The following exploit requires an internet connection. Go to the Strike Team Mission menu from your single player campaign. You will need at least one “Research Data Loot Box” and some other loot boxes that you do not care to lose that you will use to turn into Research Data loot boxes. If you do not have a “Research Data Loot Box”, complete a Strike mission that rewards one. Then, highlight the loot box directly below the Research Data loot box. There is a slight delay when you select a loot box and when it opens. Immediately after selecting the loot box below the Research Data loot box, quickly scroll up to highlight the Research Data loot box. It will take away the loot box you first selected and open a Research Data loot box without actually taking away your Research Data loot box. Repeat this as many times as desired. You can do this with any loot boxes to get more of any type of loot box. You can also easily send Strike Teams on your phone using the APEX app from the app store to easily farm it while away from the game. Note: This exploit was performed on Version 1.04 of the game and will probably eventually get patched.
Infinite resources
First, use the “Infinite credits” glitch to get a lot of credits. Then, go to a populated area with merchants, like planet Aya. Purchase all the desired ultra rare, rare, and uncommon resources from the merchants. Then, save the game and reload it for the merchant’s inventory to be restocked. Repeat this as many times as desired.
Infinite ultra rare weapons, armor, and resources
There is an orange storage container in the room next to the shop on the Nexus at the beginning of the game. However, it disappears after completing EOS. Open it, take all but one item, manually save the game, and then reload the save. The orange container will be restocked. Repeat this exploit as many times as desired. You can get ultra rare and rare weapons, armor, and resources from the orange container. You can also break down the weapons and items for unlimited resources or sell them to get an unlimited amount of money. Note: It is highly recommended to create a save before starting this exploit, just in case you accidentally take all the items from the container. Additionally, this exploit was performed on an unpatched version of the game. It was patched in Version 1.05. To avoid not being able to use this exploit, either do not install new patches before using it or delete the patches. You can avoid patches being installed by disconnecting from the internet until you are ready for the game to install new patches.
There is an orange container located at far bottom left side of the EOS map on a small enemy outpost, at the following location . Open it, take all but one item, manually save the game, and then reload the save. The orange container will be restocked again, with potential ultra rare weapons, armor, and resources. Repeat this exploit as many times as desired. Just make sure to always leave one item in the container so it respawns more items. It is highly recommended to create a save before starting this exploit, just in case you accidentally take all the items from the container.
Infinite XP
Complete the “A Better Beginning” mission on EOS to unlock the “Meet The Resistance” mission on Voeld. Complete that mission, then the “On The Frontlines” mission, and finally the “Stage A Rescue” mission to be directed to speak to Buxil on planet Voeld to start the “Remove The Heart” mission. Wear the Deep Space Exploration Suit since it gives a 25% XP bonus. During that mission, reach the Kett base. Kill all the enemies at the base, then complete the optional objective of destroying all three Defense Matrix devices by scanning and sabotaging them. Then, run back the way you came to enter the base, past the first crates at the top of the ramp leading up from the bridge to the Kett base. Run forward towards the next set of crates to hear an explosion in the distance, see the “Defense matrix component destroyed” notification, and get another 530 XP. Run back to the same crates, then run forward to the same area to get the notification again and another 530 XP. Two other methods to do this even quicker is by standing on the inside of the large rock (between the rock and rock wall) next to the crates and either boosting forward and then backwards or simply running circles around the large rock to get 530 XP each time. Repeat this as many times as desired to get 530 XP every 3 to 4 seconds while wearing the Deep Space Exploration Suit. You also do not need to wait for the notification to appear since you get the XP as soon as you get closes enough to the mounds of snow. When your life support runs low, just run inside one of the structures to restore it. Note: This exploit was performed on Version 1.04 of the game. It will eventually get patched. To avoid not being able to use this exploit, either do not install new patches before using it or delete the patches. You can avoid patches being installed by disconnecting from the internet until you are ready for the game to install new patches.
Easy rare and ultra rare items
Once you get close to a container, the game locks the specific items you will get from it. However, if you save the game a sufficient distance away from the container, the loot inside will still be random. Thus, save the game a decent distance from a container, then open it. If you do not want the items in the container, reload the saved game and keep trying until you get some desired rare or ultra rare items.
N7 armor
Once you are on the Tempest spaceship, go to the Research and Development terminal next to Liam to learn and craft weapons and armor. The iconic N7 armor from the original trilogy can be found under the Milky Way galaxy tab and requires a total of 250 Milky Way research points to unlock the entire set. The chest piece costs 100 points and the other three pieces cost 50 each. The N7 armor is also upgradeable for additional research points. The N7 chest piece increases shields by 10%, biotic power damage by 8%, and biotic recharge speed by 15% after fully upgraded. The N7 arms, legs, and helmet have the same bonuses and provide 7% increased shields and biotic power damage after a full upgrade. Wearing the complete and fully upgraded set provide 31% increased shields, 29% biotic power damage, and 15% recharge speed.
Pathfinder helmet and Platinum Nomad skin
To get the Platinum Nomad skin, simply sign up on the Andromeda Initiative website . To get the Pathfinder helmet, login to your Andromeda Initiative account, sign up for the newsletter, and watch all six training videos. The videos cannot be skipped or even closed shortly after they begin. In order to qualify for the reward, each video needs to be entirely viewed. The Andromeda Initiative videos help explain the backstory of the game. Once you have viewed all six videos, both the Pathfinder helmet and Platinum Nomad skin will be unlocked. To obtain the items in-game, progress through the story until you have reached the Tempest. All rewards can be claimed from the computer inside the Pathfinder’s quarters on the Tempest. After obtaining the items, the Pathfinder helmet can immediately be used. To use the Platinum Nomad skin, you first need to unlock the Nomad rover through the mission on EOS. You can then change the Nomad skin using any forward station.
Increase inventory capacity
You can unlock extra inventory space shortly after reaching EOS (first planet). After colonizing the planet and choosing between the science or military outpost, you are introduced to the AVP system on the Nexus. You will get AVP points for completing objectives, such as additional tasks and Heleus missions. These can be spent to release additional Cryo pods and earn bonuses. Once you have the ability to waken extra members of the Nexus crew, you can unlock a perk to increase your item limit and carrying capacity. Navigate to the Commerce Pods section of the menu (you are automatically introduced to the menu through story progression), and select “Trade Capacity” to find it.
Reset skill points
On the Tempest spaceship, go down the ladder to the med bay. After talking to the doctor, look for a large machine in the corner of the room with a human skeleton on it. Interact with the machine to respec your character. The first reset costs 20 credits, the second costs 520 credits, and it gets gradually more expensive for each additional one. During open world travel, you can quickly return to the Tempest while driving the Nomand vehicle. Hold Triangle to be teleported back to the spaceship.
Secret Remnant VI skill
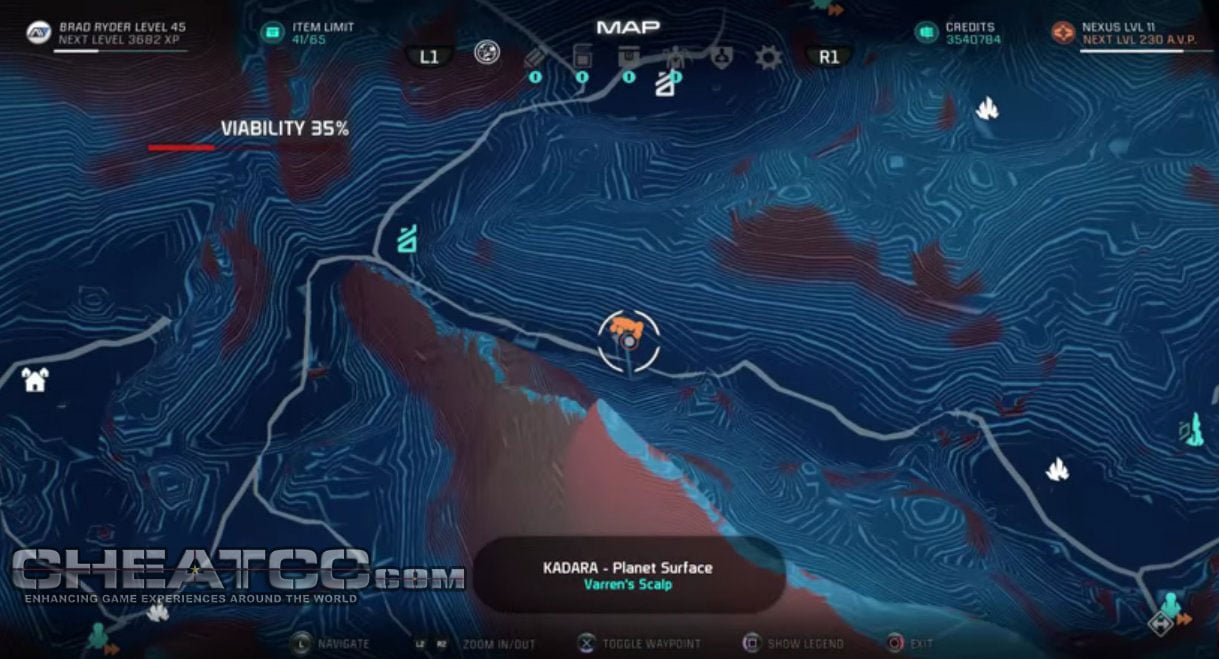
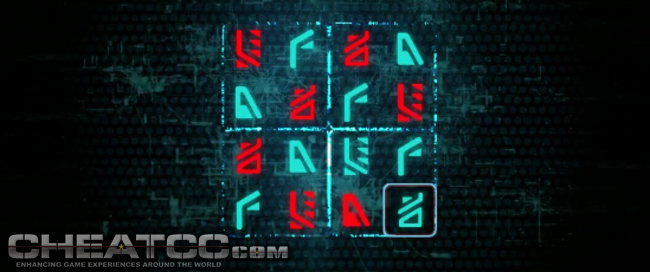
To unlock the secret Remnant VI skill in the Tech tree, you must complete a special side quest given by Peebee. The skill summons Zap, similar to how engineers can summon turrets, but the friendly Remnant drone actually moves around in combat, helping Ryder and teammates. First, complete the Vault on EOS, recruit Peebee into the squad, and talk to her aboard the Tempest. Peebee lives inside one of the escape pods next to the Tempest bridge. After talking to Peebee, you will get an e-mail titled “Rem-Tech” from her. The e-mail tasks you with recovering some Remnant technology from a site on planet Voeld. The quest marker leads to a monolith site where you need to defeat some Remnant Observers and Breachers. Once the enemies have been defeated, you must solve a Remnant Glyph puzzle. The following image shows the puzzle solution. After solving the puzzle, the Rem-Tech will be added to your inventory. Take it back to Peebee on the Tempest, and she will ask you to meet her in her apartment on the Nexus. Travel there to unlock the Remnant VI skill in the Tech tree. The Remnant VI skill has the following upgrades available as more skill points are assigned into the tree:
- Rank 2: 15% increased health
- Rank 3: 15% increased beam damage
- Rank 4: 40% increased health regen or 30% health regen delay reduction
- Rank 5: 30% increased beam damage or 100% increased health
- Rank 6: Detonating missiles that inflict 90 damage or improved beam for added shield damage
New Game+ mode
Successfully complete the main story and entire Priority Ops quest chain to unlock the “New Game+” option. This mode allows all skill points, learned powers, non-mission items, research data, and credits, as well as most character stats, to carry over to a second playthrough with an increased difficulty. You can customize your character and go through the custom character creator for history and training selection. However, mission progression, cryo pod perks, codex entries, and narrative choices reset. You will still retain your old save game files as long as you do not overwrite them, allowing you to go back to your first playthrough.
Easy Remnant Glyph puzzles
Remnant Glyph puzzles are basically a Sudoku puzzle with glyphs instead of numbers. Use the following basic rules to make solving the puzzles more easily:
- There must be a glyph inside every box.
- A row cannot have more than one type of glyph.
- A column cannot have more than one type of glyph.
- There cannot be a repeat of a glyph in a highlighted shape.
To solve Remnant Glyph puzzles, first fill in the “?” marks using your scanner and following the yellow power conduits to the nearby glyphs. Then, check that a column, row, or block has three glyphs filled in. After filling in the rest, look for another row, column, or block with three glyphs and move to it. Finally, confirm the puzzle looks correct and try decrypting it.
To very easily solve Remnant Glyph puzzles, use an online Sudoku puzzle solver. Simply assign a number to a glyph. For example, assign Shape-A to 1, Shape-B to 2, Shape-C to 3, and so on. Then, replicate and insert the glyphs as numbers into the online Sudoku solver. Once you have the solution, replicate and insert the numbers as glyphs into the Remnant puzzle. Note: This only works with Remnant Glyph puzzles that are in perfect 4×4 design as the Sudoku.
All Glyph puzzle solutions and locations
There are 20 Remnant Glyph puzzles in the game. Solve all 20 puzzles in a single playthrough to get the “Cryptographer” achievement. The video guide shows them in chronological story order. 6 out of 20 puzzles are missable because they are inside Remnant Vaults that cannot be revisited after completing them, or in quest areas you cannot return to. The missable ones are marked in the overview below. Most of them are located at Alien Monoliths or inside Remnant Vaults. Each vault contains at least one missable puzzle. If you miss a puzzle, you cannot get the “Cryptographer” achievement during that playthrough. The Remnant puzzles are similar to Sudoku. You first must locate hidden glyphs, which are always in close proximity to the puzzle. Use your scanner to follow the yellow cables from the remnant console to the glyphs and scan them. Then, decrypt the Remnant code by assigning the glyphs to a grid. No row or column can include repeats of the same glyph (only one glyph of each type per line). The same rule applies to each quadrant block (usually four quadrants divided by glowing lines). You cannot have two of the same glyphs in one quadrant. Start with the lines or blocks that are only missing one glyph. This will immediately give you the last glyph for that line (whichever one is not in the line yet). Next, move to the lines that are missing two glyphs. Piece by piece you will get closer to the correct combination. You can also use Remnant Decryption Keys (occasionally found inside chests) to immediately solve the puzzle.
Timeline (sorted by planets and quests)
EOS
- 1. Main Mission: A Better Beginning – 0:05
- 2. Main Mission: A Better Beginning (Missable) – 1:14
- 3. Free Roam/Additional Task: Data Trail – 3:40
- 4. Free Roam/Additional Task: The Ghost of Promise – 5:38
Havarl
Note: You can choose to go to Havarl or Voeld first. It does not matter which planet you go to first.
- 5. Main Mission: Helping Havarl’s Scientists – 7:01
- 6. Heleus Assignment: A Dying Planet (Missable) – 7:40
- 7. Free Roam – 9:04
Voeld
- 8. Allies and Relationships Quest: Peebee Secret Project – 10:51
- 9. Restoring A World – 11:17
- 10. Restoring A World – 12:10
- 11. Restoring A World – 13:14
- 12. Restoring A World (Missable) – 14:36
Kadara
- 13. Heleus Assignment: Healing Kadara’s Heart – 15:07
- 14. Heleus Assignment: Healing Kadara’s Heart (Missable) – 15:56
H-047C
- 15. Heleus Assignment: The Remnant Tiller – 16:37
Elaaden
- 16. Heleus Assignment: Taming A Desert – 17:12
- 17. Heleus Assignment: Taming A Desert (Missable) – 17:58
- 18. Heleus Assignment: Investigate The Remnant Tiller – 18:38
- 19. Free Roam/Additional Task: Cache Flow – 19:50
Khi Tasira
- 20. Main Mission: The Journey To Meridian (Missable) – 20:53
Fusion mods
Successfully complete the indicated task to get the corresponding fusion mod. Fusion mods are similar to weapon mods — they can be equipped and unequipped from the loadout interface at the start of a mission or any forward stations.
Mod of Shielding: Activate the EOS Vault to get the mod. It gives 50% increased shields but reduces health by 50%.
Mod of Robotics: Activate the Havarl Vault to get the mod. It gives 25% Tech construct health and damage but reduces shields by 50%.
Mod of Adrenaline: It is found inside a secret container on Havarl. To get the container, successfully complete the “A Dying Planet” mission, read Addison’s e-mail, and find the Remnant console located on the map. Solve this puzzle to be taken to a gravity well that leads to a small room with the mod inside it. It recharges all active powers after a kill, but it reduces power recharge speed by 50%.
Mod of Resistance: Activate the Voeld Vault to get the mod. It gives +20 damage resistance but reduces health by 50 on Evade.
Mod of Rapid Deployment: Activate the Kadara Vault to get the mod. It gives 50% increased power recharge speeds but reduces weapon damage by 30%.
Mod of Rupture: Activate the Elaaden Vault to get the mod. It gives 25% increased weapon headshot/weakpoint damage but reduces weapon clip size by 70%.
Mod of Biotic Mastery: Defeat the EOS Architect to get the mod. It gives 30% increased biotic power damage but reduces weapon, melee, tech, and combat power damage by 20%.
Mod of Hovering: Defeat the Voeld Architect to get the mod. It gives 100% increased hover duration but reduces weapon damage by 30%.
Mod of Tech Mastery: Defeat the Elaaden Architect to get the mod. It gives 30% increased tech power damage but reduces melee, weapon, biotic, and combat damage by 20%.
Mod of Battering: Defeat the Kadara Architect to get the mod. It gives 30% increased melee damage but reduces weapon, tech, biotic, and combat power by 20%.
Mod of Health: Successfully complete “The Journey To Meridian” mission and defeat Archon’s Sword to get the mod. It gives 100% increased health but reduces shields by 50%.
Tempest trophy locations
Successfully complete the indicated task to find or purchase the indicated Tempest trophy. The collected Tempest trophies are displayed inside a case in the Pathfinder’s Quarters, similar to the weapon showcase in Alec Ryder’s room on the Hyperion.
Alliance Dreadnaught: It is found in the Kadara slums above the medical clinic.
Angaran Shuttle: Successfully complete the “A Trail Of Hope” mission, then collect it from the Docking Bay in Aya.
Athabasca Class Freighter: After establishing an embassy in Aya, it can be found near a sink inside the embassy.
Citadel: Successfully complete “The Journey To Meridian” mission to unlock it for purchase from the General Merchant on the Nexus.
Destiny: Visit Elaaden to find it in the bar in New Tuchanka.
Hyperion: It is found in a building inside EOS Outpost after establishing a settlement on the planet.
Kett Fighter: Visit Kadara port to find it in Sloane’s Chambers, near the prison.
Kett Flagship: Successfully complete “The Journey To Meridian” mission to unlock it for purchase from the General Merchant on the Nexus.
Kett Shuttle: Purchase from the General Merchant at the Wind Farm in Kadara.
MWS Shuttle: Establish a settlement on Diteaon (Kadara outpost), then collect it from a nearby building.
MWS Fighter: It is found inside Spender’s Apartment while doing the “Krogan Betrayal” mission on the Nexus.
MWS Transport: It is found in a side room from the outpost on Kadara after establishing a settlement.
Nexus: Purchase it from the General Merchant on the Nexus.
Nomad: Establish a settlement on EOS to unlock it for purchase from the General Merchant on the Nexus.
Remnant Derelict: It is found on Alec Ryder’s desk during the Epilogue.
Remnant Fighter: Purchase from the General Merchant on Aya.
Tempest: Successfully complete the “Movie Night” quest chain on the Tempest.
Turian Frigate: Establish settlement on Voeld, then collect it from a building in Taeve Uni at the Voeld outpost.
Romancing characters
Perform the following tasks to romance and eventually have sex with the indicated character. You meet these characters on the Tempest spaceship after going to EOS, unless specified otherwise.
Scott Ryder
Avela Kjar: Avela is an Angaran historian whom you meet when you first visit Aya. Visit Evfra, then go down to the dock to find Avela. She will offer Scott several different quests, completing each one will unlock different layers of the relationship. To start the romance, select the “To meet people like you” dialogue option when first talking to her on the docks. The second opportunity to advance the relationship comes during the “Recovering The Past” mission. Go to the museum on Aya and talk to Avela. The third advance in the relationship is during the “Forgotten History” mission. You will again need to go to the museum on Aya and talk with her. While talking to her, select all the following dialogue choices: “I did it for you”, “You got it”, “Not everything, thanks to you” (possible after returning the instrument), and “Hope it helps my chances” (possible after returning the figurine). If you fail to select any of these dialogue choices, it will not advance the relationship further and the romance will fail. If successful, the next chance to romance her is during the “Journey To Meridian” mission, where you will get an e-mail from her. After reading the e-mail, go to the waterfall on Aya, speak to Avela, and choose the option to go for a second kiss to trigger the final romance scene.
Cora Harper: She is found in a room after going down the ladder. Ask her about military training and complete her Alliance mission. Select emotional choices most of the times and compliment her as much as possible. This romance culminates in exclusivity. Select the “We’ll be good together.” dialogue option when she is in the Tempest: Bio Lab. Find her on the Tempest after completing the previous dialogue and select the “Oh? What about now?” option. After leaving the Tempest at least once, select the “You’re a romantic.” dialogue option during the “Reaction To EOS Settlement” round in Tempest: Bio Lab. After completing Mission 3 and choosing the previous dialogue option, select the “You and I can handle anything.” dialogue before Mission 5. Kiss her at EOS: Prodromos after flirting with her at least three times. Finally, reach the climax of the romance in Tempest: Bio Lab before Mission 7.
Gil Brody (homosexual): Gil is found in the Cargo Bay. This romance culminates in a unique friendship that unlocks unique content and an additional option for exclusivity. Select the “I’ll do more than show up.” dialogue option when you first meet him at Tempest: Engineering to begin a relationship with him. After visiting Aya, select the “And now what?” dialogue option at Tempest: Engineering. Once you have completed the “A Trail Of Hope” mission, select the “Slow down, big guy.” option at Tempest: Engineering. Once you have completed the “Hunting The Archon” mission, read the e-mail from Gil and meet him on Prodromos to commit. Then, return to the Pathfinder’s Quarters in Tempest: Engineering to culminate your romance with Gil.
Lexi T’Perro: Use logical and emotional responses. Lexi is found by going down the ladder and to the Medical Bay. Select “You’re full of surprises” to begin a relationship with Lexi.
Sara Ryder
Jaal: Once Jaal is aboard the Tempest, after the “A Trail Of Hope” mission, regularly talk to him after missions. Initially, there will not be a lot of dialogue choices and no way to flirt with him, but after freeing Moshae on Voeld, the first romantic dialogue will appear when talking to him on the Tempest. You can tell Jaal you are interested in him and like having him around, and he will respond in kind. To further progress the relationship, you need to do his loyalty mission. Jaal’s loyalty mission, “Friend Or Foe”, requires you to travel to multiple planets in an encounter against another Angaran named Akksul. Eventually, you will have to use the vidcon terminal in the meeting room of the Tempest. While there, you can tell Jaal that Akksul is jealous of him to further advance the romance. Once you have completed the “Hunting The Archon” mission, you will get an e-mail from Jaal and he will request to speak to Sara. Go to his quarters and talk to him. He will tell you that he needs to rescue three Angarans from Akksul, which unlocks another loyalty mission, “Flesh And Blood”. This mission will take you to Havarl. At the end of the mission, there will be a standoff and you will have a gun to Akksul’s head while he will have one targeted at Jaal’s head. You will have a small amount of time to shoot Akksul, but to further advance the romance, do not shoot. Akksul will shoot the gun and miss Jaal, and he will survive the encounter. Since Jaal wanted you to make this choice, you will now have fully gained his trust and unlock the final portion of Jaal’s romance. Once you are back on the Tempest, you will get an e-mail from Jaal who would like Sara to meet his family. Go to the planet and meet at Jaal’s mother’s house. Hug his mother when the timed opportunity arrives to improve your relationship with Jaal. Afterwards, he will take you to his room where Sara and Jaal will confess their love for each other. Since you have now committed to Jaal, you cannot romance other squad mates. After completing the “Journey To Meridian” mission, talk to Jaal at the Tech Lab on the Tempest. Select the “I adore you” dialogue option to culminate the romance at Aya Hub, near the waterfall.
Liam Kosta: He is found in one of the rooms near the Cargo Bay, trying to push a couch. Talk to him to begin a relationship with him. After moving the couch, you will both sit down and talk. During this conversation, flirt with him and select the “Company like this” dialogue option once it appears. You can continue to talk to him further and express interest, but Liam will mention you both do not know each other very well and the romance possibilities will end at this point. Whenever you complete a mission and return to the Tempest, talk to Liam and try to flirt again in order to further advance the romance. Once Jaal joins the team on the Tempest, you can visit Liam’s quarters to see them both bonding with each other. There is no romance option available during this conversation, but it is required to unlock more choices in future talks. After completing the mission on Voeld to free Angaran prisoners, you can talk to Liam inside his storage room quarters, where he is doing pushups. Liam will seem upset during this conversation, but after Sara calms him down, he will talk more about his past and his passion for cars. Eventually, Liam will reveal that his family is sending him his old car, which was a relic from the 21st century that he built with his family. While the car may never reach him in time, the thought of it arriving for him keeps him happy. At this point, the “I need someone, and so do you” dialogue option will appear, which will lead to a timed action prompt. If you press the right button at this point, the romance scene will begin. In order to become exclusive partners, you will need to do Liam’s loyalty mission and commit to him once he asks you to meet him at Prodromos on EOS.
Suvi Anwar (lesbian): She can be romanced fairly easily since she does not have any loyalty missions. To begin the relationship, talk to Suvi when you reach the bridge of the Tempest. During the conversation, the dialogue wheel will eventually lead to the first flirting choice; select the “I could show you.” option. This dialogue selection marks the first trigger of the romance while the second one takes place after creating the Prodromos outpost on EOS. Return to the Tempest’s bridge, and talk to Suvi again. Select the new “We should chat on this more.” flirting option. After completing the “A Trail Of Hope” mission, talk to her again and select the “You’re not alone” dialogue option to advance the relationship. After completing the “Hunting The Archon” mission, you can commit to an exclusive relationship with Suvi. This will lock out the chance of a relationship with any other squad member except for characters like Keri T’Vessa that allow a casual relationship. To reach the full romance with her, complete “The Journey To Meridian” mission, then read the e-mail Suvi sends you. After reading the e-mail, find Suvi in the Tech Lab on the Tempest, talk to her, and choose the narrative action prompt to trigger the final romance scene.
Scott and Sara Ryder
Keri T’Vessa (bisexual): Similar to Mass Effect 3 , a reporter in Mass Effect: Andromeda can be romanced. Keri T’Vessa, the independent videomaker, can be romanced by both Scott and Sara Ryder even if they are already in a relationship with a squad mate. She is one of the few side characters in the game who can be romanced on the side. Romancing Keri is a pretty easy since there are not any loyalty missions or fetch quests to do and you just have to follow her quest line, “Path Of A Hero”. The quest begins on the Nexus after first talking to Director Tann and Addison. You will get an e-mail to talk to her, which will start the “Path Of A Hero” quest. When you talk to her, select the flirt option that appears. After each priority mission, you can go back to the Nexus’ Common Area and talk to Keri, flirt with her, and further advance the relationship whenever the opportunity appears. You must complete the “A Better Beginning” and “A Trail Of Hope” missions before you can advance the relationship further. Talk to her after completing those two Priority Ops, then complete “The Journey To Meridian” mission. Flirt with her again to get the option to have sexual relations with her.
Peebee (bisexual): Romancing Peebee takes some time, but it is fairly easy if you regularly talk and flirt with her and also complete her loyalty mission. She also has different types of romance options that culminate with different sex scenes. Talk to her in one of the escape pods next to the flight deck on the Tempest. Once you start talking to her, she will begin flirting with you. During the conversation, select the “You crave excitement, huh?” dialogue option to start flirting with her. Talk to her again for a “Flirting” option to appear. Once Jaal is aboard the Tempest, you will get an e-mail from Peebee saying she has a special mission for Ryder. Talk to her again to get another option to flirt. You will eventually get another e-mail from her with a request to do a mission. Peebee will ask Ryder to get her some Remnant Tech from Voeld. After doing that, talk to her again and select the “It’s true” dialogue option when she tells you they are nosy. Eventually, she will tell you to come back later when her secret project is finished. After that, you will need to visit her apartment on Nexus where she has used the Remnant Tech to build a drone. Kalinda will then barge in and start arguing with Peebee. To advance the relationship, stand up for Peebee during the argument and then once Kalinda leaves, tell Peebee you care about her. After visiting Aya with Moshae and then returning to the Tempest, you will get another e-mail from Peebee to meet her at a museum. Meet her at the museum, finish the conversation, and suggest to her that everyone needs to let loose in a while. Later when back on the Nexus, visit her living area and continue talking to her, eventually leading to an important point in the romance. If you select the “Strings attached” option, you will slowly start to develop the relationship over the course of the rest of the game. After committing to her and completing “The Journey To Meridian” mission, go to the Pathfinder’s Quarters and interact with the gift Peebee left to reach the climax of the romance.
Reyes Vidal (bisexual): This romance culminates in a unique friendship that unlocks unique content and an additional option for exclusivity. These are all the instances when flirt options appear to progress the relationship: No Sloane’s Deal at Hunting The Archon, after interrogating Vehn at Tartarus Bar, during the murder in Kadara Port, during Divided Loyalties at Roekaar Hideout, during Divided Loyalties while leaving the hideout, while asking about Reyes’ code name, during Precious Cargo at Kralla’s Song, during Precious Cargo at Warehouse, during Precious Cargo – Wrap-Up, during Night Out – Vidcon Call, during Night Out while Entering Party, during Night Out while speaking to Keema Dohrgun, and during Night Out – Stockroom.
Vetra Nyx (bisexual): Once you return to the Tempest after establishing the settlement in Prodromos, talk to Vetra inside the Armory where she is on a call with her sister. During the conversation, select the “You’re intense. I like it.” dialogue option to flirt and advance the relationship, even though Vetra quickly ends the conversation. If you talk to her again after this exchange and ask her about a special someone in her life, she will talk about someone special in their life. Respond by selecting the “Hopefully soon.” dialogue option. After completing the Kett facility mission on Voeld, “A Trail Of Hope”, talk to Vetra to advance the relationship. She will bring up her and Ryder’s family during the conversation and eventually you will get another option to flirt by saying “You’re too tough for that.” She will respond by expressing an interest in you. To ensure the relationship with Vetra continues to improve, keep her in active squad during missions, read and acknowledge her e-mails, and flirt during every conversation. After completing the “Hunting The Archon” mission, you will get the option again to flirt with her during the conversation by suggesting that they should embark on an adventure together. Soon afterwards, you will get an e-mail from her, inviting Ryder to Sulfur Springs on Kadara. There will be a race between Ryder and Vetra to the top of the cliff. Ryder gets to choose their reward for winning, but while the option to use the jet pack is present to cheat and win the race, let Vetra win. Once you are both on top of the cliff, Vetra will ask if Ryder’s feelings for her are real or not. In order to advance the romance, answer “Yes” and a timed action prompt will appear to kiss her. You will then be committed to Vetra Nyx and cannot romance other squad mates. After completing “The Journey To Meridian” mission, talk to Vetra on the Tempest to reach the climax of the romance.
Key decisions and consequences
Throughout the game, you are forced to make key decisions. Some of the key decisions have immediate consequences while others have an effect on the timeline at a later point in the game. The following is a list of key decisions and consequences in the game. Note: This information contains many potential spoilers.
Priority Ops
Prologue
- Key Decision: Explored Habitat 7
- Path: Make a detailed exploration of the surface
- Consequences: At the rendezvous point on Habitat 7, Alec Ryder praises Pathfinder’s ethics
Hunting The Archon
- Key Decision: Accept Sloane Kelly’s Deal
- Path: Accept Sloane Kelly’s deal and its consequences
- Consequences: Sloane and Reyes have different dialogues referring to this choice and Vehn Terev is executed
- Key Decision: Who Did You Save from the Archon’s Flagship?
- Path: Save Krogan Scouts
- Consequences: Krogan Scouts help you during the main mission
A Trail Of Hope
- Key Decision: Decision Regarding the Exaltation Facility
- Path: Destroy the facility, Cardinal, and Angara inside
- Consequences: No consequences
- Path: Let the facility remain and spare the Cardinal
- Consequences: You get help from the Angaran Resistance during the final mission on Meridian
Meridian – The Way Home
- Key Decision: Using the “Kill Code” from the Primus
- Path: Used the code
- Consequences: Kett forces are significantly weakened during the Meridian assault, and other possible negative consequences
- Path: Did not use the code but did receive it
- Consequences: No consequences
- Key Decision: Captain Dunn’s Survival
- Path: Captain Dunn Dies
- Consequences: Captain Dunn is killed but saves her crew
- Path: Captain Dunn Survives
- Consequences: Captain Dunn survives the Hyperion crash landing
Note: This path requires that you complete Turian Ark: Lost But Not Forgotten with Avitus convinced to become the Turian Pathfinder. You also need to complete Cora’s Loyalty Mission. You should then have three Pathfinders by the final mission.
Epilogue
- Key Decision: Whom Did You Back as Ambassador to the Nexus?
- Path: Moshae Sjefa, August Bradly, Director Tann, Director Addison, or Efvra
- Consequences: No consequences
Allies and Romance
Potential Romance Partners
- Reyes Vidal – N/A
- Gil Brodie – Can only be romanced by Scott
- Liam Kosta – Can only be romanced by Sara
- Suvi Anwar – Can only be romanced by Sara
- Cora Harper – Can only be romanced by Scott
- Jail Amar Dara – Can only be romanced by Sara
- Peebee – Can be romanced by either Scott or Sara
- Vetra Nyx – Can be romanced by either Scott or Sara
- Keri T’Vessa – Can be romanced by either Scott or Sara
If you choose Keri T’Vessa, you will see different dialogues in her interviews for Task: Path Of A Hero.
Liam Loyalty Mission
- Key Decision: Liam Confines Verand at the end
- Path: No
- Consequences: No consequences
- Path: Yes
- Consequences: Can possibly cut-off relationship
Cora Loyalty Mission
- Key Decision: Condition of Sarissa and the Asari Pathfinder
- Path: Sarissa’s Secret Kept
- Consequences: Sarissa appears in the final mission as the Asari Pathfinder
- Path: Sarissa Disgraced and Replaced by Vederia as Pathfinder
- Consequences: Vederia takes her place
- Path: Sarissa Disgraced but Stayed as Pathfinder
- Consequences: Slightly altered dialogues
Jaal Loyalty Mission
- Key Decision: Decision Regarding the Extremist Faction
- Path: Killed Akksul
- Consequences: Jaal becomes upset, Roekaar hostiles on UNCs increase, and Jaal’s family aid Ryder
- Path: Akksul Shoots Jaal
- Consequences: Roekaar hostiles on UNCs decrease and Jaal’s family aid Ryder
Peebee Loyalty Mission
- Key Decision: Fate of the Mysterious Device
- Path: Choose the Mysterious Device Over Kalinda
- Consequences: No consequences
- Path: The Mysterious Device Lost Forever and Peebee Saves Kalinda
- Consequences: Kalinda sends the Remnant Tech and appears in the final mission
Drack Loyalty Mission
- Key Decision: Aroane’s Status
- Path: Alive
- Consequences: Vorn appears in the final mission
- Path: Allowed to Fall
- Consequences: Vorn appears in the final mission
Gil Loyalty Mission
- Key Decision: Cheated in Poker
- Path: Yes
- Consequences: Altered dialogue
- Path: No
- Consequences: Altered dialogue
- Key Decision: Co-Father Jill’s Baby with Gil
- Path: Decide that Gil Should Father a Child with Jill
- Consequences: Altered dialogue
- Path: Decide that Gil Should Not Father a Child with Jill
- Consequences: Altered dialogue
Kallo
- Key Decision: Kallo or Gil Brodie
- Path: Preferred Kallo
- Consequences: No consequences
- Path: Preferred Gil Brodie
- Consequences: No consequences
B-Stories
Krogan Exodus
- Key Decision: Spender’s Status
- Path: Exiled
- Consequences: No consequences
- Path: Demoted
- Consequences: No consequences
Salarian Ark
- Key Decision: Dr. Aden Arrested
- Path: Yes
- Consequences: Saelen helps during the final mission
- Path: No
- Consequences: No consequences
Turian Ark
- Key Decision: Turian Pathfinder is Avitus Rix or Not
- Path: Yes
- Consequences: Avitus helps Ryder and contributes to Captain Dunn’s survival
- Path: No
- Consequences: Avitus becomes a drunk mercenary on Kadara
Ryder Family
- Key Decision: Memory Fragments
- Path: Quest not Completed
- Consequences: No consequences
- Path: Found All Memory Triggers
- Consequences: Ryder recalls Alec’s memory and figures out the Scourge
Hubs and UNCS-Related
Nexus
- Key Decision: Status of Protesting Families
- Path: Ignored the quest or Forcefully Removed
- Consequences: No consequences
- Path: Arrested in Order to Restore Peace
- Consequences: No consequences
- Path: Agreed to Protestors’ Terms to End the Crisis
- Consequences: No consequences
- Key Decision: Status of Keri T’Vessa Documentary
- Path: Ignored the Quest or Interviewed Director Tann
- Consequences: Tann makes an appearance in the documentary
- Path: Help Keri Produce a Piece
- Consequences: No consequences
- Path: Help Keri to Focus on the Achievements of the Initiative
- Consequences: No consequences
- Path: Keri Quits her Documentary
- Consequences: Keri leaves the Nexus
- Key Decision: Status of Nexus Saboteur Path: Turned to the Nexus Leadership
- Consequences: No consequences
- Path: Exiled to Kadara Port
- Consequences: No consequences
- Path: No Investigation
- Consequences: No consequences
- Key Decision: Make Nexus’s Involvement with the Three Sabers Mercenary Crew Public
- Path: Yes
- Consequences: News can be found over the Heleus News Service
- Path: No
- Consequences: No consequences
- Key Decision: Nilken’s Status in the Murder Plot
- Path: Exiled
- Consequences: Find Nilken on Kadara later down the road to catch up on him and his family
- Path: Released
- Consequences: Find Nilken in Hyperion before he is placed in statis
- Key Decision: Knight’s Status
- Path: Talked in Peacefully
- Consequences: Knight’s son, Alain, joins the Nexus scientists
- Path: Killed
- Consequences: No consequences
Kadara
- Key Decision: Status of the Oblivion Formula
- Path: Arenna Farenth
- Consequences: Continues to be sold on Kadara, Ryota is angry with the Pathfinder, and does not become a doctor
- Path: Dr. Nakamoto
- Consequences: No longer sold and Ryota becomes the doctor
- Path: Never Found the Formula
- Consequences: No consequences
- Key Decision: Mystery behind the Murders in Kadara Port
- Path: Yes
- Consequences: Both Ryder and Reyes Vidal take out the Roekaar cell
- Path: No
- Consequences: The murders continue to occur
- Key Decision: Faction on Top
- Path: The Outcasts
- Consequences: Reyes Vidal escapes and The Collective loses dominance on Kadara
- Path: The Collective
- Consequences: The Collective becomes the new power in Kadara Port after Sloane Kelly is killed and uses Keema Dohrgunon the front
- Path: Did not Show Any Interest
- Consequences: Sloane remains in charge and the tension between the factions remain untouched
- Path: Do Nothing
- Consequences: Either Sloane shows up during the final mission, or Reyes if he is in charge of the Kadara Port
Aya
- Key Decision: Ryder Tells Angaran the Truth about the Kett
- Path: Yes
- Consequences: No consequences
- Path: No
- Consequences: No consequences
- Key Decision: Romance Avela Kjar
- Path: Yes
- Consequences: Post-ending dialogue on Aya
- Path: No
- Consequences: No consequences
- Key Decision: Found the Ancient Aya Vault Plans
- Path: Yes
- Consequences: No consequences
- Path: No
- Consequences: No consequences
EOS
- Key Decision: Create a Research/Science Outpost or Defense/Military Outpost
- Path: Science
- Consequences: A slight chance into the deployment scene from Addison
- Path: Military
- Consequences: A Prodromos security team appears to help during the final mission
Elaaden
- Key Decision: Gave the Remnant Drive Core to the Krogan Colony
- Path: Yes
- Consequences: The Krogan put down an outpost and allow the MWS to join their settlement
- Path: No
- Consequences: Receive 1,000 Remnant research data and 2,000 credits. No encounter with the Architect and no Elaaden outpost.
- Key Decision: Status of Secret Water Source on Elaaden
- Path: Allowed Annea the Water Trader to Continue her Business
- Consequences: Receive regular bribes, help during the final mission, and free stuff from her crate
- Path: Yes, but Annea is Replaced with a Nexus Representative
- Consequences: Annea and her crew attack Ryder
- Path: Did not find the Water Source
- Consequences: No consequences
Voeld
- Key Decision: Tell Maarel About Her Brother’s Exaltation
- Path: Yes
- Consequences: Maarel leaves for Havarl
- Path: No
- Consequences: Maarel comes back home
- Path: Did not Attempt the Quest
- Consequences: No consequences
- Key Decision: Killed the Angaran AI
- Path: Yes
- Consequences: No consequences
- Path: No
- Consequences: The AI kills the Angaran hostages and Ryder keeps the AI
- Key Decision: Status of AI
- Path: Given to the Angara
- Consequences: You receive help from the Angara during the final mission with advanced calculations by AI
- Path: Moved to Nexus to work with SAM
- Consequences: No consequences
Bane Massani Easter Egg
Bane Massani is the son of Zaeed Massani from Mass Effect 2 and Mass Effect 3 . You will get an option to meet him in the east area of EOS once you complete the main mission on the planet and get rid of the radiation.
Liara T’Soni Easter Egg
Go to “Hyperion – Habitation Deck” on the Nexus and interact with the Archive System. Select “General logs”, “Asari archaeologist”, and “Dr. Liara T’Soni” to listen to audio logs from Liara T’Soni. She is an asari researcher who appeared in all previous Mass Effect games.
Plants vs. Zombies: Garden Warfare Easter Egg
On the Tempest spaceship, go down into the sleeping area next to the meeting room (Tempest – Deck 1) to find a Peashooter and Scientist toy on a bed.
Easy “Friendly Fire” achievement
Remnant VI is the secret missing tech skill. It is unlocked by completing the “Peebee: Secret Project” quest. The quest is unlocked during the “A Trail Of Hope” main mission. To track the quest, pause the game and select “Journal”, “Allies And Relationships”, “Peebee: Secret Project”. The first step is to read her e-mail aboard the Tempest. You must obtain a piece of tech from the Voeld planet, and then meet with Peebee in her room on the Nexus space station to unlock the Remnant VI. You must then attack the following six Remnant enemies with the Remnant VI to get the “Friendly Fire” achievement:
- 1. Breacher
- 2. Observer
- 3. Assembler
- 4. Nullifier
- 5. Destroyer
- 6. Architect
You can view pictures of these enemies in the Codex under Andromeda species. With the exception of Architects, they are all found inside Remnant Vaults. They can all be found in the Remnant Vault on the Kadara planet. Architects are very rare Boss enemies. There are only four of them in the entire game, one per planet (EOS, Voeld, Kadara, Elaaden). They are tied to Heleus Assignment quests of their respective planet. For example, complete the Heleus Assignments on the Voeld planet until you can establish an outpost. You will then get the “Missing Science Crew” quest that has the Architect Boss at the end. Since there are only four Architects and a limited amount of Remnant enemies, this achievement is missable. Make sure to get the Remnant VI tech skill as soon as possible and use it against all Remnant enemies that you encounter.
Easy “Hang Time” achievement
This can only be done on the “H-047c” low gravity moon in the Remav star system. Since you are in low gravity, the Nomad will float in the air much longer. It is recommended to add the following three upgrades to the Nomad to make doing this much easier: “Improved Boost”, “Improved Suspension (4WD)”, and “Vertical Thrust Upgrade”. They can be bought at the Research and Development terminal on the Tempest. It is possible without them, but those upgrades definitely make it easier. Drive towards a high ledge at full speed and jump off it (press A). Do not use any of your nitrous boost yet. While in mid-air, pull back on the Left Analog-stick and quickly alternate between boost and jump. Repeatedly press X, A, X, A as quickly as possible to easily stay in the air for a long time. If you bought the recommended Nomad upgrades, you can stay in the air for over 50 seconds. It will be around 35 seconds without the upgrades.
Easy “Icebreaker” achievement
The Cryo Beam (Tech) skill is required to get the “Icebreaker” achievement. Use the Cryo Beam skill to freeze an enemy. Then, press A to jump and Y to perform a melee attack. The enemy has to die from this attack to get the achievement. Set the difficulty to Normal or higher or else enemies will die before freezing. You will know they are frozen when they fall to the ground, unable to move. Stop using the Cryo Beam just before the enemy’s health is depleted or else it will kill them.
Easy “Long-Distance Jump” achievement
There are many mountains on EOS, like around the landing zone of Planet: EOS (Heleus Cluster, Pytheas System). Jump down one of those mountains to the landing zone. Run towards the ledge to gain speed, jump off at the last moment, and perform a dash in mid-air. You do not have to land safely, as it is fine if the screen fades to black and you get teleported back up the mountain. Make sure to run towards the ledge and dash after jumping off. Also, hold [Jump] and do not just tap it because holding it gives a bigger jump boost. Jump down from any high platform or mountain to get the “Long-Distance Jump” achievement.
Easy “Pyrotechnics Expert” achievement
The Flamethrower (Tech) skill is required to get the “Pyrotechnics Expert” achievement. Lighting three enemies on fire with one continuous flamethrower attack works best with enemy dropships. Wait under a dropship and when the enemies jump out, immediately use the flamethrower on them. You encounter a lot of dropships throughout the game. This can be done on the very first dropship in “Chapter 1: Planetfall” (Habitat 7). Every drop ship has at least a few enemies jumping off it at the same time. Make sure to set the difficulty to Normal or higher or else the enemies will die before they start to burn. You can also do this where enemies are standing close together so you can hit them all before the flamethrower runs out.
Easy “Rough Landing” achievement
The Trip Mine (Combat), Pull (Biotics), and Throw (Biotics) skills are required to get the “Rough Landing” achievement. Place a trip mine, then use Pull to grab an enemy and Throw to toss him into the mine. When using Pull, you can walk around with the enemy and aim at the mine. Get close to the mine so it is easier to hit.
Easy “Vanguard Surprise” achievement
The Charge (Biotics) and Tactical Cloak (Tech) skills are required to get the “Vanguard Surprise” achievement. Equip both skills, activate Tactical Cloak, and immediately use Charge on a nearby enemy. Charge requires you to have nine skill points invested in Biotics or choose the Scrapper character class to get it for free. Tactical Cloak requires nine skill points invested in Tech or the Operative character class.
Achievements
Accomplish the indicated achievement to get the corresponding number of Gamerscore points:
- Fireworks (15 points): Perform 100 power combos.
- Terminator (15 points): Kill 2000 enemies.
- Death from Above (15 points): Kill 100 enemies while hovering. (Single-Player)
- Close Combat Specialist (15 points): Kill 100 enemies with melee attacks.
- With Our Powers Combined (15 points): Detonate 10 targets that were primed by a teammate. (Single-Player)
- Pinpoint Shot (15 points): Hit 250 enemy weak points while using a scope. (Single-Player)
- Medic! (15 points): Perform 25 revivals on teammates.
- Mastermind (10 points): Using constructs, kill 100 enemies.
- Icebreaker (10 points): Shatter a frozen enemy with a jump melee attack. (Single-Player)
- Fastball (10 points): Hit an enemy with a thrown enemy 25 times. (Single-Player)
- Rough Landing (10 points): Detonate a trip mine with a thrown enemy. (Single-Player)
- Friendly Fire (10 points): Direct your Remnant VI to attack each type of Remnant enemy. (Single-Player)
- Trapshooter (10 points): Hit 25 floating enemies with Concussive Shot, Lance, or Incinerate. (Single-Player)
- Sucker Punch (10 points): Use a melee attack to hit 25 floating enemies. (Single-Player)
- Pyrotechnics Expert (10 points): Light three enemies on fire with one continuous Flamethrower attack. (Single-Player)
- Long-Distance Jump (10 points): Travel at least 30m in a single jump. (Single-Player)
- Matchmaker (20 points): Complete romances with three different characters across all playthroughs.
- Vanguard Surprise (10 points): While cloaked, hit an enemy with a Charge attack. (Single-Player)
- Hang Time (10 points): Keep the Nomad airborne for 35 seconds.
- Unwavering (90 points): Complete an “Insanity” single-player game, or 5 “Gold” multiplayer extractions from any firebase.
- Veteran (30 points): Successfully complete a combined 25 strike team missions or APEX multiplayer mode extractions.
- APEX (10 points): Complete the multiplayer mode tutorial mission.
- Explorer (10 points): Complete a combined five strike team missions or APEX extractions in multiplayer mode.
- Mission Accomplished (30 points): Activate Meridian.
- Activation (20 points): Activate the Remnant city.
- Family Connections (20 points): Reboot the Pathfinder.
- Liberation (20 points): Free the salarian ark.
- Foothold (15 points): Establish an outpost.
- Exaltation (15 points): Destroy the exaltation facility or save the angara prisoners.
- First Steps (15 points): Meet the angara on Aya.
- Alliance (15 points): Ally with an outlaw faction.
- Pathfinder (15 points): Become the new Pathfinder.
- Initiated (15 points): Gain access to the Tempest.
- World-Shaper (15 points): Activate the first Remnant vault.
- Buccaneer (15 points): Recover the krogan colony ship.
- Building Bridges (15 points): Stop the Roekaar leader.
- United (15 points): Unite the outposts against a common threat.
- Helping Hand (15 points): Help Vetra’s sister.
- Signal Tracking (15 points): Find the source of the strange signal Peebee discovers.
- Role Model (15 points): Rescue the asari ark.
- Full Roster (15 points): In single-player mode, recruit all 6 squadmates.
- First Contact (10 points): Land on an alien planet.
- Peak Condition (30 points): Reach Level 40 in single-player mode or Level 20 in multiplayer mode.
- Kitted Out (30 points): Kill a foe with a Rank 5 weapon in a single-player game or equip a Rank 10 weapon in multiplayer.
- High Performance (30 points): Unlock Rank 6 for each single-player profile type, or obtain a Level 6 multiplayer bonus stat.
- Full Power (20 points): Evolve one tech, one combat, and one biotic power to Rank 6. (Single-Player)
- Almost There (20 points): Reach Level 25 in single-player mode or Level 15 in multiplayer mode.
- Teamwork (20 points): Create six strike teams or earn 25 assist medals in multiplayer mode.
- Top Talent (20 points): Promote a strike team to Level 20.
- Jack Of All Trades (10 points): Equip three different profile types.
- All Clear (90 points): Increase all discovered planets to 100% viability.
- Terraformer (15 points): Increase a discovered planet to 100% viability.
- Craftsmanship (10 points): Craft armor or a gun with 3 augments.
- Data Mining (10 points): Scan 100 different objects.
- Cryptographer (10 points): Complete 20 Remnant puzzles in a single playthrough.