
Fallout 76
Unique weapons
Successfully complete the indicated task to unlock the corresponding unique (legendary) weapon:
All Rise (Two-Handed Melee): Successfully complete the “Mayor For A Day” quest. To start this quest, go to the Watoga Municipal Center, and access the computer in the Mayor’s Office. The All Rise gives +10% HP and -90% Weight.
Ancient Blade (One-Handed Melee): Successfully complete the “Breach And Clear” event.
Anti-Scorched Training Pistol (10mm Automatic Pistol): Successfully complete the “Into The Fire” quest. To start this quest, go to the Charleston Fire Department, and join the Fire Breathers to begin. The Anti-Scorched Training Pistol gives +25% Damage to Scorched, -20% Damage to everything else.
Black Diamond (One-Handed Melee): Successfully complete the “Flavors Of Mayhem” quest. To start this quest, talk to Rose on the top floor at the Top Of The World ski resort in the center of the map. The Black Diamond gives +1 Strength.
Blade Of Bastet (One-Handed Melee): Successfully complete the “Forging A Legend” quest. To start this quest, join the Order Of Mysteries faction in Riverside Manor, near Charleston. Then, listen to the “Blade Of Bastet” holotape to begin. The Blade Of Bastet gives bonus weapon penetration.
Bunker Buster (Heavy Weapon, Explosive): Successfully complete the “One Of Us” quest. To start this quest, join the Enclave in Whitespring Resort. Get credentials to enter from the Abandoned Toxic Waste Dump in the Mire —- get the Senator’s holotape. The Bunker Buster gives +20% Damage.
Camden Wacker (One Handed Melee): Purchase it from the Prize Shop in Camden Park in the Ash Heap region.
Daisy Cutter (Heavy Weapon, Explosive): Successfully complete the “Organic Panic” quest.
Grant’s Saber (One Handed Melee): Successfully complete the “Forging A Legend” quest. To start this quest, join the Order Of Mysteries faction in Riverside Manor, near Charleston. Then, listen to the “Blade Of Bastet” holotape to begin.
Meteoric Sword (One Handed Melee): Successfully complete the “Lode Baring” event. The Meteoric Sword gives +10% Damage to Humans, -90% Weight, and +50% Durability.
Nailer (One Handed Melee): Successfully complete the “One Violent Night” quest. The Nailer buffs damage more the lower your HP.
Paddle Ball (Exotic): Purchase it from the Prize Shop in Camden Park in the Ash Heap region.
Perfect Storm (10mm Automatic Pistol): The Perfect Storm is a unique 10mm SMG with a folded stock and large flash suppressor that causes 24 points of burn damage for three seconds after each shot, which makes it very powerful. The Perfect Storm is unlocked by completing a quest found in Wavy Willard’s Water Park. Look for the crocodile cartoon icon on your map to find it. It is in the northwest corner of the lakes area. Interact with the robot named “Miss Annie” in the lazy river area to begin the “Cold Case” quest. To complete the quest, do the following steps:
1. Find the Park Security Terminal and access it. Read through the terminal messages until it is revealed that the holotape with a clue is locked in the Security Office safe. The Security Office safe is built into the floor in the room with the terminal. It requires Level 0 Lockpicking skill.
2. Play the tape, then travel to Crocolossus Mountain and enter the underground “Employees Only” area. The second clue is located in a cabinet.
3. Go back upstairs and search the mailbox just outside the Crocolossus Mountain ride. The clue will lead you to the top of the Ssslither Slide. Collect the KidSecure ID from the container. It will direct you to the Clarksburg post office, south of the water park. To enter Clarksburg, you need a Hazmat Suit to survive the radiation.
4. Once you reach the post office in Clarksburg, use the terminal inside. Select “[Search By Box Number]” and choose “[Box 012]” to get Otis Pike’s address.
5. Go to Otis Pike’s address (southwest) and access the terminal. Read through the diary entries to get the next clue. You will then need to go to Grafton Dam.
6. After entering Grafton Steel and fighting through the Super Mutants guarding the area, find five clues at the Dam to be directed to the Woods Estate. The Woods Estate is located on the southwest shore of the lakes area, just south of the water park. It is a destroyed house. Read the note in the desk on the upper floor, then return to Miss Annie to complete the “Cold Case” quest and get the Perfect Storm 10mm SMG.
Pumpkin Grenades (Grenade): Successfully complete the “Trick Of Treat” daily quest. Check the Daily Quest section to find the quest. The quest is available at Pumpkin House, in the Savage Divide. The Pumpkin Grenades give +Damage and +Radiation to effected targets.
Pyrolyzer (Heavy Weapon, Energy Gun): Successfully complete the “Tracking Unknowns” quest. To start this quest, check the terminals at Harper’s Ferry and select the entries for “Missing Persons” and “Missing Hunting Party”.
Rose’s Syringer (Exotic, Pipe Gun): The Rose’s Syringer unique weapon can be obtained at the “Top Of The World” resort, which is located in the center of the map in the Savage Divide region. The quest for the special syringer is given by a Raider Robot named “Rose” on the top floor of the resort. Talk to Rose, and she will send you on three Raider faction quests: “Signal Strength”, “Flavors Of Mayhem”, and “Keys To The Past”. Complete all her quests to get Rose’s Syringer. Most syringers are not too useful, but this syringer turns any enemy shot with it extremely powerful for 60 seconds, and then extremely weak for 60 seconds. As long as you can survive the first 60 seconds, even high-level enemies can then easily be killed. This allows Level 10-20 players to kill Level 40-50 enemies. Note: While at the “Top Of The World” resort, you can also find a Vault-Tec Bobblehead on the Mezzanine Level, on a speaker near the elevator exit.
Somerset Special (Pistol): Successfully complete the “Back On The Beat” quest.
Voice Of Set (Pistol): Successfully complete the “Prototypical Problems” quest. To start this quest, join the Order Of Mysteries faction in Riverside Manor, near Charleston. Then, listen to the “Voice Of Set” holotape to begin. The Voice Of Set gives +Electric Damage against robots.
Getting the Alien Blaster
The Alien Blaster is a unique energy pistol. It is also an Easter Egg weapon that can be found in Fallout 3 , Fallout: New Vegas , and Fallout 4 . It can be found in Fallout 76 by traveling to the Toxic Valley — on the east edge of the water. It is located at the bottom of a pond in the Toxic Valley, between Graninger Farm and Phillippi Battlefield Cemetery, near the following location . The Alien Blaster is located in a ruined safe, under the water. Note: The Alien Blaster does not come with any ammo. You must build a mod that allows you to use regular fusion ammo. The safe with the Alien Blaster also contains a Rusted Key. Travel to the Mount Blair Trainyard and unlock the case on the rooftop (Lockpick 2 required) to find the TNT Dome Key 2. Use the TNT Dome Key at the Black Mountain Ordnance Works, south of the Tyler County Fairgrounds. Open the TNT Dome to find the Alien Blaster mod and some Alien Blaster ammo. The mod, when installed, allows you to use Fusion Cells as ammo.
Getting the Artillery Cannon
To get the Artillery Cannon, you first need to obtain the Artillery schematic. The schematic can be purchased for 190 caps from a random vendor —- try the Watoga Market vendor in Cranberry Bog. The Artillery schematic can also be obtained for free by progressing in the main story until you are able to bypass the laser fence blocking a room in Fort Defiance. The Artillery schematic can be found on the desk. The Artillery Emplacement works just like it did in Fallout 4 . After it is built and placed, connect it to power (requires 3 power). Once the Artillery is hooked up, you can collect extra smoke grenades from the crate. The range on it has been improved, so you can it launch from far greater distances. Throw a smoke grenade into a group of enemies, then wait a few moments for shells to rain down on the enemies. Almost anything will be killed, and you can always restock on grenades from the Artillery crate. Note: The Artillery Cannon is connected to your C.A.M.P. — so it can be destroyed if you leave and another player destroys it.
Getting the Laser Minigun
Join the Enclave faction, then access the Enclave Vault terminal to purchase the Laser Minigun plans for 1,000 caps. The Laser Minigun is one of the most powerful weapons in the game.
Joinning the Enclave faction
Go to the Waste Dump on the eastern-most river on the map (just look for the large icons on the map). Once you reach the dump, search for a cave guarded by Deathclaws. Clear the Abandoned Waste Dump cave and enter the bunker interior. Complete the puzzles to unlock the location of the Enclave Vault. Travel to the Enclave Vault and accept their faction quest. Note: Before beginning the Enclave faction quest, you need Level 3 Lockpicking/Hacking skill. The Enclave will send you to a new location. Go to Sugar Grove and destroy the robot guardian. Collect the tape from the Sugar Grove terminal, then return to the Enclave bunker to turn in the quest item and join the Enclave faction.
Excavator armor
Successfully complete the “Miner Miracles” quest to unlock the Excavator armor schematic. The quest can be started by traveling to the Garrahan Mining Headquarters and examining a poster. The HQ is located in the southwest corner of the southern mining region. The armor has a bonus stat that adds +100 to carrying weight.
Ultracite armor
Successfully complete the “Belly Of The Beast” Brotherhood Of Steel quest to unlock the Ultracite armor schematic. The schematic is locked at Level 50. The Brotherhood Of Steel faction story can be started at Fort Defiance.
X-01 (Enclave) armor
Join the Enclave faction to unlock the X-01 (Enclave) armor schematic for purchase. Travel to Whitespring Resort/Camp McClintock and complete Boot Camp.
Infinite Power Cores
To get an unlimited supply of Power Cores, travel to the Dyer Chemical Plant in the Mire (southeast region). Robobrains spawn in this area and will always drop half-charged Power Cores.
Getting Power Armor Frames
You can get a Power Armor Frame in the Morgantown Trainyard, straight east from Vault 76. You can also get one in Camden Park, in the southwest area of the map. There will always be a Power Armor Frame and Power Core near the rollercoaster ride. Another set of Level 15 Raider armor can be found on the high bridge in the first region.
Prevent Power Armor Frames from getting stolen
When Power Armor Frames are left alone, they can be looted by other players. To prevent your armor from getting stolen, make sure to stash it.
Easy XP
Fast travel to Whitespring Golf Club. Enter the clubhouse and circle the main room to attract all the ghouls in the building. Exit the building and circle the bus until all the ghouls have exited the building and are chasing you. Lure the large group of ghouls to the explosive car and stand on it, then trigger it to explode with any weapon. The explosion will probably kill you, but it will also kill the group of ghouls. Quit to the main menu, then load your character to reset the server. Repeat this process as many times as desired. Even at Level 24+, you can earn 1,300+ XP in just a few minutes using this trick. Respawn after dying and collect your junk, then repeat the process. When you reload your character, you will connect to a new server. Simply fast travel to the same location, lure the enemies out, and destroy the car.
Duplicating items
Find a valuable item that spawns on the map. This does not work for items in lootable chests, on bodies, or quest items. For example, get a minigun at the top of the catwalks, in the exterior of the Poseidon Energy Plant, far south of Vault 76. You can either wait (in real-time) for an area’s items to respawn and travel back to the area, or exit the server and travel to a new server. Then, keep collecting the same item(s) as many times as desired. You can sell these items to vendors, but they restock slowly and their cap limit is global — so you cannot get money quickly using this method.
Un-diluting aid items
Aid items (like Stimpacks and RadAway) can be transformed into “diluted” versions. You can make a single item into two, but they will be weaker versions. You can also restore the diluted versions, making them no-longer diluted. Diluting aid items will turn one aid item into two weaker aid items. They will have “diluted” in the name. To un-dilute an item, open a trade window and place the diluted aid items into trade. Then, simply wait for the window to timeout to get a bunch of un-diluted aid items in return. Note: This trick may eventually get patched.
Getting weapon mods
Mods are weapon customization features you can unlock to enhance your weapons at the crafting table. There are two ways to obtain weapon mods. One method requires you to scrap weapons with mods to learn the weapon mod pattern. You can then craft the mod. The other method requires you to purchase weapon mods from a vendor. You do not have to craft these, as you can just apply them. Note: Each weapon mod is attached to a particular weapon —- so you cannot remove a mod from one weapon, then place it on another. Additionally, some weapon mods can only be crafted and installed with certain perks. You may need Chemist Level 1, 2, etc., Gunsmith Level 1, 2, etc., or other perks to unlock the ability to add a weapon mod.
Easy weapon mods
To get the best mods and build powerful weapons, you may need to farm weapons. To farm weapon mods, find an area with enemies that carry the weapon you want to farm for weapon mods. Mods are completely random. Kill enemies, then collect their weapons and scrap the guns to get mod crafting recipes. After clearing an area of enemies, simply log off and log back on to reset the enemy mob. You can also switch servers. Some recommended places to do this is the swamp southeast of Flatwoods, as it contains a lot of Super-Mutants carrying Hunting Rifles. Bolton Greens contains a lot of Pipe Guns, and Blackwater Mine is a good place to farm for Pump-Action, Double-Barreled, or Combat Shotguns.
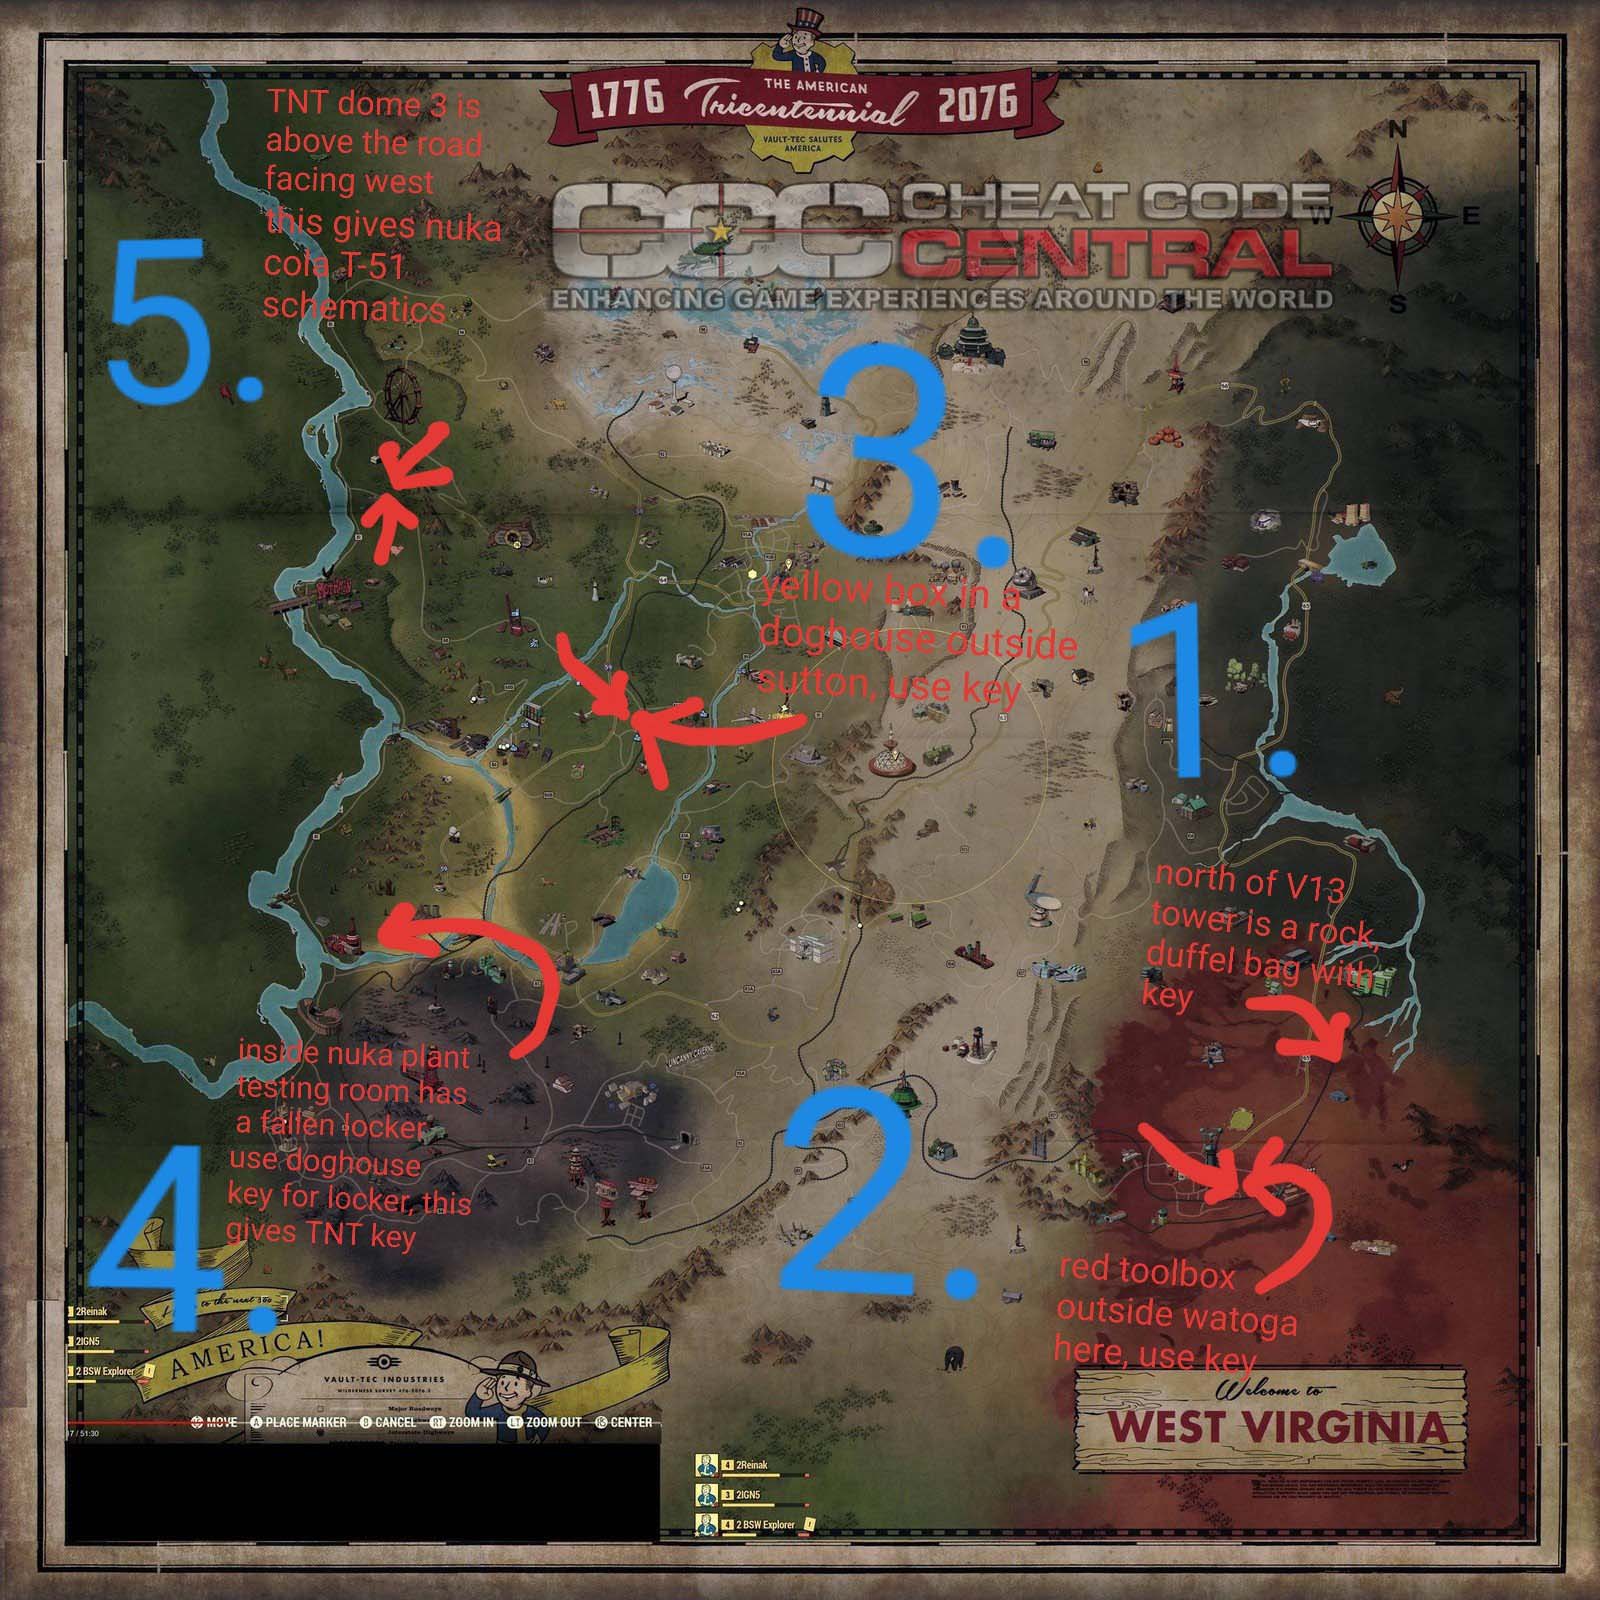
Nuka Cola armor skin
To unlock the unique Nuka Cola power armor skin for the T-51 suit, complete the following tasks ( map of all locations referenced below):
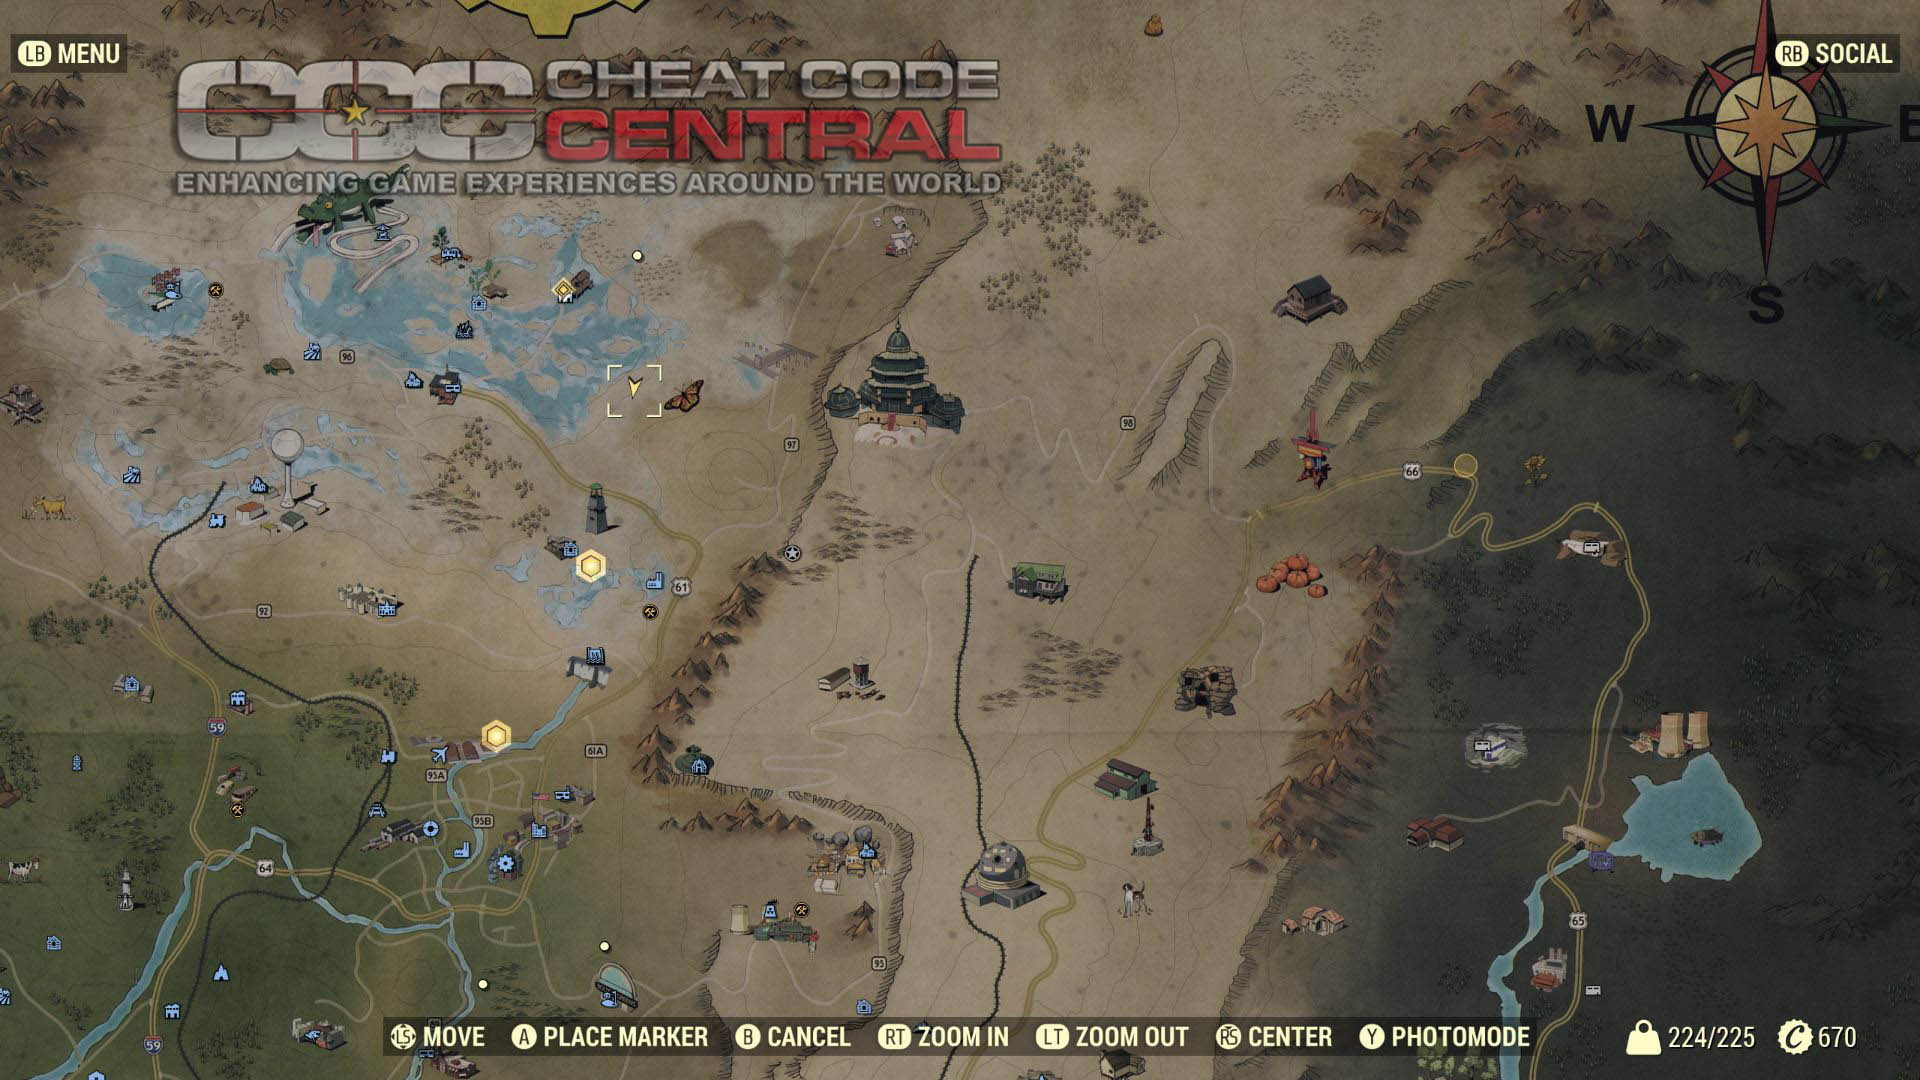
1. Get the key in the duffle bag, which is found at a rock north of Pylon V-13, in the far eastern side of the map. The Pylon is located south of the RobCo Research Center. Travel slightly northeast of the Pylon to find the duffle bag.
2. Once you have the key, travel south to Watoga. Use the key to unlock the red toolbox just outside of Watoga.
3. Travel to the starting region. At Sutton, look in the dog house near the truck, north of the Red Rocket Station. Use the key to unlock the yellow box.
4. Take the next key to Kanawha Nuka Cola Plant on the far west edge of the map. Enter the Taste Testing Room, and unlock the fallen locker.
5. Go to the Black Mountain Ordnance Works, south of the Tyler Country Fairgrounds. Use the TNT key on TNT Dome 3 to find the Nuka Cola T-51 schematics inside, as well as some other Nuka Cola branded clothing items.
Vault locations
Travel to the indicated location to find the corresponding vault. Note: These additional vaults are currently sealed and will eventually unlock as a timed event.
Vault 63: This vault is found south in the Ash Heap region, at the following location . Follow the road west of Garrahan Estate, and look for a shack off the road leading to the Abandoned Mineshaft. The shack actually hides another cave entrance that takes you straight to the locked Vault 63 door.
Vault 94: This vault is found on the border of the Savage Divide, at the following location . Locate the side-road leading east from Route 66 into the mountains east of Pumpkin House. You can travel east from Abbie’s Bunker, and look for a path to the left to find the entrance.
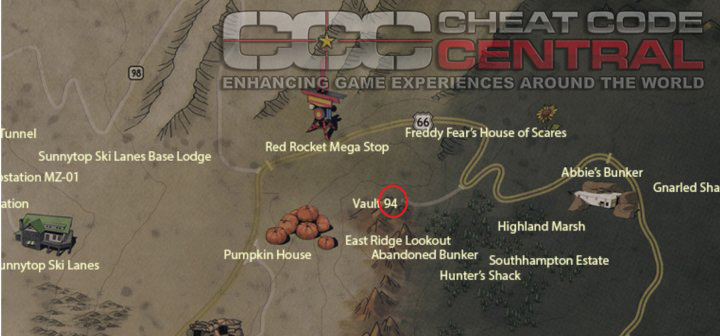
Vault 96: This vault is found far south of the Savage Divide, between the Federal Disposal Field HZ-21 and Lake Eloise, at the following location . Look for a road between those two locations on your map, and follow it south to reach the Vault 96 entrance.
PvP without becoming wanted
When you shoot another player in Fallout 76 , you basically initiate PvP. The other player can run away or ignore you (your attacks inflict 50% damage, half your normal damage rate), but if they shoot you, you will both do full damage. If you kill the other player, you can loot their junk/scrap, but you cannot steal their weapons or caps. After killing another player, you will be marked in red as a murderer to everyone else on the server. You will also reach “Wanted” status. If the player you just killed comes back and gets a revenge kill on you, they will be able to loot double the junk/scrap off your body. To do PvP without consequence, play one of the following modes:
Hunter/Hunted mode: To join Hunter/Hunted mode, you must be at least Level 5. Then, go to the Radio Tab on your Pipboy, and select the “Hunter/Hunted” station. You will be transferred into a lobby to wait for a session to begin. A minimum of four players are required. The goal of Hunter/Hunted mode is to track down and kill another PC (player character) target. While you are hunting them, another player is hunting you. If you kill your player target, you will receive their target. Continue until you are the last player standing. There are special rewards for winning, or just doing well in this mode. Note: Once you join a Hunter/Hunted lobby, you can continue to complete quests, explore the map, and do whatever desired. You do not have to stay in the lobby.
The Battle That Never Was mode: This is a Team Deathmatch mode and can be started at Prickett’s Fort. When you arrive, an event will trigger called “Event: The Battle That Never Was”. You can choose your side (Union or Confederate), and fight other players that arrive in the area. Whichever team gets the most kills wins the match.
Starting tips and tricks
Use the following tips and tricks to make the beginning of Fallout 76 easier:
1. Collect as Many Materials as Possible: Materials are extremely valuable in Fallout 76 . You will encounter vendors, but everything you really need is carried by enemies or found as loot. To earn XP, kill enemies and explore areas. It is recommended to stay in the opening area for as long as possible. Unlock, hack, loot, and kill everything in the area for easier levels. Looting is not too useful on its own. There are vendors, but selling stuff is not always useful. Instead, get a crafting bench and scrap useless items. Base materials are used for crafting, and they are far lighter than standard items like weapons or armor. You can carry lots of base materials, which is very helpful early in the game.
2. Create Bulk Bundles: You can use a Tinkerer Workbench for more than just scraping items. You can also transform base materials into a “bulk” bundle. Use the “bulk” function to place a lot of base materials into a single bundle with just 1 weight. This allows you to carry multiple bundles of bulk materials with almost no weight. You can also store the bulk bundles in your stash for later.
3. Upgrade Skills Wisely: Place your skill points into Perception and Intelligence first to unlock Hacking and Lockpicking (two very important skills). If you want to loot everything and explore all areas, lockpicking and hacking are mandatory. Unlock perks related to those activities first, then upgrade your Strength. Strength not only allows you to kill enemies more easily so you can save ammo, but it also unlocks the Rat Pack perk at Level 8. This perk increases your carrying capacity, which is very helpful when you have to often carry most of your stuff around.
4. Move Your Camp to Quicksave: Your camp can be used like an item, and dropped down at a new location as you explore. This allows you a safe place to sleep and save your game, allowing you to respawn at the campsite most recently used. Use your portable camp regularly as you explore, or before getting into a dangerous fight, so you can save and do not have to start too far away or lose a lot of progress if you die.
5. Get a Gun at the Start: After leaving Vault 76, there is a corpse with a gun to your right. It only has approximately eight bullets, but if you miss this weapon, you will have to fight enemies with your fists at the start.
6. Get Power Armor Early: You can get some Power Armor shortly after leaving Vault 76. Go to the Morgantown Trainyard, which is straight east of Vault 76. There is a partial Power Armor suit inside the train car with “USA” labeled on the side. It contains a frame, helmet, and few random armor pieces.
7. Get a Hazmat Suit: The Hazmat Suit completely protects against the negative effects of radiation. It can be found in the Poseidon Energy Plant WV-06. You do not actually have to go inside to get the suit. Simply travel to the plant (it is the huge nuclear power plant on the west side of the map, just off the river). After entering the plant grounds, stay to the left side to find an exterior catwalk. Follow it up and around to the first roof landing to find a small exterior trailer-like office. There is a Hazmat Suit sitting on some boxes inside.
8. Get a Mini-Gun: While you are in the Poseidon Energy Plant, there is a common Mini-Gun that spawns in this area. From the rooftop while wearing the Hazmat Suit, go up the catwalks to find a balcony with a burnt corpse standing on the edge. A Mini-Gun will sometime spawn on the wooden crates in this area. If it does not appear, it can spawn in a different nearby location. Proceed up to the second rooftop, then go to the catwalks above the interior office door. A Mini-Gun will sometimes spawn on the landing with the sitting corpse. There is one other area the Mini-Gun regularly spawns. Go up the catwalks until you reach one that spirals around a tower. At the top is a dead end with a few crates. The Mini-Gun at this location spawns very often.
9. Get Free Materials from Responder Bots: This is only useful early in the game, but sometimes you will encounter Responder Bots that try to help you. These bots are useful if you are struggling, and will sometimes even give you free items. Talk with Responder Bots before killing them to sometimes get materials, which you cannot loot off their bodies after killing them.
10. Get a Bobblehead: Bobbleheads spawn in semi-random locations in Fallout 76 , but there is a bobblehead that spawns in a common location at the County Fair (large Ferris Wheel on the map). The Bobblehead can be found on the table covered with old Halloween decorations inside the shed/metal building on the edge of the fairground.
Easy “Schwag” achievement
Go to the location of a bobblehead. One can be found in the tent in the amusement park west of Vault 76. Another can be found in a window high in the Landview Lighthouse, southeast of Vault 76. After collecting a bobblehead, return to your CAMP and stash the bobblehead. Remove the bobblehead. Each time you remove the bobblehead from your stash, it counts as another discovery. Remove it nine times to get the “Schwag” achievement.
Steam achievements
Successfully complete the indicated task to unlock the corresponding achievement. To view your achievements and stats in Steam, select “Community”, “My profile”, “View all my games”, then the game and view stats.
- Reclamation Day!: Leave Vault 76.
- First Contact: Complete “First Contact”.
- Final Departure: Complete “Final Departure”.
- Second Helpings: Complete “Second Helpings”.
- Into the Fire: Complete “Into the Fire”.
- Recruitment Blues: Complete “Recruitment Blues”.
- Heart of the Enemy: Complete “Heart of the Enemy”.
- Key to the Past: Complete “Key to the Past”.
- Coming to Fruition: Complete “Coming to Fruition”.
- Bunker Buster: Complete “Bunker Buster”.
- One of Us: Complete “One of Us”.
- Officer on Deck: Complete “Officer on Deck”.
- Happy C.A.M.P.er: Build a C.A.M.P..
- We Must Rebuild: Build 20 C.A.M.P. Items.
- Appalachian HOA: Build 100 C.A.M.P. Items.
- Mistress of Mystery: Complete “Mistress of Mystery”.
- Personal Matters: Complete “Personal Matters”.
- Queen of the Hunt: Complete “Queen of the Hunt”.
- Monster Mash: Win the “Monster Mash” Event.
- Scorched Earth: Win the “Scorched Earth’ Event.
- Breach and Clear: Win the “Breach and Clear” Event.
- Never Go it Alone!: Join 20 Teams.
- Second Skin: Craft 5 Pieces of Armor.
- A Fighting Chance: Craft a Weapon.
- Fallout Forever: Reach Level 100.
- LITerally: Read 20 Magazines.
- Ground Zero: Be at Ground Zero of a Nuclear Blast.
- Perked Up: Fully Rank Up one Perk.
- Gimme Gimme!: Pick 50 Locks.
- Code Cruncher: Hack 50 Terminals.
- Monet of Murder: Mod 50 Weapons.
- Tested Mettle: Complete 5 Challenges.
- A Real Challenger: Complete 20 Challenges.
- Field Medic: Revive 20 Fallen Players.
- Moneybags: Possess 10,000 Caps.
- Retro Now: Play a Holotape Game.
- Giant Slayer: Kill 5 Giant Creatures.
- Pioneer Scout: Discover 100 Locations.
- Bounty Hunter: Kill a Wanted Player.
- Kill or Be Killed: Kill Another Player.
- Good Grief!: Kill 20 Players.
- Pest Control: Kill 300 Creatures.
- Junker Funk: Gather 200 Pieces of Junk.
- Photo Bomber: Take 20 Photos.
- Ain’t He the Cutest?: Collect a Bobblehead.
- Shwag: Collect 10 Bobbleheads.
- Wild West Virginian: Reach Level 10.
- Appalachian Trailblazer: Reach Level 25.
- American Hero: Reach Level 50.
- I Am Become Death: Complete “I Am Become Death”.