If your little one is interested in learning how to code, Scratch is the program for them. Scratch is a programming language and online community developed by MIT, which is designed to teach basic programming concepts and logic to kids in a fun and interactive way. Rather than using text-based commands, Scratch uses a visual approach where users create programs using blocks that snap into place. Users can use Scratch to create animations, interactive stories, games, and more, then share their creations with other Scratch users through the community site.
Scratch has a number of benefits for kids looking to learn programming. These include encouraging thinking, developing problem-solving skills and attention to detail, fostering creativity, imagination, self-expression, and collaboration, and promoting equity in computing because Scratch is completely free to download and use.
Getting Started with Scratch
To get started, first, visit the Scratch website and create a free account. Make sure to pick a safe username and a complex password. Then, answer what country you live in, your birthday, your gender, and provide your email. You will receive an email to confirm your account.
Once you confirm your account, you can click “OK, let’s go!” to get sent back to the home page. From there, you can browse the finished products to play or watch another user’s creations or click “Create” to make your first creation.
Navigating the Interface
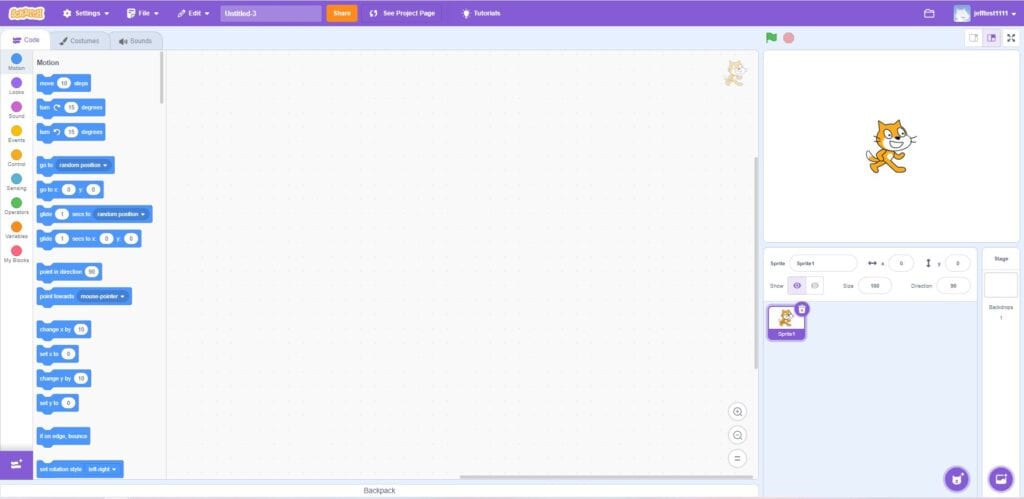
When you first start your creation, you will see a blank canvas, ready for your artistic touch. Among the elements here are:
- Stage (center area): This is the main area where your projects come to life. It is like the backdrop of your interactive world. You will create your animation, game, or story here.
- Sprite Area (bottom right): This is where you manage your sprites. You can add new sprites, change their appearance, and add scripts to control their behavior.
- Coding Blocks Palette (far left): Here, you’ll find various categories of colored blocks that represent different programming commands. These blocks can be dragged and dropped to create your scripts. Edit your character’s motion, add music or screen effects, set guidelines for when users interact with your creation, and more.
- Script Area (bottom): Located at the bottom of the interface, this is where you assemble your scripts by snapping the coding blocks together. Each script is a sequence of blocks that defines what your sprite should do.
Selecting a Sprite and Backdrop
Before you can start creating, you will need to select a character. The game gives you the little orange cat as a default, but there are hundreds of other options available based on the project you want to make. To add a pre-made sprite, click the “Choose a Sprite from Library” button in the Sprite Area and pick your favorite. If you would rather create your own sprite from scratch, you can use the “Paint” option to draw your own sprite.
Once you have a sprite, it’s time to add a backdrop. You can either choose a pre-made backdrop by clicking the “Choose a Backdrop from Library” button in the Stage Area or use the backdrop editor to draw your own.
Understanding and Using Blocks
Blocks are utilized to bring your creation to life. They represent different actions across a variety of functions. These include:
- Motion — blocks that control the movement of your sprites. Examples include “Move 10 steps” or “Turn 90 degrees.”
- Looks — blocks that change the graphical effects of your sprite, including color, size, and layer placement.
- Sound — blocks that add and control certain sounds to your creation.
- Events — blocks that trigger events when certain actions are performed.
- Control — blocks that perform basic programming commands like if/when, if/then/else, repeat, and more.
- Sensing — blocks that trigger when users interact with items using their mouse.
- Operators — blocks that perform math or logical functions
- Variables — blocks that let you use variables
- My Blocks — your custom blocks
Adding and Removing Blocks
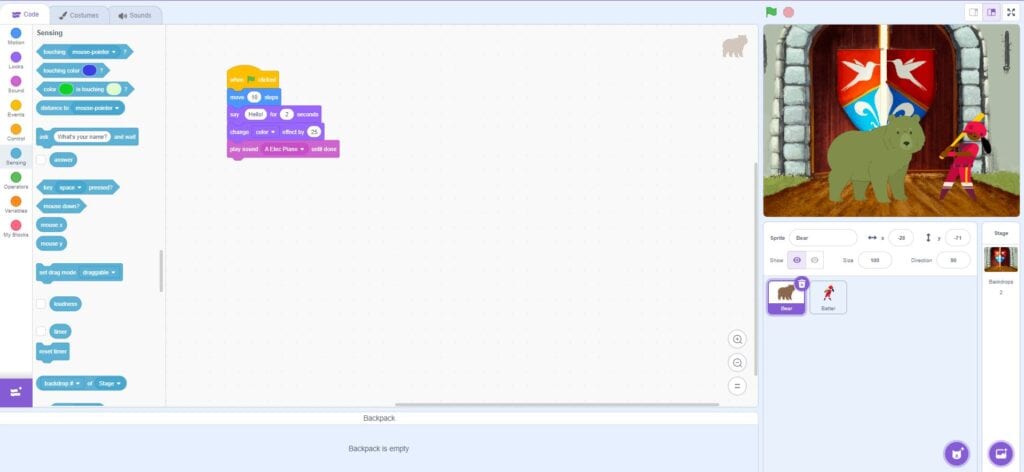
To add blocks, simply drag and drop them into the script area. To remove a block, just drag it out of the script and out of the window. Blocks can also connect with one another to create a seamless sequence of events. Simply drag and drop them into one another to create a sequence.
Now, you’re ready to start creating within Scratch. Use the tools available to you and create something special! If you get stuck or have more questions, the program has an extensive tutorial that can show you everything you need to know. Most importantly, have fun!
Scratch by MIT FAQs
How do I share my project?
Sharing your project is as easy as clicking the orange “Share” button on the top taskbar. Make sure to give your project a name before you share! Once you click “Share,” your project will be available for other users to try.
Is Scratch safe for kids?
Yes — Scratch is designed for kids to learn the joys of programming with easy-to-use functions all in a playful and engaging learning environment.
Does Scratch have inappropriate content?
Truly inappropriate content would be flagged by the program’s internal filters, but remember that Scratch is designed for use by children ages 6 to 16. Older kids may program games or stories that aren’t right for younger kids but are right in line with teenagers. It is important to monitor your child’s online activity and make sure they’re consuming online content that is okay for them.