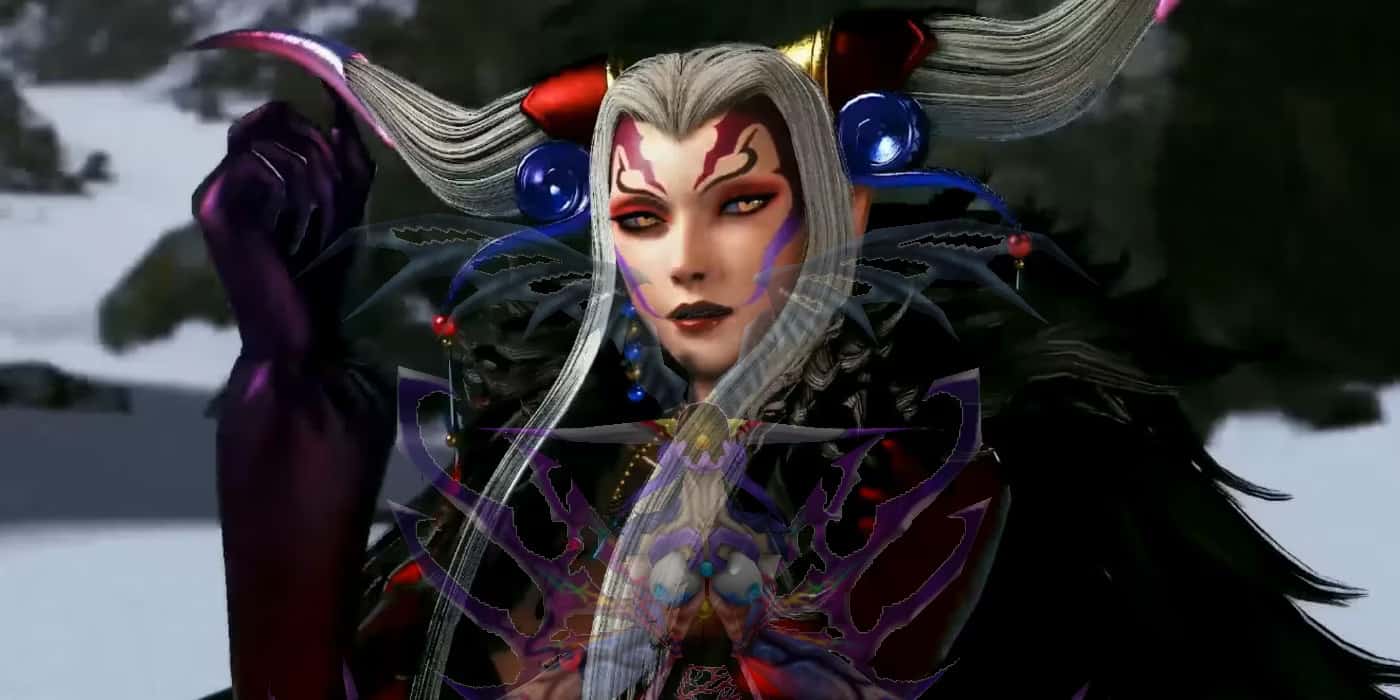
After introducing millions of new fans to the series with Final Fantasy VII, Square’s next mainline game in the series completely flips the script by featuring some of the more complex and non-beginner-friendly mechanics in the entire series. Final Fantasy VIII is an excellent game and a follow-up that is in line with the level of quality one would expect from the Final Fantasy franchise, but all bosses in Final Fantasy VIII help to illustrate that it’s undoubtedly more difficult and punishing to newcomers than its predecessor. Unfortunately, this is something that helped to make the game a bit of a “middle child” in the series’ PlayStation entries and also helped lead to the “return to form” of fan-favorite Final Fantasy IX.
Still, for those who are willing to stick with it and engage with its layered mechanics, Final Fantasy VIII is yet another excellent JRPG. One thing that helps it hold up is its incredible visuals and character models, which are a significant step up from Final Fantasy VII‘s polygonal visuals and position it as one of the best-looking games on the PS1. The game’s bosses are an excellent category of assets to showcase the game’s visual fidelity, and they also happen to have some of the game’s best magic spells for players to draw and then junction to their heroes using Final Fantasy VIII‘s unique mechanics.
In addition to lising out the magic spells available for Draw from each encounter, each boss will have an HP range. Enemies’ stats and HP are determined by level, which scales based on whatever the player’s level is. Because of this, it’s recommended to stay as low-level as possible until getting to the later sections of the game, making use of the Cactaur Guardian Force’s stat-boost abilities on level gain.
Ifrit
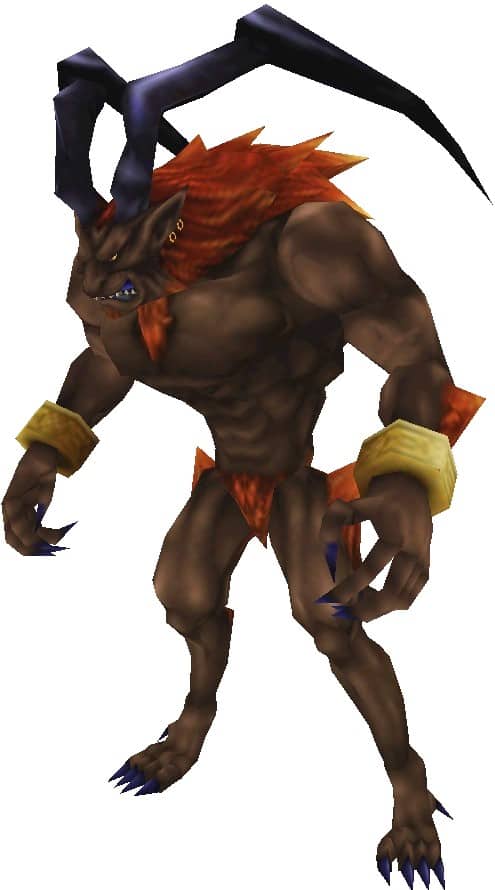 | Players face off against Ifrit as the first boss in Final Fantasy VIII in order to acquire his Guardian Force for junctioning and summoning as well as to pass Squall’s SeeD exam. He awaits players inside the Fire Cavern just outside of Balamb Garden and making your way through the cavern and fighting Ifrit is dependent on a timer. The closer players get to the timer running out without it going over when defeating Ifrit, the higher their starting SeeD rank. Unlike other bosses and enemies, Ifrit’s level is also sationary as level 6. Ifrit is the only Guardian Force battle that is necessary for the game’s critical path, with all other Guardian Force fights being optional encounters. HP – 1,068 (Max) Weaknesses – Ice Draw – Cure, Scan, Fire/Fira/Firaga (depends on level) |
Biggs
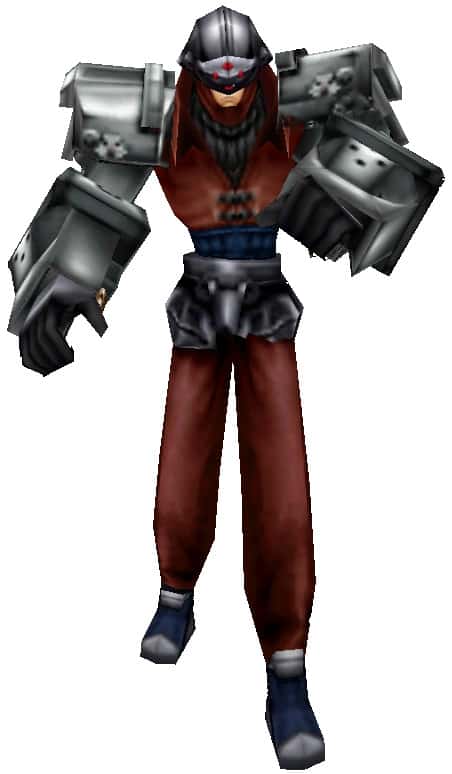 | Recurring Final Fantasy characters Biggs and Wedge make an appearance in Final Fantasy VIII as the Elite Soldier and G-Soldier enemy types, respectively. Players will encounter both Biggs and Wedge as recurring boss fights throughout the game, and outside of changing levels, stats, magic draws, and rewards, each encounter plays out roughly the same. The first time players fight the duo will be atop the Communications Tower in Dollet. HP – 460-700 Weaknesses – N/A Draw – Fire, Thunder, Blizzard, Esuna |
Wedge
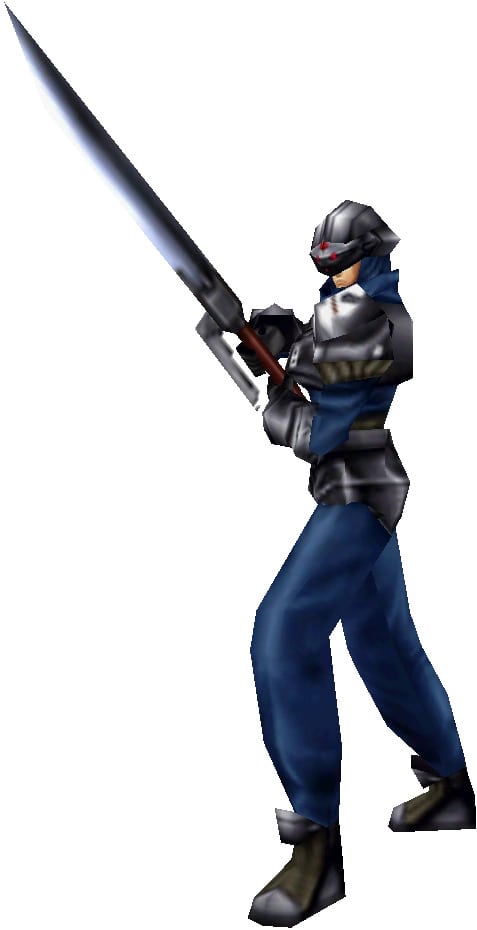 | Wherever Biggs goes, his subordinate Wedge is sure to follow. Along with his commander, Wedge will fight the party three times throughout the course of Final Fantasy VIII, although the third fight against the duo will end before it actually begins thanks to the pair deciding they’ve had enough. Just like the fight against Biggs, Wedge’s multiple appearances are mostly the same and he only differs in terms of his HP and stats. The first fight against the soldier on top of the Dollet Communications Tower can be easily beaten with melee attacks. HP – 640 (Max) Weaknesses – N/A Draw – Fire, Thunder, Blizzard, Cure |
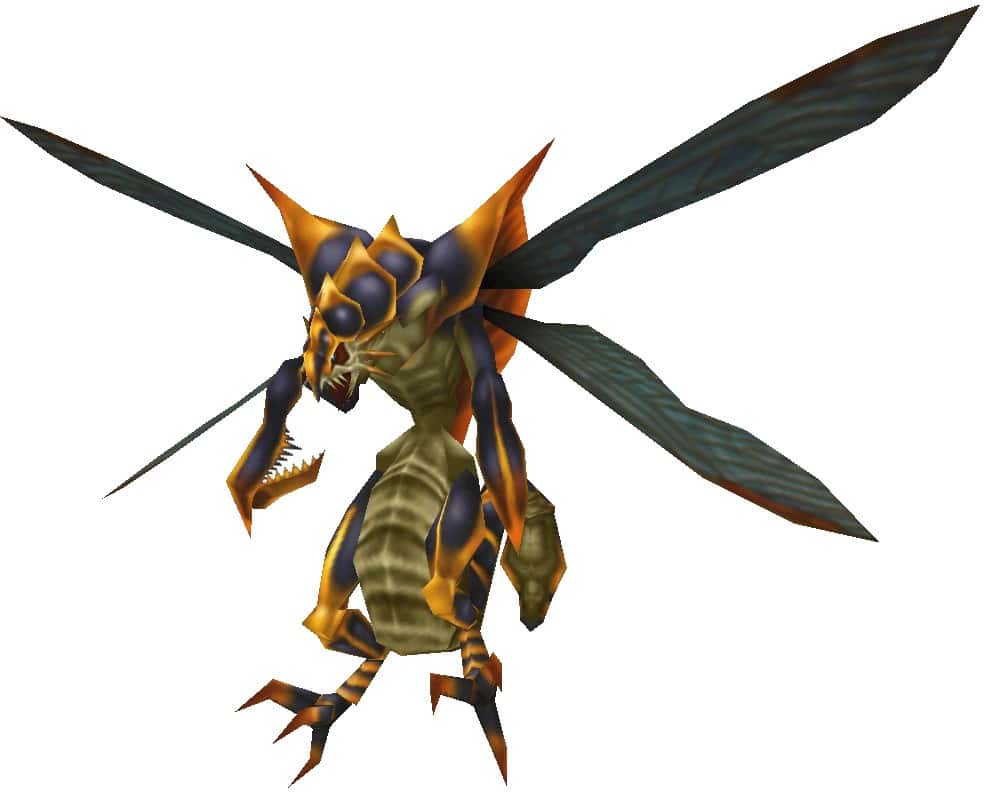
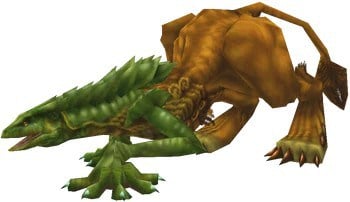
Elvoret
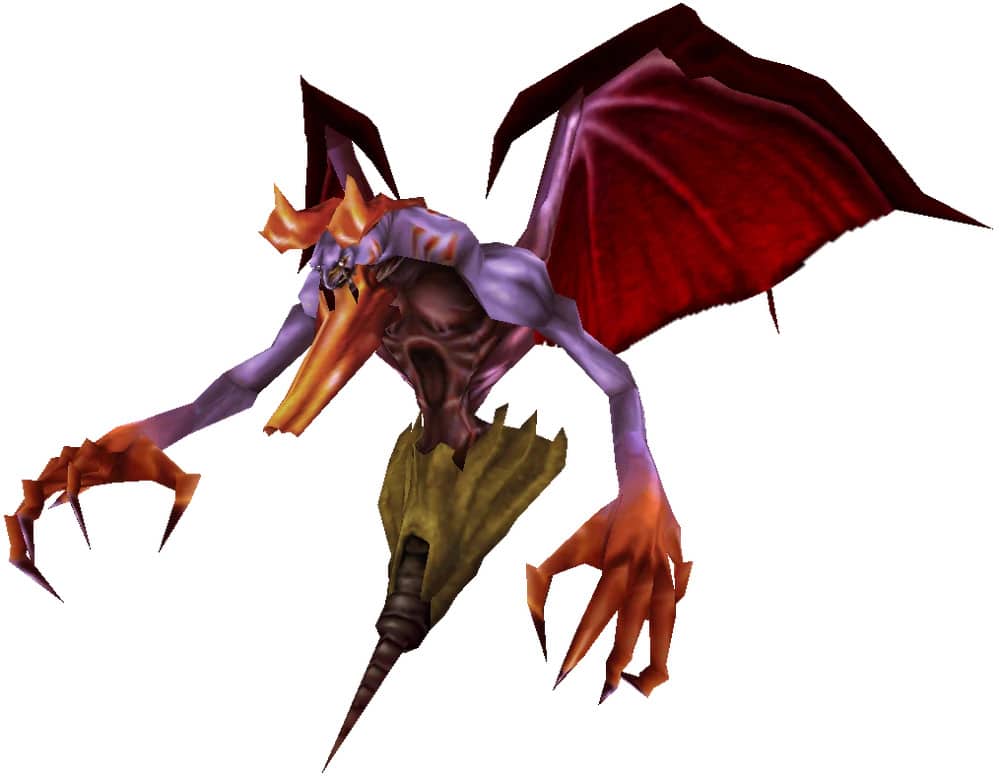 | The Elvoret is essentially a weaker version and pallette-swap of the Elnoyle enemy type, and players encounter this beast as a boss atop the Dollet Communications Tower as part of their first official mission for SeeD. Unlike the preceeding fight with Biggs and Wedge, Elvoret is not a complete pushover and can be considered the first genuine boss fight in Final Fantasy VIII thanks to the potential for it to provide a challenge to players. With proper junctioning (especially Magic and Strength junctions to boost offensive spells and melee attacks), Elvoret will eventually fall, and it’s practically necessary to make sure you draw the Siren GF from the creature during the fight as failing to do so will mean needing to wait until Ultimecia’s Castle. HP – 1,500-3,500 Weaknesses – N/A Draw – Siren (GF), Cure, Double, Thunder |
X-ATM092
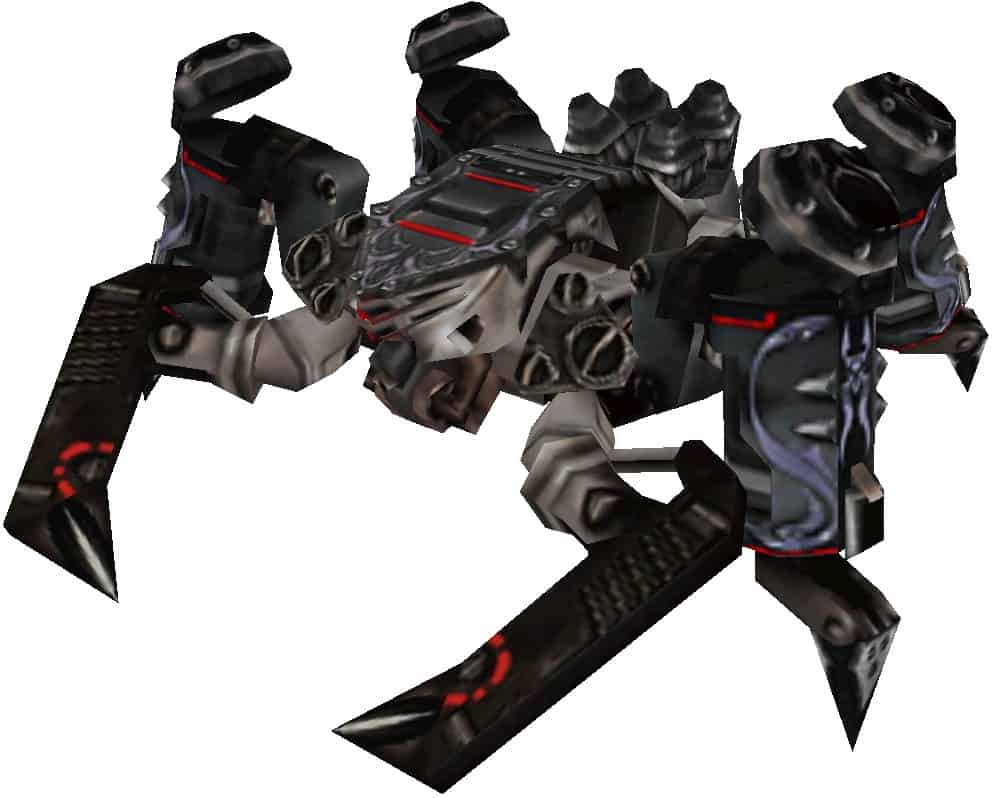 | The X-ATM092 is an arachnid-like tank that the Galbadian military deploys to chase after the SeeD members in the Dollet mission. This fight doesn’t actually end as a normal encounter would, instead seeing the boss enter “repair mode” after Squall and his companions deal enough damage. This allows the party to run away, though the X-ATM092 will eventually catch up for another round. Once the party reaches the beach, Quistis will put an end to the spider-tank once and for all using the mounted turret on the escape vessel. HP – ~5,600 Weaknesses – Thunder Draw – Protect, Fire/Fira/Firaga, Cure/Cura/Curaga, Blizzard/Blizzara/Blizzaga |
Granaldo
 | Players will encounter the Granaldo alongside three Raldo enemies, which it uses to pick up and throw at the part to deal damage. At this point in the story (after the Dollet mission but before heading to the Timber mission), players should be low enough level to where fighting the Granaldo in the Balamb Garden Training Center is a cakewalk. Using melee attacks will do substantial damage, but players can make quick work of the boss by using offensive wind magic like Aero or Tornado (both easily obtainable through playing Triple Triad) or summoning one of their Guardian Forces. HP – 9,700 (Max) Weaknesses – Wind Draw – Shell; Under Lvl. 30: Blind, Sleep; Over Lvl. 30: Silence, Confuse, Pain |
Fake President
 | After players confront Galbadian President Vinzer Deling during the Timber mission, they realize that it is actually a body double meant to trap the Forest Owls resistance group. This fight is nothing more than a precursor to the next boss, Gerogero, as hitting the Fake President a handful of times will trigger his transformation. HP – 56-778 Weaknesses – N/A Draw – Cure |
Gerogero
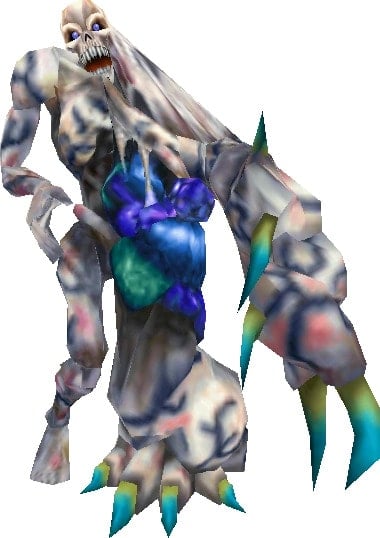 | The hideous, zombie-like Gerogero is the true form of the Fake President body double and the actual boss fight of the Timber mission. As an undead monster, players can take advantage of Gerogero’s weakness to restorative magic and items to make short work of it using Phoenix Downs or the Cure spell. Before quickly eliminating Gerogero, though, it’s worth drawing some of the magic spells in its repetoire beforehand. HP – 3,650 (Max) Weaknesses – Earth, Fire, Holy Draw – Berserk, Double, Esuna, Zombie |
Iguion
 | Following Edea’s speech in Galbadia players will need to rescue Rinoa from a pair of Iguion statues that the sorceress brings to life. One of the first things the dual bosses will do is cast reflect, making use of any offensive magic a moot point. Instead, players should use the recently acquired Brothers summon to deal Earth damage to both Iguions, but not before drawing the valuable Carbuncle Guardian Force from them. If players fail to draw Carbuncle during this fight, they won’t have another chance until Disc 4. HP – 1,747 (Max) Weaknesses – Earth, Holy Draw – Carbuncle (GF), Break, Cure, Esuna |
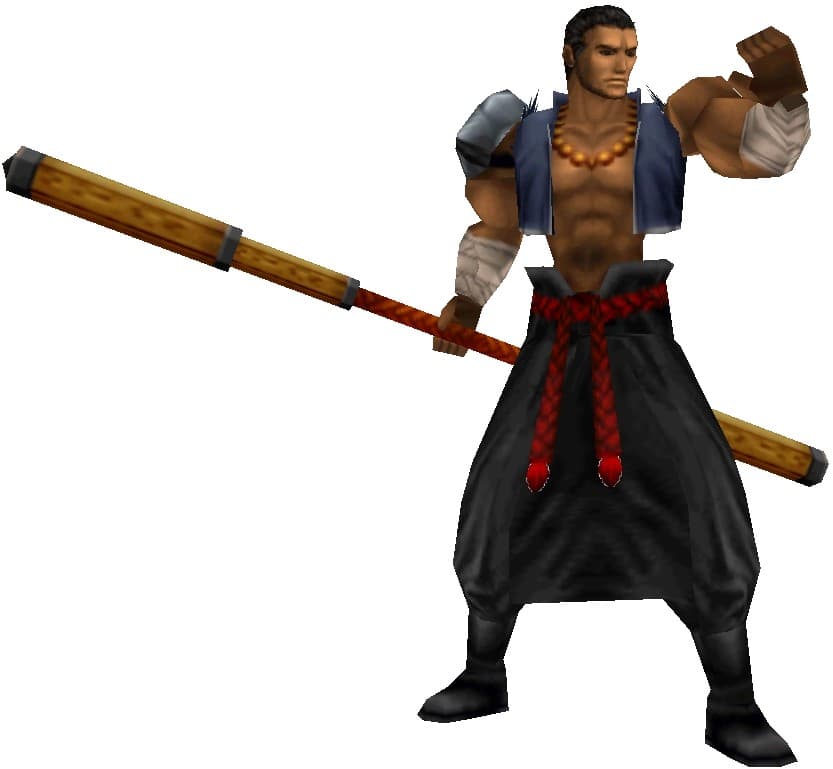
Seifer
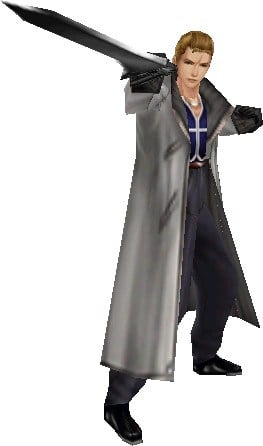 | After saving Rinoa and Irvine failing to successfully assassinate Edea, Squall will finally face Seifer in batte during a one-on-one encounter. This is the first of four separate fights against Squall’s rival, although this is the only one that is strictly a face-off between the two. Seifer has the Fira spell at his command but is much more likely to rely on melee attacks. After defeating Seifer, Rinoa and Irvine will join Squall to fight Edea for the first time. HP – 1,150 (Max) Weaknesses – N/A Draw – Life, Cure/Cura/Curaga, Fire/Fira/Firaga |
Edea
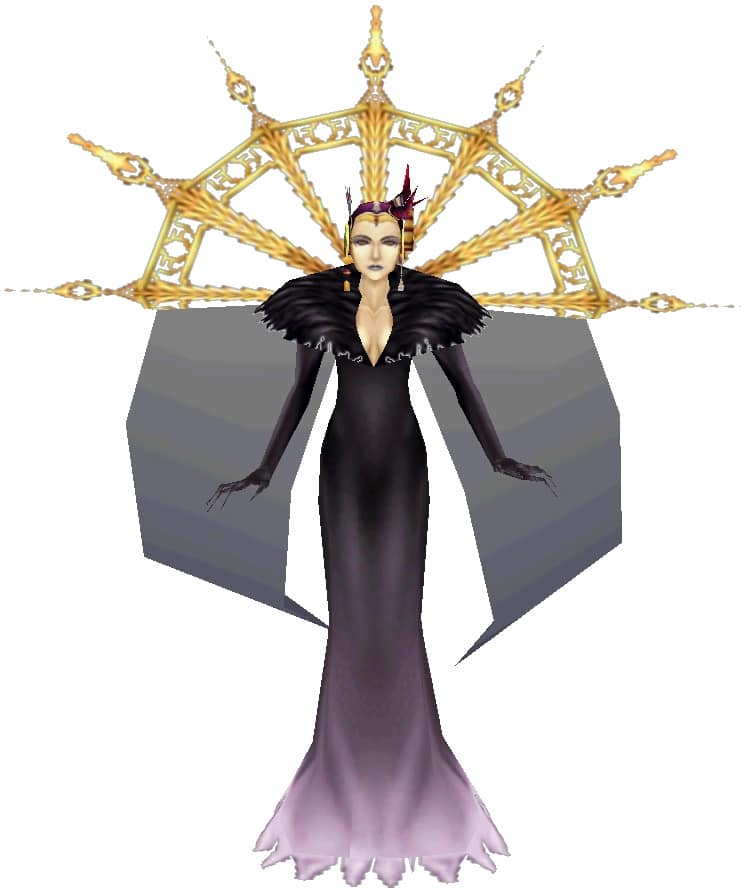 | The first fight with Edea immediately follows Squall’s victory against Seifer and can prove to be quite challenging depending on how much players have been taking advantage of Draw during previous boss fights and whether they’re keeping their party’s level low. Players should use their recently acquired Carbuncle GF to protect the party from Edea’s offensive magic while hammering away at her HP with melee attacks and limit breaks. If an opportunity presents itself, a timely GF summon can deal a large amount of damage as well. This is one of the rare boss fights in the game where the main story will progress whether players win or lose, though losing means missing out on a nice chunk of AP. HP – 1,300-7,000 Weaknesses – N/A Draw – Cura, Dispel, Double, Life |
Biggs
| The second encounter with Final Fantasy VIII‘s recurring Galbadian soldier bosses occurs during the escape from the Galbadia prison. Once again, both Biggs and Wedge are trivial encounters that can easily be beaten with just using melee attacks, though it’s recommended to stick around long enough to draw some of their valuable magic. In the case of Biggs, the Regen spell he has is incredibly valuable as a Vitality junction and players should take advantage of the easy encounter to draw 99 for each party member present. HP – 1,400-2,230 Weaknesses – N/A Draw – Cure, Haste, Slow, Regen, Over Lvl. 20: Cura |
Wedge
| Wedge, as usual, is weaker than Biggs and has less-valuable spells, meaning players can focus on eliminating him first during the second encounter with the duo, freeing up opportunity to Draw spells from Biggs without distraction. HP – 2,139 (Max) Weaknesses – N/A Draw – Protect, Reflect, Shell, Fire/Fira/Firaga |
GIM52A
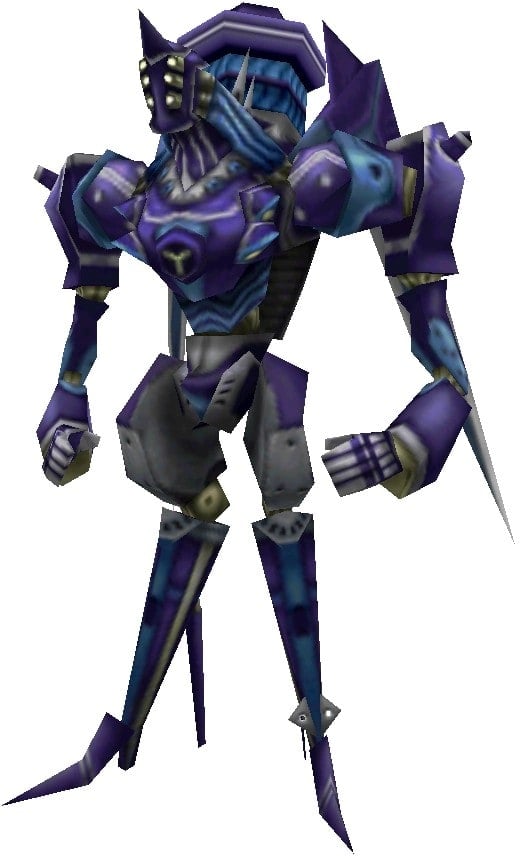 | Like the Iguions near the end of Disc 1, players will encounter two of the GIM52A robots in one encounter as a boss fight. These foes are also accompanied by an Elite Solder enemy that will heal them regularly if players don’t eliminate him first. After taking care of the Elite Soldier, focus all attacks on one GIM52A at a time to limit the ability for both enemies to hit the party per turn. Using lightning spells or summoning Quezacotl will make short work of the robotic enemies. HP – 19,400 (Max) Weaknesses – Earth, Thunder, Water Draw – Haste, Slow; Under Lvl. 30: Dispel; Over Lvl. 30: Esuna, Dispel |
BGH521F2
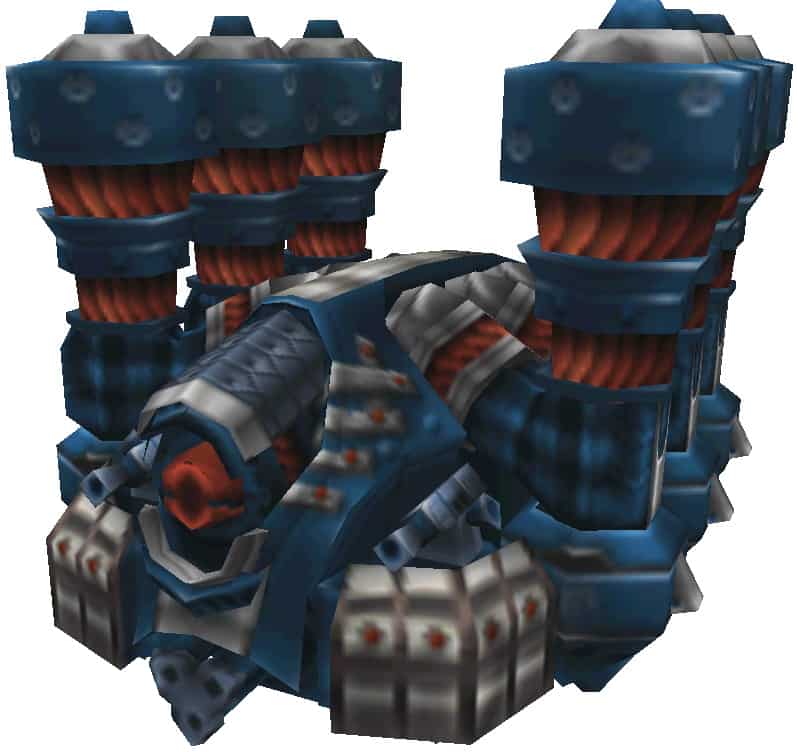 | The BGH52F12 is a Galbadian weapon that also goes by the name Iron Clad, and the encounter with the enemy at the Galbadian Missile Base is the first of two times the party will need to fight it. Like other robot enemies, the BGH521F2 is weak to lightning spells. Players should use Thunder and summon Quezacotl to quickly whittle down the HP of the enemy while also making sure to regularly heal and not let party members’ health get below a certain threshold. After defeating the tank-like enemy, simply use melee attacks against the rank-and-file soldiers that show up. HP – 4,200-8,400 Weaknesses – Earth, Thunder, Water Draw – Protect, Shell, Stop |
Oilboyle
 | Before encountering the Oilboyle enemy type as a regular encounter later in the game, the creature shows up as a boss fight on the MD level of Balamb Garden during the evacuation and coup of NORG against Cid. Oilboyle is one of the few bosses that is vulnerable to Quistis’ Degenerator blue magic attack/limit break, and players should take advantage of that fact to make short work of the fight by lowering the enemy’s level. One thing to note, though, is that Oilboyle releases a powerful Oil Blast attack after losing about a third of its total HP, but making sure the party is kept in good health negates any possibility of this leaving a character KO’d. HP – 15,630 (Max) Weaknesses – Fire Draw – Cure/Cura/Curaga, Esuna, Confuse, Over Lvl. 30: Dispel |
NORG’s Capsule
 | Players will encounter the Garden Master NORG at the bottom of Balamb Garden during the evacuation sequence. Before facing off against NORG himself, though, the party needs to defeat his Capsule and its defensive Orbs. The NORG Capsule has no actual attacks that the player needs to worry about but the Left and Right Orbs can pose some trouble for players. The Orbs aren’t actually capable of being destroyed but instead need to be managed by players throughout the fight to keep them from turning red and casting offensive magic on the party. One melee attack on the Orbs as they turn from blue, to yellow, and then red will quickly restore them back to blue. HP – 2,000 Weaknesses – N/A Draw – Cure/Cura/Curaga |
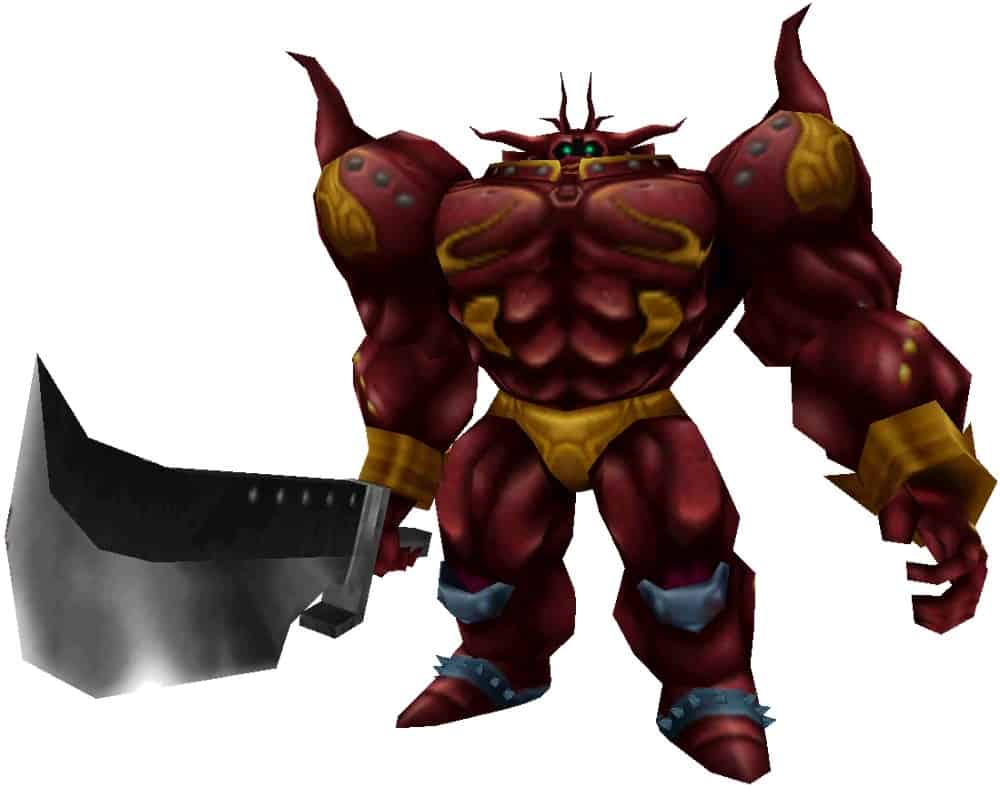
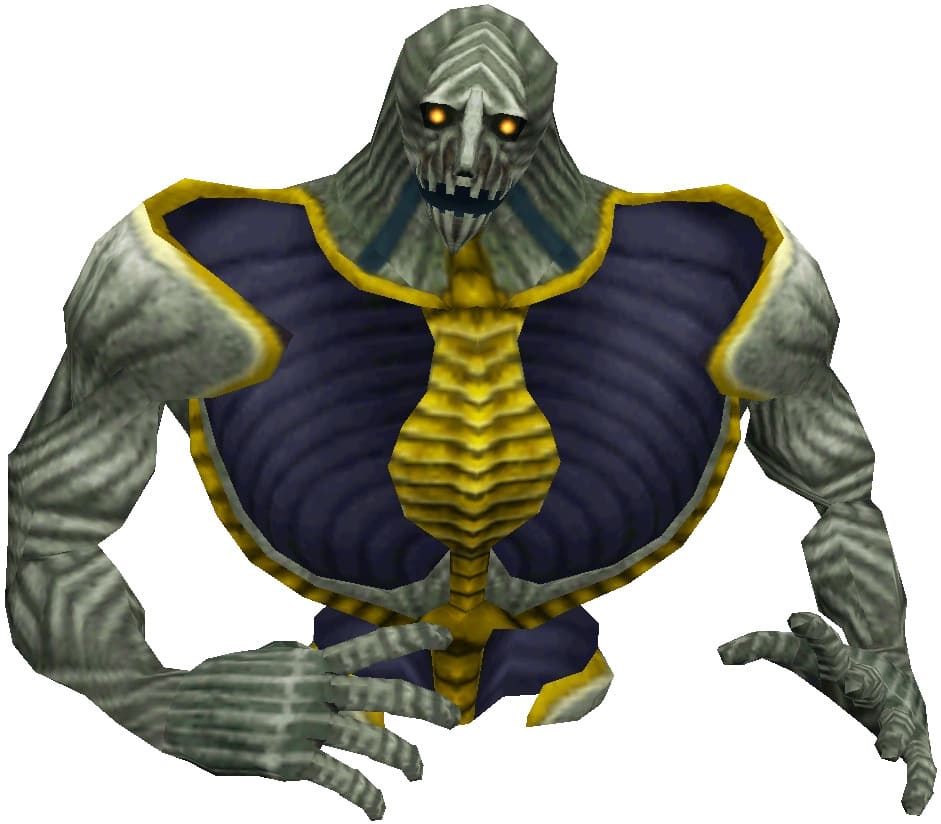
NORG
 | After defeating the NORG Capsule the structure will disappear and reveal the true form of NORG underneath, a strange-looking creature from a race of beings in Final Fantasy VIII known as the Shumi. The very first thing players need to do in this fight is draw Leviathan from NORG so that they can obtain it at this earlier point in the game rather than near its conclusion. After successfully drawing Leviathan, players can use strong wind magic like Tornado (or, even better, junction it to their Elemental Attack if equipped with a corresponding GF) to quickly defeat NORG. In addition to dealing damage against NORG with wind spells, players should consider using Carbuncle to negate the effects of most of NORG’s magic-based attacks. HP – 12,200 (Max) Weaknesses – Wind Draw – Leviathan (GF), Esuna, Protect, Shell |
BGH521F2
| Players encounter the BGH521F2 after Balamb Garden takes flight and crashes into Fisherman’s Horizon, defeating the war machine once and for all so that no further harm can come to the peaceful area. Using Shell to halve the damage of BHG521F2’s Beam Cannon attack makes the boss fight much easier, and like before players can lean heavily on lightning-elemental spells and summoning Quezacotl to make short work of this robotic boss. HP – 5,000-7,800 Weaknesses – Earth, Thunder, Water Draw – Protect, Shell, Stop |
Raijin
 | Players will fight the reluctant Raijin (and later, Raijin and Fujin) several times throughout the story of Final Fantasy VIII as they loyally stick by the side of their friend Seifer. The first time players fight Raijin he has two Galbadian soldiers with him, which players can easily take care of first to limit the number of enemies on the battlefield. Players can reduce Raijin’s effectiveness in battle by using Blind since he only uses physical attacks, and it’s recommended to stay in good health before the end of the fight as players will have to face off against Fujin and Raijin together immediately after beating Raijin with no time to recover. HP – 400-40,000 Weaknesses – Poison Draw – Protect, Shell, Thunder, Thundara |
Fujin
 | Along with Raijin, Fujin is one half of Seifer’s duo of best friends and will follow him throughout much of the game despite questioning the validity of his actions. The first thing players will want to do in the initial encounter with Fujin is draw the Pandemona GF from her, as it won’t be available again until Disc 4 if not acquired during this encounter. The fight against both Fujin and Raijin can prove to be quite difficult if players don’t manage their health, and Raijin’s ability to absorb lightning damage makes using Thunder/Thundara/Thundaga or Quezacotl a bad idea. Instead, try to inflict the poison status effect on both and focus on using melee attacks and other debuffs. HP – 300-8,700 Weaknesses – Poison Draw – Pandemona (GF), Aero, Cura, Life |
Seifer
| The second encounter with Seifer occurs as part of the Battle of the Gardens section of Final Fantasy VIII, culminating with the party’s final battle against Edea before she regains her consciousness. Like the first encounter with Seifer, he poses little challenge to a prepared party and players have the added benefit of having three characters to battle him instead of just one with Squall. Using melee attacks, limit breaks, and summoning Guardian Forces will see this fight over not long after it starts. HP – 10,300 (Max) Weaknesses – Poison Draw – Dispel, Haste, Fire/Fira/Firaga, Thunder/Thundara/Thundaga |
Edea
| The second time players face Edea they will actually take on the sorceress and her knight Seifer at the same time. The main priority in this fight is to quickly draw Alexander from Edea so as to not be without the valuable Guardian Force until the end of the game. After obtaining Alexander, focus all attacks on Seifer while using spells like Shell and Haste to boost the party. With Seifer out of the way, pummel Edea with GF summons and melee attacks, making sure to keep the party’s health in tip-top shape all the while. Once players defeat Edea here, she will come to her senses and become an ally to the party in the face of Final Fantasy VIII‘s true antagonist. HP – 16,000 (Max) Weaknesses – N/A Draw – Alexander (GF), Demi, Esuna, Blizzard/Blizzara/Blizzaga |
Abadon
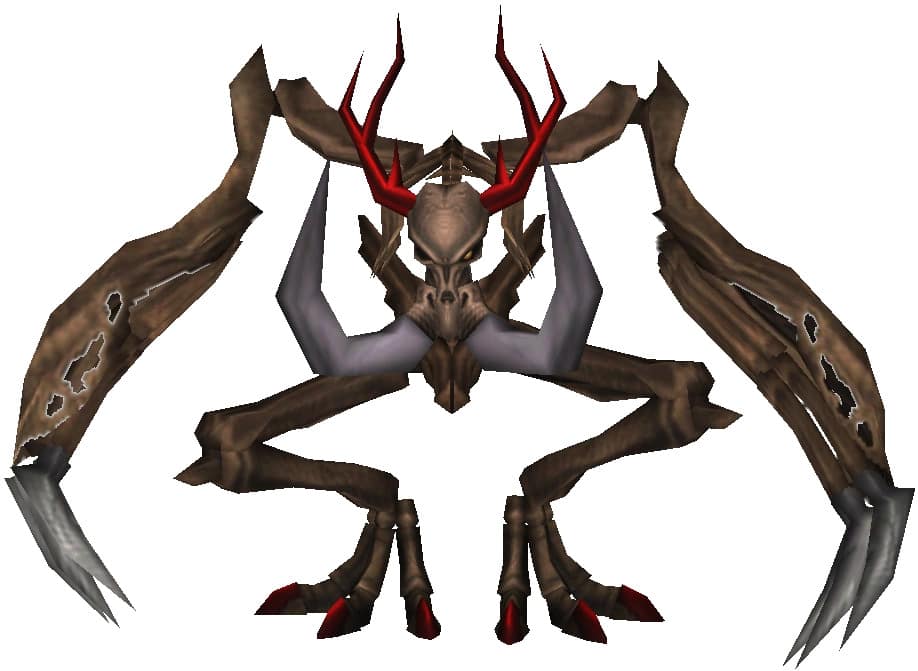 | Players will encounter Abadaon at the beginning of Disc 3 as they make their way across the Great Salt Lake toward the hidden city of Esthar. Abadon is yet another undead enemy and is very weak against restorative magic and curative items. One thing to note is that, if players are over level 30, Abadon is one of the earliest chances they have to Draw the Flare spell from an enemy in a low-stakes encounter. With Edea in the party, players can draw as much Flare as they need and then quickly end the fight using Phoenix Downs or cure spells. Alternately, if players have Leviathan from the NORG fight they can use the GF’s Recover ability. HP – ~510-17,000 Weaknesses – Cure, Fire, Holy Draw – Cure/Cura/Curaga, Dispel, Esuna, Over Lvl. 30: Flare |
Fujin
| The second fight against Fujin (and third against Raijin) is the last time the party will need to face the duo and is a much more manageable encounter than the first fight against Seifer’s lackeys. Once again, players should avoid using lightning-elemental magic and focus on inflicting status effects and dishing out non-elemental damage. If players happened to have visited the Deep Sea Research Center and have Bahamut in their possession, summong the GF can make quick work of both enemies. HP – 5,300-18,200 Weaknesses – Poison Draw – Aero/Tornado, Cure/Cura/Curaga, Life, Full-Life |
Raijin
| As with Fujin, the second battle against Raijin is much easier than the first and players can abide by the same rules as before. Avoid casting any elemental magic and instead try to inflict negative status ailments on Raijin such as Blind and Poison. Using limit breaks and non-elemental GF summons will see both Raijin and Fujin quickly defeated. HP – 22,200 (Max) Weaknesses – Poison Draw – Protect, Shell; Under Lvl. 20: Thunder; Under Lvl. 30: Thunder, Thundara; Over Lvl. 30: Thundara, Thundaga |
Mobile Type 8
 | The first time players fight Mobile Type 8 it will simply eject them from Lunatic Pandora, but encountering it proper after returning for your second visit will see the enemy put up a fight. One of the best things to do at the outset of the encounter is summon Cerberus for its healing abilities and then focus on dealing consistent lightning-elemental damage by Drawing or casting Thundaga and summoning Quezacotl. With the Mobile Type 8 out of the way, players can head toward the final confrontation with Seifer and put Ellone’s plan to trap Adel into action. HP – 42,300 (Max) Weaknesses – Thunder Draw – Blizzard/Blizzara/Blizzaga, Fire/Fira/Firaga, Thunder/Thundara/Thundaga |
Seifer
| The final battle against Seifer is an important moment in Final Fantasy VIII‘s story, but it’s also one of the best chances to stock up on the valuable Aura spell that helps limit breaks build faster. Start of the fight by drawing 99 for each character while keeping health high and casting protective magic. With plenty of Aura in the party’s possession, use the same strategy as before and hit Seifer with melee attacks, limit breaks, and GF summons. Having Bahamut at this point in the game is a huge help against Seifer’s increased HP pool, but the party’s physical attacks should suffice if not. HP – 34,500 (Max) Weaknesses – Poison Draw – Aura, Blizzard/Blizzara/Blizzaga, Fire/Fira/Firaga, Thunder/Thundara/Thundaga |
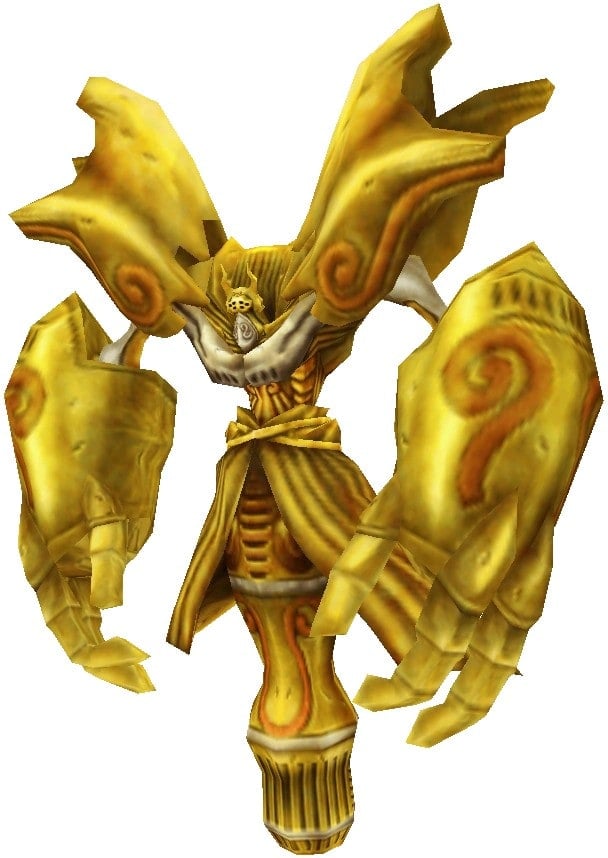
Adel
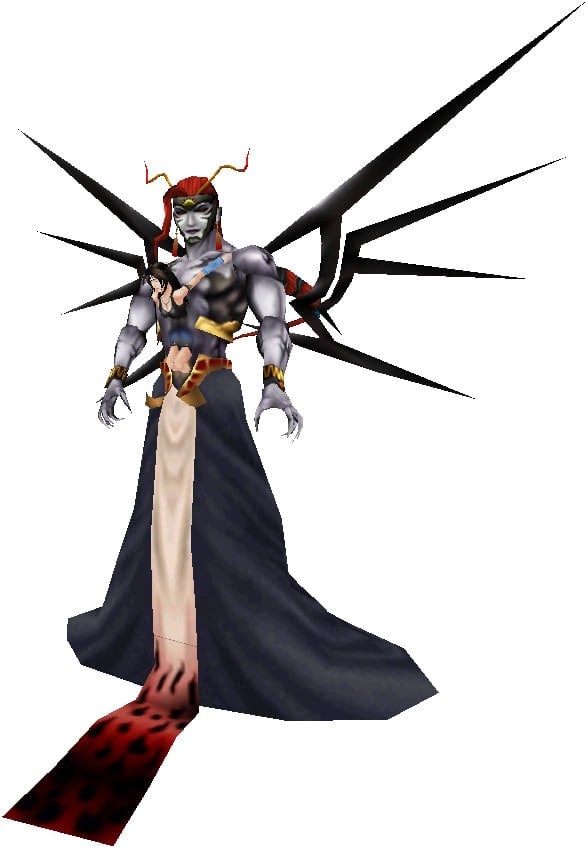 | The first thing players will notice in the fight against Adel is that Rinoa is trapped as part of Adel’s body and can be targeted. Do not attack Rinoa, as KO-ing her will cause a Game Over. That said, if players have the Mug ability they should at least use it once on Rinoa in order to obtain 8 Megalixers. Rinoa also has the Regen spell available for Draw, and players should definitely stock up on it if they do not have it already since it’s one of the best Vitality-junctioning spells. Use restorative magic to keep the party’s health high and cast Shell to reduce incoming magic damage, all while pummeling the sorceress with physical attacks and limit breaks. HP – 6,000-51,000 Weaknesses – N/A Draw – Blizzard/Blizzara/Blizzaga, Fire/Fira/Firaga, Thunder/Thundara/Thundaga |
Ultima Weapon
 | Ultima Weapon is an optional superboss in Final Fantasy VIII and one that players should only attempt by the time they get to Disc 4. After time compression occurs and players wind up in Ultimecia’s Castle, there is a way to get back outside and get to the Ragnarok, opening up another portal to the castle in the process. With easy access to the Ragnarok, head to the Deep Sea Research Center and enter it to find that the column where Bahamut was is now gone. Venturing to the bottom and facing Ultima Weapon is a great way to Draw both Ultima and the Eden GF (though she can be obtained from Tiamat inside Ultimecia’s Castle), but the fight is incredibly tough. HP – 51,100-160,000 Weaknesses – N/A Draw – Eden (GF), Dispel, Regen, Ultima |
Sphinxara
 | The first boss that most players will encounter once inside Ultimecia’s Castle is the Sphinxara. Since players will have most of their abilities locked when they enter the castle, the best strategy is to simply pummel the enemy with physical attacks until it falls. After defeating Sphinxara, players have a selection of various abilities they can unlock for further use inside of UItimecia’s Castle, and players should pick either Guardian Force or Limit Break as the first ability to unlock before challenging Trauma. HP – 10,000 Weaknesses – Holy Draw – Cure/Cura/Curaga, Blizzard/Blizzara/Blizzaga, Fire/Fira/Firaga, Thunder/Thundara/Thundaga |
Trauma
 | If players don’t have Leviathan in their possession by the time they make it to Ultimecia’s Castle it’s possible to obtain the GF from Trauma as long as they unlock the Draw ability after defeating Sphinxara. Otehr than the boss having Leviathan available for Draw, there’s not much to Trauma and the boss is easily dispatched using physical attacks or by summoning strong GFs if players have that ability available to them. HP – 1,010-3,128 Weaknesses – Wind Draw – Leviathan (GF), Dispel, Esuna |
Red Giant
 | If players have the ability to summon Guardian Forces, bringing either Cactaur or Diablos into the fight will trivialize the encounter with Red Giant. Otherwise, he can put up quite a long battle thanks to his incredible defense against both physical attacks and elemental magic. Like Trauma, Red Giant has a previously available GF in his possession with Pandemona, and players should Draw it from the enemy if they don’t have it already. HP – ~30,000 Weaknesses – N/A Draw – Pandemona (GF), Demi |
Tri-Point
 | Tri-Point is an interesting encounter in that players will need to use Scan to occasionally check the enemy’s current weakness. The boss will alternate between fire and ice weaknesses during the fight and will rely heavily on lightning-elemental attacks. Having the right spells junctioned to each member of the party helps to make the fight significantly easier, and the creature frequently switches its elemental weakness after players hit it with a particular elemental type. Like some of the other bosses in Ultimecia’s Castle, Tri-Point has a previously available GF that players can Draw in Siren. HP – 22,400 (Max) Weaknesses – Fire, Ice Draw – Siren (GF), Blind, Haste, Tornado |
Krysta
 | Krysta will counter any physical attacks that players use against it, meaning summoning Guardian Forces is the best way to eliminate the enemy. Draw Carbuncle from Krysta if you didn’t acquire it from the Iguion on Disc 1, but otherwise simply aim to keep party health high and reduce Krysta’s HP. Krysta will cast Ultima as a deathblow after players reduce its HP to zero. HP – 16,000 (Max) Weaknesses – N/A Draw – Carbuncle (GF), Holy |
Gargantua
 | One of the best things players can do to negate Gargantua’s attacks is cast Float, which makes the battle much easier. Gargantua will counter physical attacks and has no elemental weaknesses, so again summoning Guardian Forces is the best approach to eliminate the boss. Like others, Gargantua has a previously available GF with Cerberus. Cerberus’ abilities are incredibly useful and players should prioritize Drawing the GF from Gargantua before attacking if they don’t already have it. HP – 10,100-15,400 Weaknesses – N/A Draw – Cerberus (GF), Bio, Quake, Reflect |
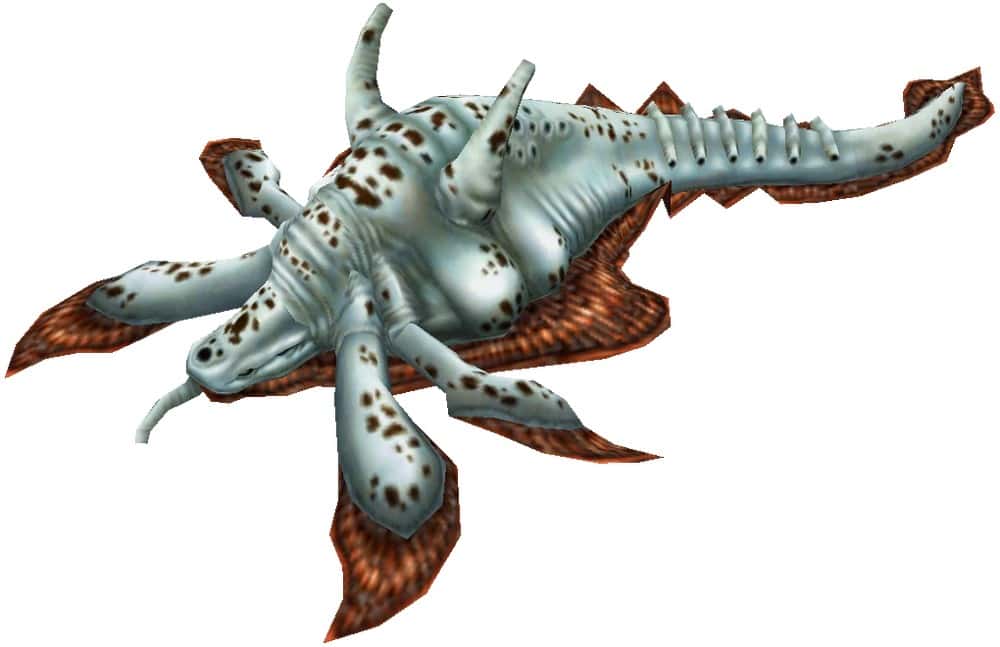
Catoblepas
 | Catoblepas will occasionally cast Meteor so players should make sure to keep the party’s health high and rely on restorative GF abilities as well as Curaga and other healing spells. If you happened to miss Drawing Alexander from Edea the monster has the GF available, and using Leviathan and Shiva to hit Catoblepas for its elemental weakness will make short work of the beast. HP – 10,500-60,000 Weaknesses – Earth, Water Draw – Alexander (GF), Meteor |
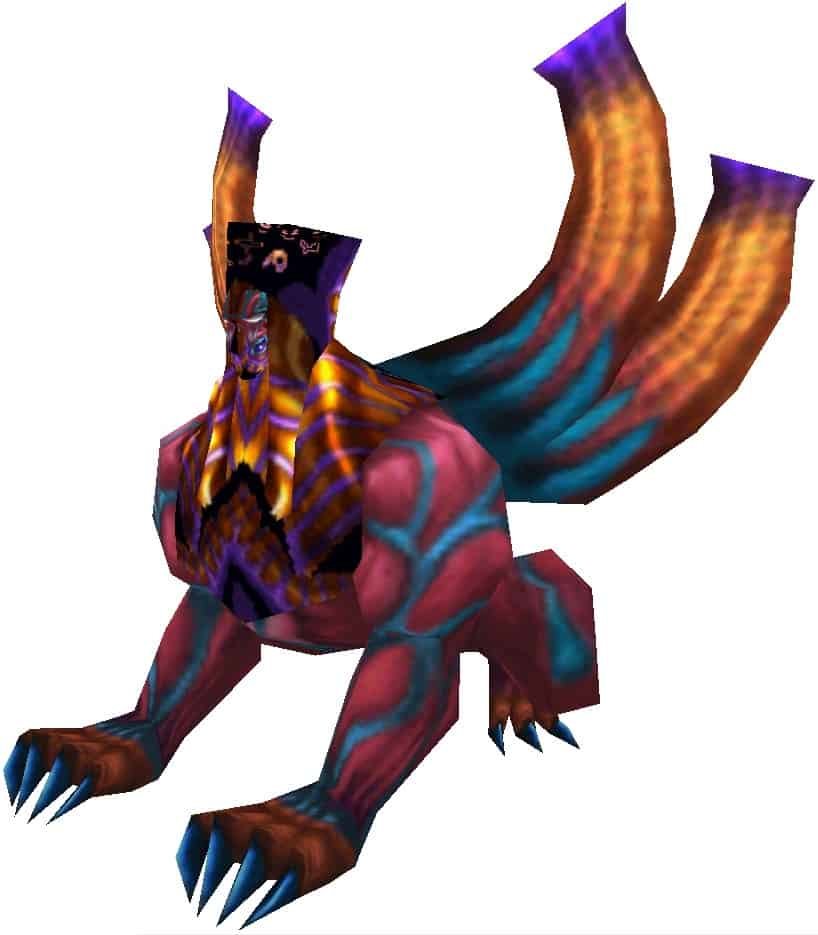
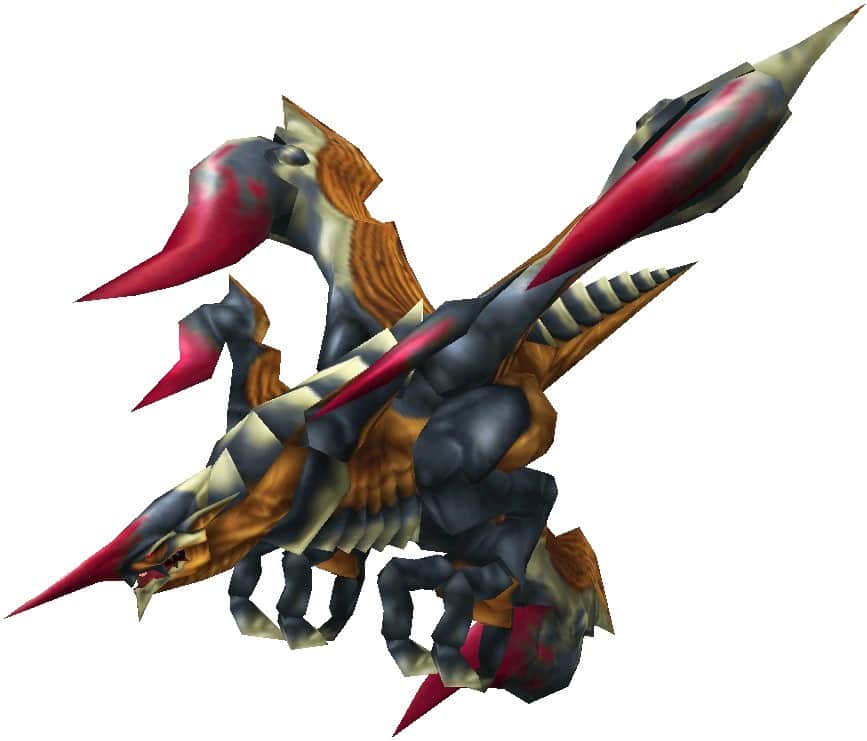
Tiamat
 | Other than Ultima Weapon, Tiamat is the only chance players will have to Draw the Eden Guardian Force. The fight with Tiamat is on a timer, similar to previous Final Fantasy fights against Bahamut. The best strategy is to launch into an all-out assult on the creature using the strongest offensive magic available (Flare, Meteor, Ultima, etc.) and use Aura to trigger Squall’s limit break and have him deal as much physical damage as possible. If you’re lucky, the fight will be over before the timer ends and Tiamat has a chance to attack. HP – 89,600 (Max) Weaknesses – N/A Draw – Eden (GF), Flare |
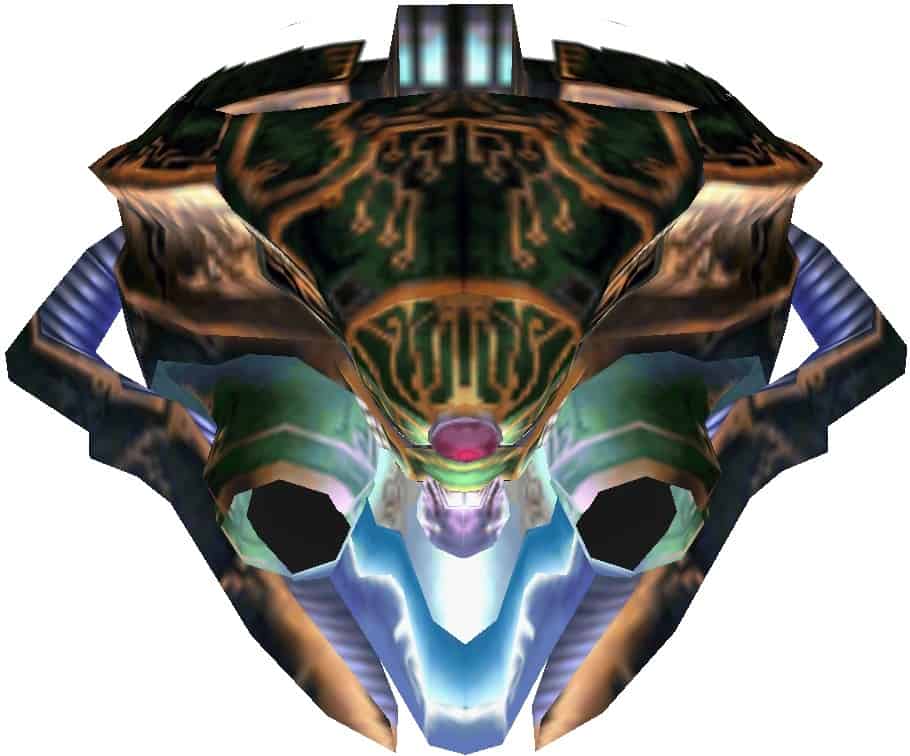
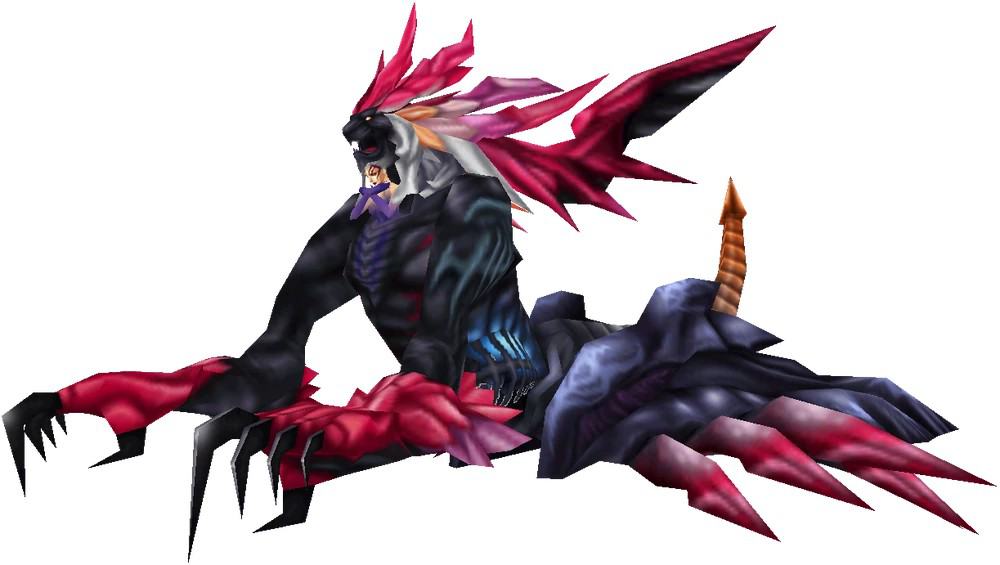
Omega Weapon
 | Omega Weapon is the other optional superboss for players to fight in Final Fantasy VIII and doesn’t offer much in terms of worthwhile rewards. The boss is more than capable of wiping out the entire party in a single attack and, at higher levels, has more than a million hit points. Still, if players are adamant about beating every boss in the game, the best bet is to junction 100 of the Death spell to the Status junction ability, which negates the Level 5 Death attack Omega Weapon starts the fight with. Using the best available Guardian Force summons and offensive magic, along with casting Aura to keep spamming limit breaks, is a player’s best chance at defeating Final Fantasy VIII‘s hardest encounter. HP – 111,105-1,161,000 Weaknesses – N/A Draw – Flare, Holy, Meteor, Ultima |
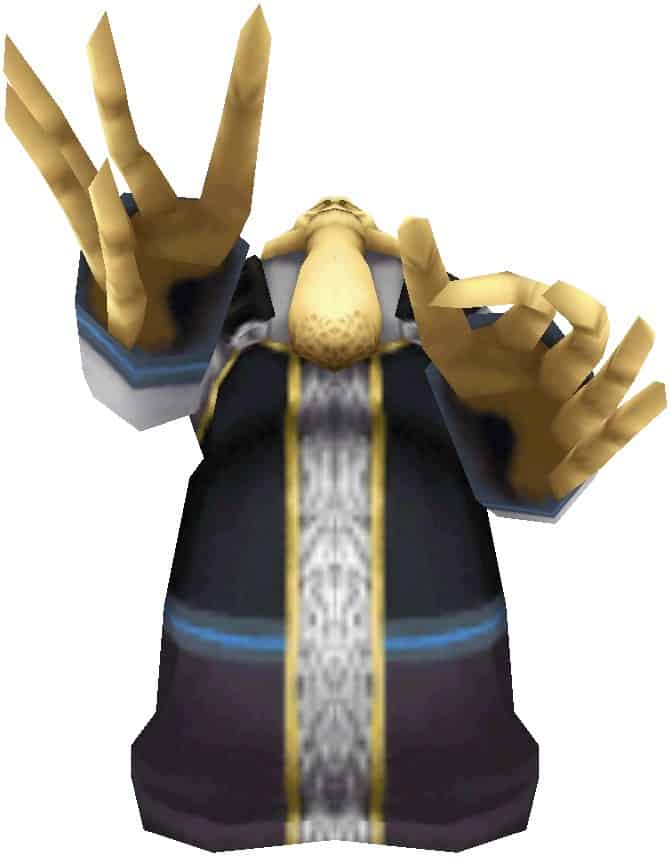
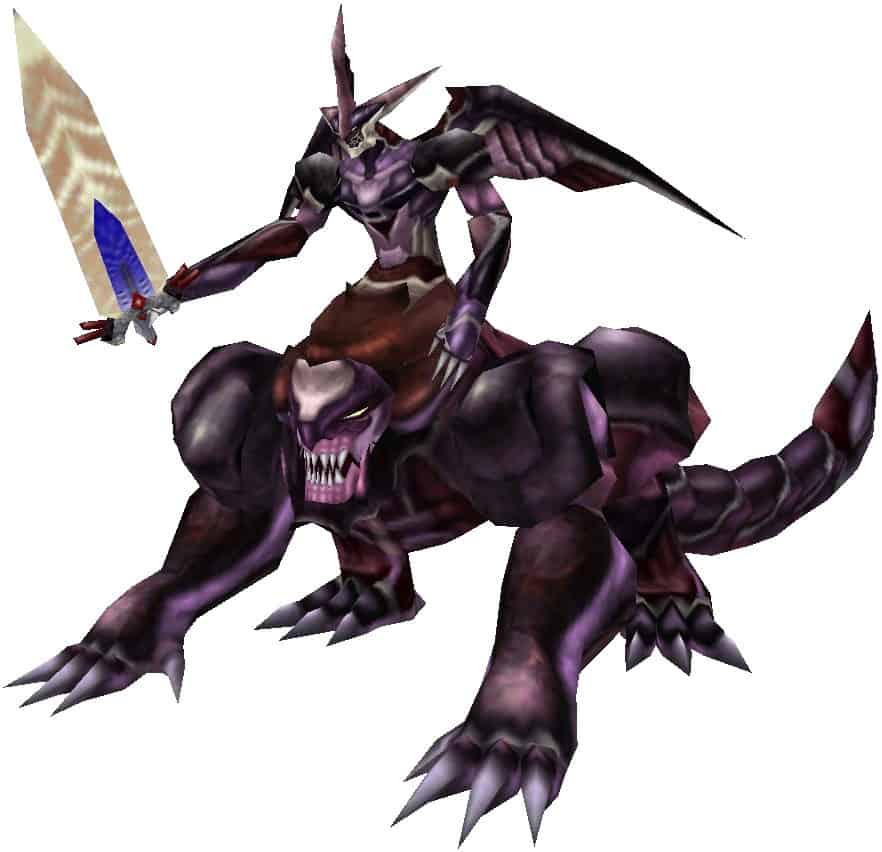
Ultimecia
 | The most important thing to know before finall challenging Final Fantasy VIII‘s ultimate antagonist is that the party will be chosen at random at the fight’s outset. For this reason, it’s essential to make sure that the entire cast of main characters is powerful enough to take on the most challenging enemies in the game. Ultimecia is a 4-phase boss fight, and the first phase is the easiest. Summoning Cerberus and boosting the party’s speed and defense with Haste and Protect will make this first phase easier. When she falls she will summon her own GF, Griever. HP – 43,000 (Max) Weaknesses – Poison Draw – Demi, Haste, Reflect, Slow |
Griever
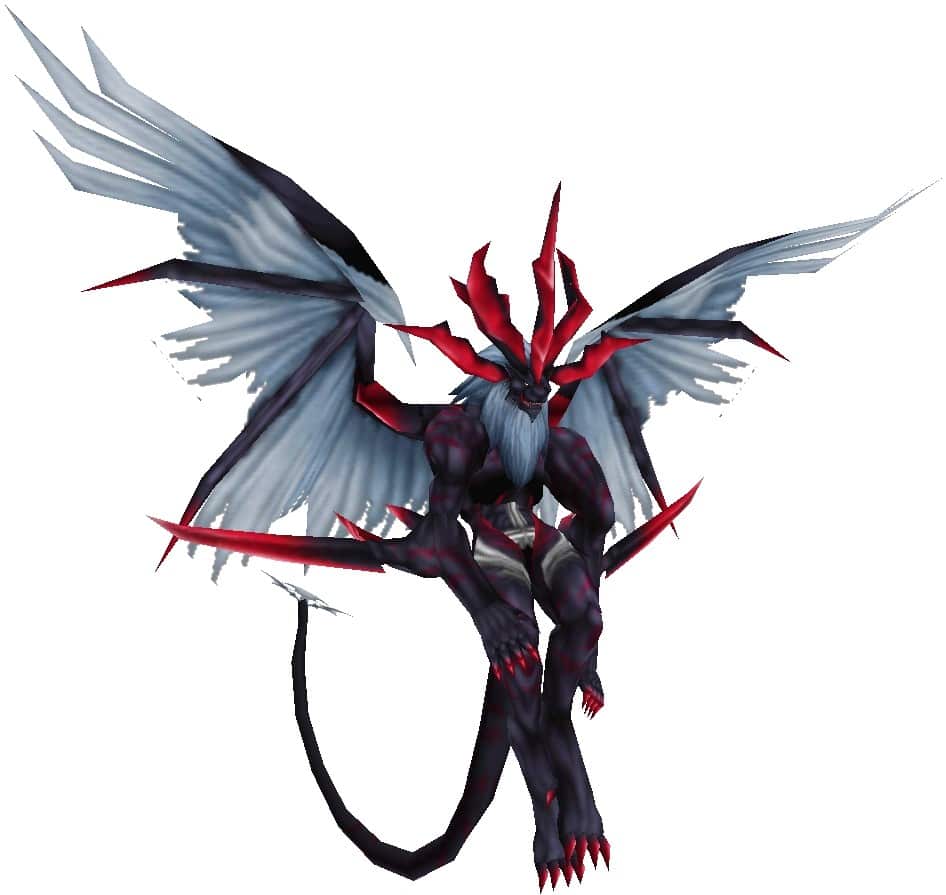 | Griever is an increidbly powerful foe and representative of the Lion on Squall’s ring, symbolizing that it is intended to be something to instill fear in the hero. Players should have plenty of Aura at their disposal by this point and should cast it willingly in order to pummel Griever with limit break after limit break. Griver’s Shockwave attack can hit the party for roughly 7000 HP, so keeping every member in good health is a must. After defeating Griever, the GF will junction to Ultimecia and players will fight them together. HP – 115,950 (Max) Weaknesses – N/A Draw – Bio, Quake, Tornado |
Griver Junctioned to Ultimecia
 | In the third phase of the fight against Ultimecia, the sorceress will junction Griever to herself and use many of the same attacks that each enemy has at their disposal individually. Casting as many protective and status-boosting spells as possible is a must, as is using Aura to boost limit breaks and summoning all of the strongest available GFs and using the most powerful offensive magic. Having Ultima and Flare in stock will work well against Griever and Ultimecia, and keeping the party’s health high is of paramount importance. HP – 176,250 (Max) Weaknesses – N/A Draw – Blizzard/Blizzara/Blizzaga, Fire/Fira/Firaga, Thunder/Thundara/Thundaga |
Final Ultimecia
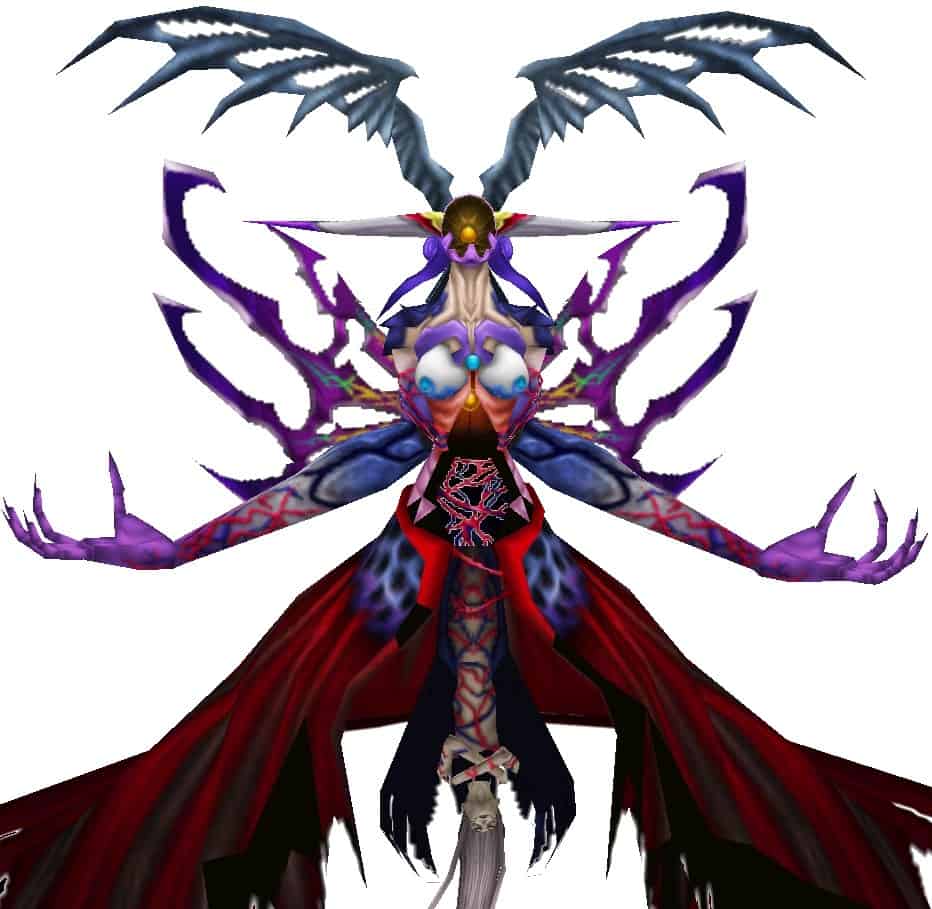 | The final form of the sorceress Ultimecia is a god-like being with total control over time. Some of her attacks, such as Apocalypse and Hell’s Judgement, can completely derail a player’s success in the encounter, and keeping plenty of restorative magic and curative items like Megalixers handy is a must. There’s the option to use Aura to rely more on limit breaks, and players can also use a Holy War after getting hit with Hell’s Judgement to lock in the resulting 1 HP and spam limit breaks. At a certain point in the fight, players can draw Apocalypse from Ultimecia and then use Double (or Triple) to repeatedly hit her with a taste of her own medicine. After a long and arduous fight, Ultimecia will fall and players can sit back and enjoy Final Fantasy VIII‘s happy ending. HP – 278,900 (Max) Weaknesses – N/A Draw – Apocalypse, Flare, Holy |