Few games in the Final Fantasy series end up being as polarizing as Final Fantasy II. Thanks to the original game’s notoriously obtuse and difficult approach to leveling and character progression, several fans have since labeled the game as the weakest in the entire series and the game definitely holds a place as the “black sheep” of the first 6 games in the franchise. Thankfully, the recent Pixel Remasters of the first 6 final Fantasy games add in some quality of life features that help to make Final Fantasy II a much more palatable experience, highlighting the bits of brilliance that occasionally shine through. And the bosses in Final Fantasy II
Contrary to the mostly threadbare story that the first game in the series presents, Final Fantasy II features a more developed narrative that tells a captivating story of a band of rebels attempting to stop the evil Palamecian Empire. This story results in some truly inventive boss fights, each with their own pixel-perfect sprites and relevance within the context of Final Fantasy II‘s narrative. The following is a list of all bosses in Final Fantasy II, all the way from the unassuming Land Turtle to the Emperor of Hell himself.
Land Turtle
| The first boss players encounter in Final Fantasy II is the Land Turtle, which appears as a “Monster-in-a-Box” encounter within the Semitt Falls dungeon. After beating this boss, players will routinely encounter it as a regular enemy in certain dungeons and the overworld map. HP – 140 Weaknesses – Ice |
Sargeant
| Although players may encounter the Land Turtle first, the Sargeant is the official first boss encounter in Final Fantasy II that’s necessary to beat to progress through the critical path. Players will encounter this enemy first as a boss in Semitt Falls and then as a regular enemy in several subsequent dungeons. HP – 140 Weaknesses – N/A |
Adamantoise
| Players will encounter the Adamantoise while attempting to ring the Goddess’s Bell inside of the Snow Cave. After beating the enemy as a boss in the Snow Cave, players will encounter the foe as a regular enemy in random encounters. HP – 450 Weaknesses – Ice |
Borghen
| The dastardly traitor Borghen is the official boss of the Snow Cave and players will encounter the villain as they attempt to leave the dungeon. The boss is mostly a trivial encounter, although he does have the ability to greatly restore his health. HP – 240 Weaknesses – N/A |
Red Soul
| Players will find the Red Soul guarding Egil’s Torch within Kashuan Keep. Like other early bosses in the game, players will encounter the Red Soul as a random encounter after defeating it in its official boss battle. It’s also possible to encounter the Red Soul as a boss within the Arcane Labyrinth if less than 7 of the game’s passwords are learned before traversing it. HP – 540 Weaknesses – N/A |
Pirate (x8)
| Players fight a group of 8 Pirate enemies in order to gain control of Leila’s ship and earn the character as a companion. As one might expect from the number that you fight, the Pirates are relatively weak enemies that don’t present much of a challenge. HP – 90 Weaknesses – N/A |
Chimera (x4)
| Players will encounter anywhere from 1-4 Chimera as a boss battle within Deist Cavern. After defeating this mythical creature as a boss encounter, players will soon run into them on a regular basis as a random enemy in the subsequent dungeons and overworld areas. HP – 640 Weaknesses – N/A |
Lamia Queen
| After attempting to board the Dreadnought and getting arrested, players will discover that Princess Hilda is actually the Lamia Queen in disguise. Following this initial important story encounter, players will regularly fight against the Lamia Queen in random battles. HP – 1290 Weaknesses – Ice |
Behemoth
| Players will encounter the Behemoth as a boss enemy during the assault on the Palamecian Coliseum to rescue the real Princess Hilda. After this initial encounter, the Behemoth becomes a recurring boss enemy in several other locations and is a random encounter on the way to the town of Mysidia. HP – 1620 Weaknesses – N/A |
Gottos
| Gottos waits for the party within Castle Flynn during the Wild Rose Rebellion’s counter offensive to retake the city of Flynn. After defeating the foe as a boss and liberating the city of Flynn, Gottos will reappear as a random encounter in later areas of the game, occasionally in groups of 2 or more. HP – 2000 Weaknesses – N/A |
Bighorn (x4)
| Players will face off against 4 Big Horns while trying to retrieve the Black Mask on the Tropical Island. Defeating these rhino-like foes will give Firion and the party access to the Ultima spell. After defeating them on the Tropical Island, they reappear as dangerous and challenging random encounters on the way to Mysidia. HP – 1140 Weaknesses – N/A |
Roundworm
| After the Leviathan swallows the party’s ship, Firion and company will have to face off against the Roundworm before escaping. The Roundworm will also appear as a boss in the Arcane Labyrinth (depending on how many passwords the party has learned) and as a random encounter. HP – 2000 Weaknesses – N/A |
Fire Gigas
| The Fire Gigas is one of the three giants players must fight on their way to acquire the Ultima spell in the Mysidian Tower. The fearsome creature also makes an appearance in the game’s final dungeon, Pandaemonium. HP – 1800 Weaknesses – Ice |
Ice Gigas
| The Ice Gigas is the second of the three giants players face off against while climbing the Mysidian Tower. Just like its other two giant companions, the Ice Gigas will appear as a random encounter in the game’s final dungeon after players defeat it as a boss enemy. HP – 2000 Weaknesses – Fire |
Thunder Gigas
| The Thunder Gigas is the final of the trio of giants players must defeat in order to claim Final Fantasy II‘s most powerful magic, Ultima. The Thunder Gigas is the most challenging of the three giants players fight in the Mysidian Tower and has substantial attack power, resulting in physical strikes that can easily KO party members in one hit. HP – 2500 Weaknesses – Poison |
White Dragon
| The White Dragon is the first of the 4 elemental dragons players will encounter as they enter the latter half of Final Fantasy II‘s main story. The White Dragon hides inside of a treasure chest in the Mysidian Tower as a “Monster-in-a-Box” encounter and guards the Black Robe armor. Players will encounter the creature again in the Jade Passage. HP – 2500 Weaknesses – Fire |
Green Dragon
| The next elemental dragon players face off against is the Green Dragon, which embodies the poison element and resides within the Emperor’s Cyclone fortress guarding the Wind Flute item. After defeating the Green Dragon within the confines of the Cyclone, players will encounter the foe again within the Jade Fortress. HP – 3000 Weaknesses – Lightning |
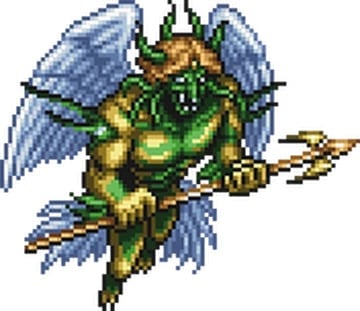
Emperor, Royal Guard (x2), Wood Golem
| The Emperor is the main antagonist of Final Fantasy II, and players will fight him twice throughout the course of the story. The first of these two encounters takes place at the climax of the party’s invasion of the Cyclone, the Emperor’s fortress. During this encounter, the Emperor is joined by two Royal Guards and a Wood Golem, each of them tough battles in their own right. HP – 1290 Weaknesses – N/A |
| After going up agasinst plenty of Royal Guards as random encounters on the lower floors of the Cyclone, Firion and his companions will face off against two more preventing physical attacks from reaching the Emperor. Thankfully, by this point in the game, players should be able to easily dispatch the guards protecting the Emperor. HP – 870 Weaknesses – N/A |
| The Wood Golem are similar to the elemental Gigas enemies in that they have high attack and defense stats, making using normal melee attacks against them a futile gesture. Thankfully, they telegraph their elemental weakness in their name. By using a strong fire spell, players can readily make short work of the Wood Golems they encounter. HP – 1620 Weaknesses – Fire |
Imperial Shadow
| The Imperial Shadow is a lingering spectre of the Emperor and a particularly challenging random encounter players will experience after their initial fight against Emperor Matteus. In addition to appearing in the Great Desert and around Altair, an Imperial Shadow guards the Thunder Spear in Palamecia as a “Monster-in-a-Box” encounter. HP – 3000 Weaknesses – N/A |
White Dragon
| The second encounter against the White Dragon occurs within the confines of the Jade Passage. Like the first time players face off against one of these elemental creatures, the White Dragon is particularly weak against fire. HP – 2500 Weaknesses – Fire |
Blue Dragon
| The Blue Dragon is the third of the four elemental dragons players encounter. Like its other counterparts, it’s a fearsome enemy with a particular elemental weakness based on its coloring. Also like the other dragon bosses, the Blue Dragon is a “Monster-in-a-Box” encounter guarding powerful equipment. After defeating the enemy as a boss, it reappears as a random encounter in Pandaemonium. HP – 3500 Weaknesses – Poison |
King Behemoth
| The King Behemoth, as the name suggests, is a much stronger version of the challenging Behemoth enemy type. Players will fight the King Behemoth as a “Monster-in-a-Box” boss enemy in the Jade Passage and then again as a random encounter in Pandaemonium. HP – 5000 Weaknesses – N/A |
Red Dragon
| The final of the four elemental dragons players will fight is the Red Dragon. This final draconic foe guards the immensely powerful Yoichi’s Bow within the Jade Passage. Like its counterparts, its coloring gives away information regarding its elemental weakness. The Red Dragon also reappears as a random encounter on the final floor of Pandaemonium. HP – 5000 Weaknesses – Ice |
Zombie Borghen
| Zombie Borghen is the undead form of Borghen, returning from the grave to challenge Firion once again. Rather than exist as a story boss, Zombie Borghen is yet another “Monster-in-a-Box” encounter. Players will likely face off against Zombie Borghen as the first boss encounter in the game’s final dungeon, Pandaemonium. HP – 2500 Weaknesses – Fire |
Tiamat
| Tiamat is one of the bosses in Pandaemonium guarding some of Final Fantasy II‘s most powerful equipment. Its appearance largely resembles the Wind Fiend of the same name from the original Final Fantasy. It does not have any elemental weaknesses but is particularly weak against physical attacks. HP – 5000 Weaknesses – Body |
Beelzebub
| Beezelbub is another demon guarding powerful equipment within Pandaemonium. The creature is heavily reliant on using magic, making casting Shell or Wall at the battle’s outset a wise move. After defeating Beelzebub, players will acquire the Genji Armor for their troubles. HP – 5000 Weaknesses – N/A |
Astharoth
 | Astharoth is the final of the four demon bosses in Pandaemonium and guards the ultimate accessory Ribbon. This powerful foe has high HP and no discernable elemental weaknesses, earning their place as the Emperor’s second in command. However, like the final battle against the Emperor in Pandaemonium, the encounter is made trivial by using the Blood Sword. HP – 7000 Weaknesses – N/A |
Iron Giant
 | Although not technically a boss, the Iron Giant fights players can encounter on the final floor of Pandemonium play the boss theme rather than the regular battle theme during the fight. The Iron Giant is the rarest of the bosses in Final Fantasy II, as their encounter rate is the lowest in the game. While not overly challenging, they do drop some of the game’s best items and equipment. HP – 3500 Weaknesses – Ice, Lightning |
Emperor
| After defeating the Emperor initially, he battles his way through Hell to become its Emperor and returns in the dimensonal rift known as Pandaemonium. At the final floor of this concluding dungeon, players face off against the Emperor of Hell himself as Final Fantasy II‘s final boss battle. This fight is challenging without the use of the Blood Sword, but using the weapon makes it a laughably trivial encounter. HP – 15000 Weaknesses – N/A |